Overriding CommerceRuntime tax calculation with a 3rd party implementation


Note: Implemented with Dynamics 365 version 7.2.* (but likely working fine with lower or higher versions). Sample code can be downloaded at the end of this blog.

This information explains how to override tax calculation in the CRT in Dynamics 365 for Operations (and similar products). This is a simple example how integrate the calls to external tax providers and how to embed the returned values back into the CRT. The code is of non-production quality; its main purpose is to show the concepts only.

High-level overview

In this example, I demonstrate how to short-circuit any CRT tax calculations (by implementing my own IRequestHandler) and forward the individual line items on the cart in one large payload to a call to an external system. The external system will calculate a 20% tax rate on each item (a simplification). Our new implementation of the tax service will then take the return values and save the information on the transaction as it is expected by the CRT and CDX frameworks.

The identifier of the product in the external system is modelled to be different from ItemId or ProductId in Dynamics. Here, I showcase the use of the product attribute framework to add an attribute called “ExternalTaxId”. As part of the newly implemented code, we must fetch the value of this attribute and forward it to the external provider. As an optimization, the fetching of this attribute is cached. This should help with limiting the number of calls to a minimum (per IIS process). There are other approaches that could be taken, but this seemed to be the simplest.

Finally, imagine that we have “additional” data coming from the external tax provider to be saved per sales tax line and to be brought back to Dynamics HQ. This shows the use of a table extension in X++, an extension table in the channel database and the inclusion of this data in the transaction upload job (P-job).
When all work is finished, we will see the 20% tax rate in the POS clients:

After running the P-0001 job, we can also see the data in AX:

Details

There are 3 tax-related CRT request handlers that can be overridden for tax-related purposes.

  • CalculateTaxServiceRequest: Re-calculates taxes for individual items and whole transaction
  • AssignTaxCodesServiceRequest: Fetches and assigns sales tax codes. Since we do not calculate the taxes locally, this is not really needed. However, there is no negative impact to just leave that code untouched.
  • PopulateTaxRatesRequest: Since we will override CalculateTaxServiceRequest, there is no need for this handler. We will just provide with our own empty implementation.

In the overridden CalculateTaxServiceRequest, we carry out these steps:

  • Use the passed in SalesTransaction, loop through all active sales line items and get the external product id (from the product attributes). For the steps how to setup product attributes see this blog post
  • cache the external product id for later calls (see blog post for more detailed discussion)
  • pass the sales line information and external product id to the external tax service
  • dummy tax service returns a single tax code per sales line item with 20% tax and some other string value that must be stored on the tax line
  • the CRT tax service builds the right data structure with tax lines and calculates final total taxes
  • CRT tax service adds additional string value as Extension property on each tax line
  • CRT tax service returns the SalesTransaction

In addition, we need to hook into the transaction save process. Therefore, we implement the SaveSalesTransactionDataRequest post trigger. More details in this blog post.

The full source code can be found Extensions.MyTaxServiceBlog

Extending a transactional Retail Channel table with additional data (HQ X++ table extension, CDX, extension table, CRT data service)


Note: Implemented with Dynamics 365 version 7.2.11792.62628, or App Update 4 (may not work with lower versions). Sample code can be downloaded at the end of this blog.

A frequent customization need is to store more transactional data in the channel database in order to synchronize it back to HQ. There is a list of tables that holds these data, i.e. RetailTransactionTable, RetailTransactionSalesTrans, RetailTransactionTaxTrans tables, and a few others.

In this example, I am going to show how to extend the RetailTransactionTaxTrans table, how to write to it from a CRT data service, how to create a view to sync it back to AX and how to configure CDX. The single string that the tax line is extended with, is being passed in by means of an CRT Extension property. This sample is part of a larger sample to override the CRT’s tax calculation.

Lets work on the pieces from bottom up to the top.

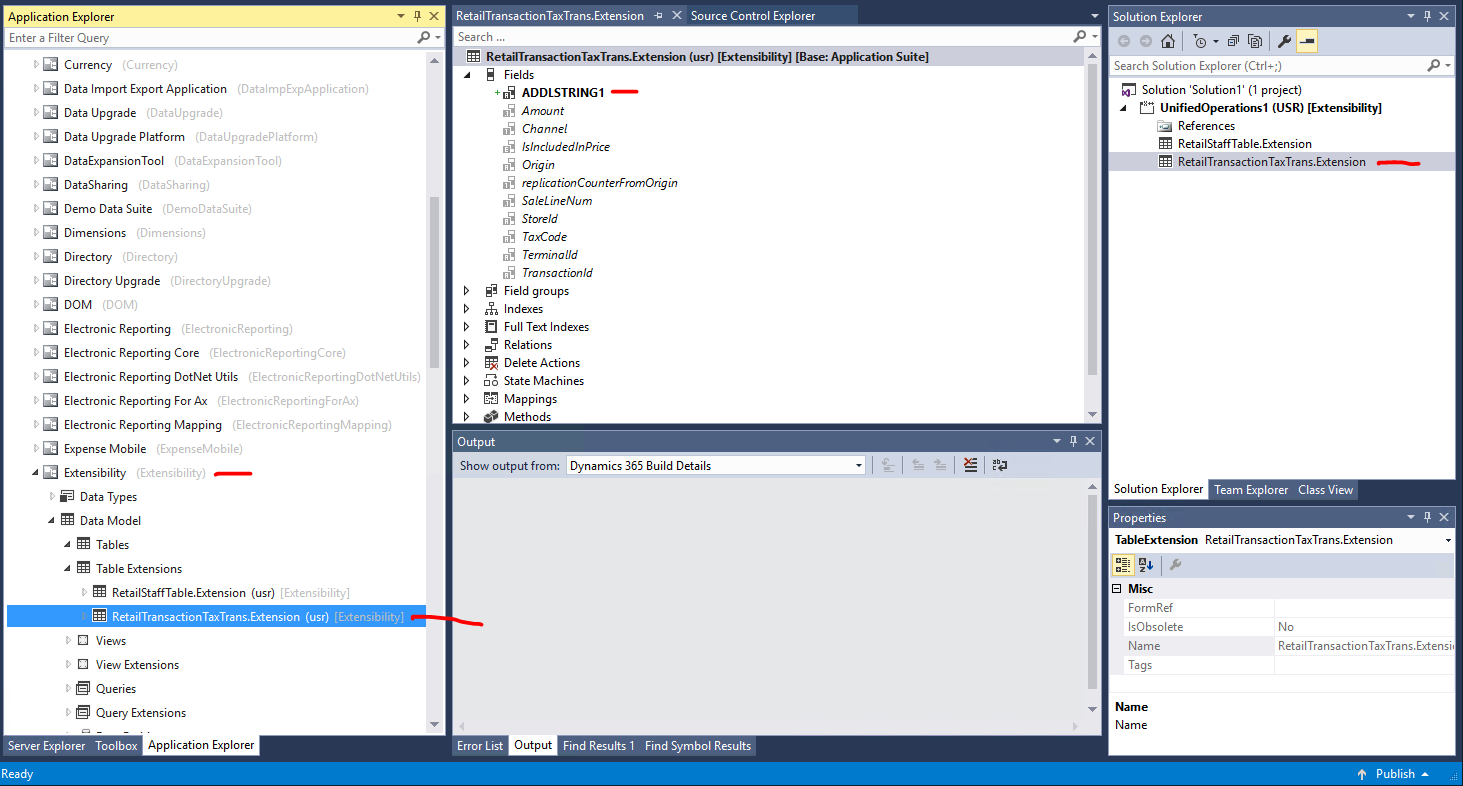
HQ table extension (X++)

Build an X++ table extension for the table RetailTransactionTaxTrans by use of the AOT and Visual Studio. Before you do that, create a new Dynamics 365 package and model. In the screenshot below you can see I created a package called “Extensibility” and a model called “Extensibility” and added a new string column called ADDLSTRING1.

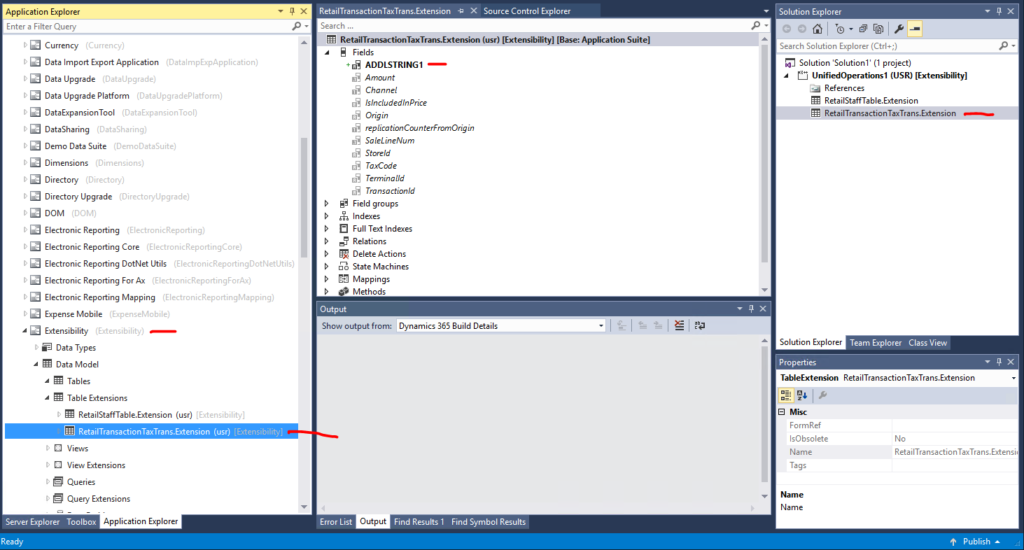
Make sure to build and db sync, and when all looks good to add the new package to VSTS.

Channel database extension (SQL)

Since we want to get the data from the channel to the HQ, we must store it initially in the channel (or even in the ModernPOSOffline db). In order to do that, we must develop some SQL for the channel database.

The new way for doing this is to create any new SQL on the db schema “[ext]” and NOT in any preexisting schemas, i.e. [ax], [dbo], [crt]. At this point you can reference Microsoft’s schemas, but we careful to not take too many dependencies. SQL objects cannot be considered a real interface, so the more assumptions your SQL makes on Microsoft’s SQL, the higher the probability you may need to fix something someday when taking an update. In the SQL I show here, you will see that all the new SQL objects live in the [ext] schema.

New table

We need to store the new column in a new table. Since, in this sample we want to store one more string value, we must at least have this new column in the table, plus all the other columns that allow us to reference the corresponding record in the original table (base table). The correct approach is to add all PK columns from the original table to the new table as well. In addition, it is a good practice (but not required) to add columns for creation and modification time.
Also, make sure that the PK on the new table is the same as on the original one. This is needed so CDX can find the data correctly.
Lastly, we need to provide CRUD privileges on the table to the DataSyncUsersRole (CDX) and insert privileges to the UsersRole (CRT process).

    CREATE TABLE [ext].[RETAILTRANSACTIONTAXTRANS](
		[CHANNEL] [bigint] NOT NULL,
		[SALELINENUM] [numeric](32, 16) NOT NULL,
		[STOREID] [nvarchar](10) NOT NULL,
		[TAXCODE] [nvarchar](10) NOT NULL,
		[TERMINALID] [nvarchar](10) NOT NULL,
		[TRANSACTIONID] [nvarchar](44) NOT NULL,
		[DATAAREAID] [nvarchar](4) NOT NULL,
		[CREATEDDATETIME] [datetime] NOT NULL,
		[MODIFIEDDATETIME] [datetime] NOT NULL,
		[ROWVERSION] [timestamp] NOT NULL,
		[ADDLSTRING1] [nvarchar](200) NOT NULL DEFAULT (''),
		 CONSTRAINT [I_EXT_RETAILTRANSACTIONTAXTRANS_PK] PRIMARY KEY NONCLUSTERED 
		(
			[CHANNEL] ASC,
			[TERMINALID] ASC,
			[STOREID] ASC,
			[TRANSACTIONID] ASC,
			[SALELINENUM] ASC,
			[TAXCODE] ASC,
			[DATAAREAID] ASC
		)WITH (PAD_INDEX = OFF, STATISTICS_NORECOMPUTE = OFF, IGNORE_DUP_KEY = OFF, ALLOW_ROW_LOCKS = ON, ALLOW_PAGE_LOCKS = ON) ON [PRIMARY]
		) ON [PRIMARY]

END
GO

GRANT SELECT,INSERT,UPDATE,DELETE ON [ext].[RETAILTRANSACTIONTAXTRANS] TO [DataSyncUsersRole]
GRANT INSERT ON [ext].[RETAILTRANSACTIONTAXTRANS] TO [UsersRole]
GO

New view

Consider that the view should represent the exact same columns as the original table before, plus the new column. As explained already above, we have the same PK on both tables, so we will use these to LEFT JOIN the two.
Grant the priviledge to SELECT by the DataSyncUsersRole (CDX).

CREATE VIEW [ext].[RETAILTRANSACTIONTAXTRANSEXTVIEW] AS
(
	SELECT
	tt.[AMOUNT],
	tt.[CHANNEL],
	tt.[ISINCLUDEDINPRICE],
	tt.[REPLICATIONCOUNTERFROMORIGIN],
	tt.[SALELINENUM],
	tt.[STOREID],
	tt.[TAXCODE],
	tt.[TERMINALID],
	tt.[TRANSACTIONID],
	tt.[DATAAREAID],
	tt.[ROWVERSION],
	exttt.[ADDLSTRING1],
	exttt.MODIFIEDDATETIME,
	exttt.CREATEDDATETIME
	 from [ax].RetailTransactionTaxTrans tt
	LEFT JOIN [ext].[RETAILTRANSACTIONTAXTRANS] exttt
	ON 
		tt.[CHANNEL] = exttt.[CHANNEL] AND
		tt.[TERMINALID] = exttt.[TERMINALID] AND
		tt.[STOREID] = exttt.[STOREID] AND
		tt.[TRANSACTIONID] = exttt.[TRANSACTIONID] AND
		tt.[SALELINENUM] = exttt.[SALELINENUM] AND
		tt.[TAXCODE] = exttt.[TAXCODE] AND
		tt.[DATAAREAID] = exttt.[DATAAREAID]
)
GO
GRANT SELECT ON [ext].[RETAILTRANSACTIONTAXTRANSEXTVIEW] TO [DataSyncUsersRole]
GO

New table type (TVP)

A table value type is a convenient way to “pass around a data table”. Eventually, we want to call a stored procedure and pass in a whole data table in order to be more efficient. An alternative would be to just pass in the individual parameters for each column and call the stored procedure multiple times. In this sample, since we want to create tax lines, we will create usually a few rows in one call (5 sales items with 2 different tax codes each would produce 10 rows). I created the TVP by copying the original one, and expanded it with the new column.

CREATE TYPE [crt].[EXTRETAILTRANSACTIONTAXTRANSTABLETYPE] AS TABLE(
	[DATAAREAID] [nvarchar](4) NULL,
	[SALELINENUM] [numeric](32, 16) NULL,
	[STOREID] [nvarchar](10) NULL,
	[TAXCODE] [nvarchar](10) NULL,
	[TERMINALID] [nvarchar](10) NULL,
	[TRANSACTIONID] [nvarchar](44) NULL,
	[ADDLSTRING1] [nvarchar](200) NOT NULL)
GO
GRANT EXECUTE ON TYPE::[crt].[EXTRETAILTRANSACTIONTAXTRANSTABLETYPE] TO [UsersRole];
GO

New stored procedure (sproc)

The sproc will get supplied by the TVP and the channel Id. This sproc will be called by our CRT data service below.

CREATE PROCEDURE [ext].[INSERTRETAILTRANSACTIONTAXTRANS]
			   (@bi_ChannelId		bigint,
			   @tvp_ExtRetailTransactionTaxTrans		[crt].[EXTRETAILTRANSACTIONTAXTRANSTABLETYPE] READONLY)
AS
BEGIN
...

CRT data service to write to the new table

Each CRT service (for data or other purposes) requires a Request class. In this example, we want to store additional tax line data from the transaction. So we can pass the SalesTransaction instance to our service via the Request.

public sealed class InsertTaxTransExtensionDataRequest : DataRequest
{
    public InsertTaxTransExtensionDataRequest(SalesTransaction transaction)
    {
        this.Transaction = transaction;
    }

    [DataMember]
    [Required]
    public SalesTransaction Transaction { get; private set; }
}

The data service must find the data we want to store and build a DataTable with multiple DataRows that corresponds to the TVP in SQL. Make sure the columns are in the same order. Then we use the DatabaseContext class to make the call to the sproc, by passing in the expected parameters.

using (DataTable taxTable = new DataTable("EXTRETAILTRANSACTIONTAXTRANSTABLETYPE"))
{
    taxTable.Columns.Add(DataAreaIdColumn, typeof(string)).DefaultValue = string.Empty;
    taxTable.Columns.Add(SaleLineNumColumn, typeof(decimal)).DefaultValue = 0m;
    taxTable.Columns.Add(StoreIdColumn, typeof(string)).DefaultValue = string.Empty;
    taxTable.Columns.Add(TaxCodeColumn, typeof(string)).DefaultValue = string.Empty;
    taxTable.Columns.Add(TerminalIdColumn, typeof(string)).DefaultValue = string.Empty;
    taxTable.Columns.Add(TransactionIdColumn, typeof(string)).DefaultValue = string.Empty;
    taxTable.Columns.Add(ADDLSTRING1Column, typeof(string)).DefaultValue = string.Empty;

    foreach (var line in tx.ActiveSalesLines)
    {
        foreach (var taxItem in line.TaxLines)
        {
            DataRow row = taxTable.NewRow();
            row[DataAreaIdColumn] = request.RequestContext.GetChannelConfiguration().InventLocationDataAreaId;
            row[SaleLineNumColumn] = line.LineNumber;
            row[StoreIdColumn] = tx.StoreId;
            row[TaxCodeColumn] = taxItem.TaxCode;
            row[TerminalIdColumn] = tx.TerminalId;
            row[TransactionIdColumn] = tx.Id;
            object oAddlString = taxItem.GetProperty("AdditionalString1");
            string addlString = string.Empty;
            if (oAddlString != null)
            {
                addlString = (string)oAddlString;
            }

            row[ADDLSTRING1Column] = addlString;
            taxTable.Rows.Add(row);
        }
    }

    ParameterSet parameters = new ParameterSet();
    parameters[ChannelIdVariableName] = request.RequestContext.GetPrincipal().ChannelId;
    parameters[TVPVariableName] = taxTable;

    int errorCode;
    using (var databaseContext = new SqlServerDatabaseContext(request))
    {
        errorCode = databaseContext.ExecuteStoredProcedureNonQuery("[ext].INSERTRETAILTRANSACTIONTAXTRANS", parameters);
    }

Finally, register this CRT data service with the CRT, in the commerceruntime.ext.config (RS) and the commerceruntime.ext.offline.config (MPOS offline).

Implement trigger in the appropriate place to call CRT data service

For our use case, it is perfect to piggy-bag onto the SaveSalesTransactionDataRequest CRT request and provided an implementation for a post-trigger to call our new data service. In that trigger, we initialize the request to our new data service and let the CRT take care of routing the call.

class SaveSalesTransactionDataRequestTrigger : IRequestTrigger
{
    public IEnumerable SupportedRequestTypes
    {
        get
        {
            return new[] { typeof(SaveSalesTransactionDataRequest) };
        }
    }

    public void OnExecuted(Request request, Response response)
    {
        ThrowIf.Null(request, "request");
        ThrowIf.Null(response, "response");

        var newRequest = new InsertTaxTransExtensionDataRequest(((SaveSalesTransactionDataRequest)request).SalesTransaction);
        request.RequestContext.Execute(newRequest);
    }

    public void OnExecuting(Request request)
    {
    }
}

Do not forget to register the trigger in the commerceruntime.ext.config (RS) and the commerceruntime.ext.offline.config (MPOS offline), similarly as shown above.
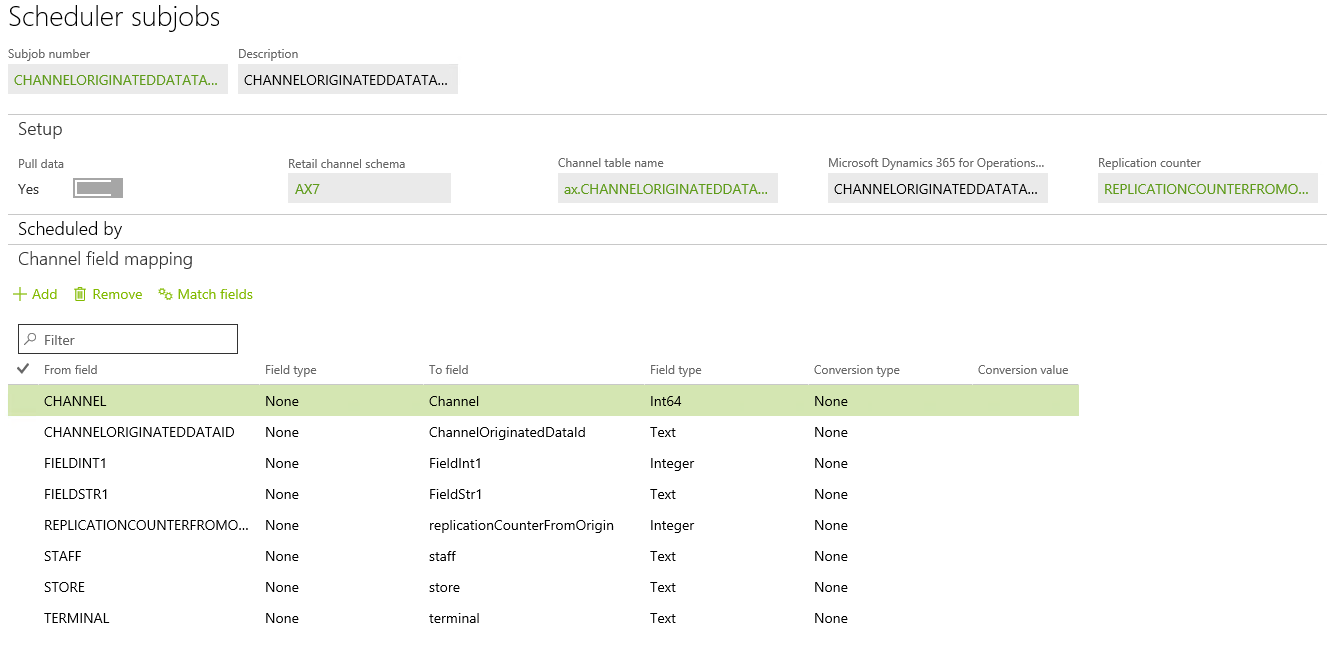
Configure CDX

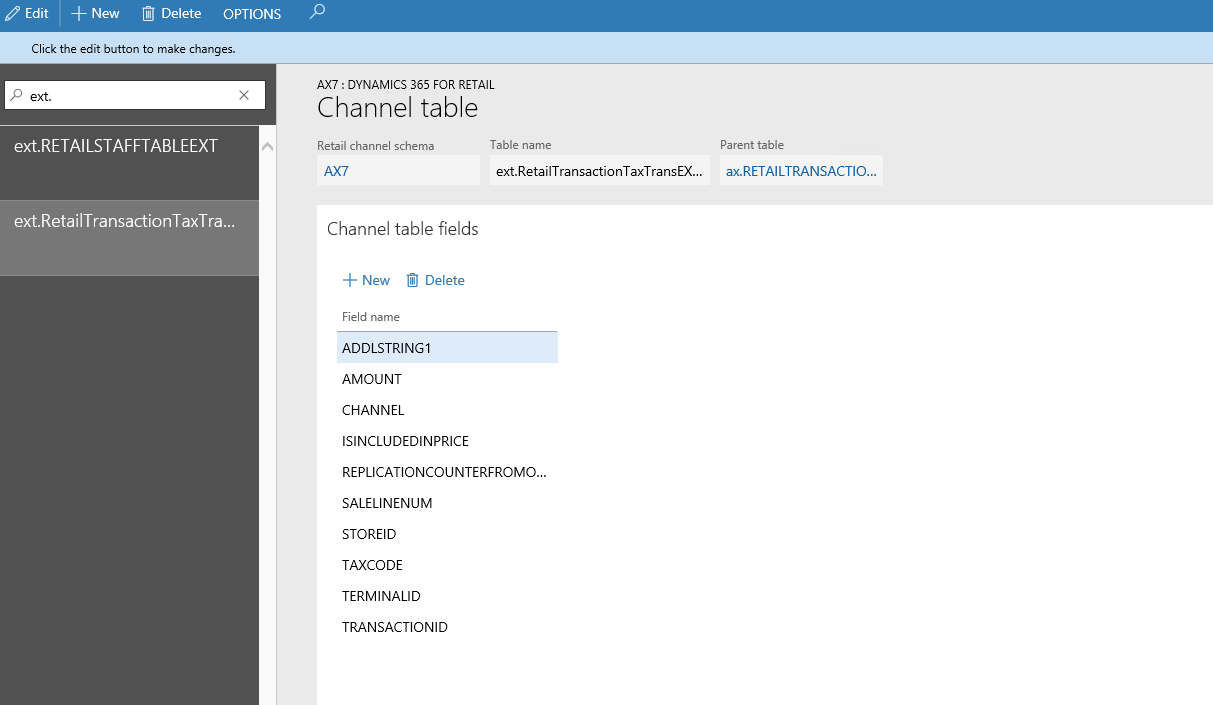
New AX7 schema table

Create a new AX7 schema table called “ext.RetailTransactionTaxTransEXTView” in the “Retail Channel schema” page for AX7 schema. Make sure the same columns are used as in the original table called “ax.RETAILTRANSACTIONTAXTRANS”, plus the new ADDLSTRING1 column.

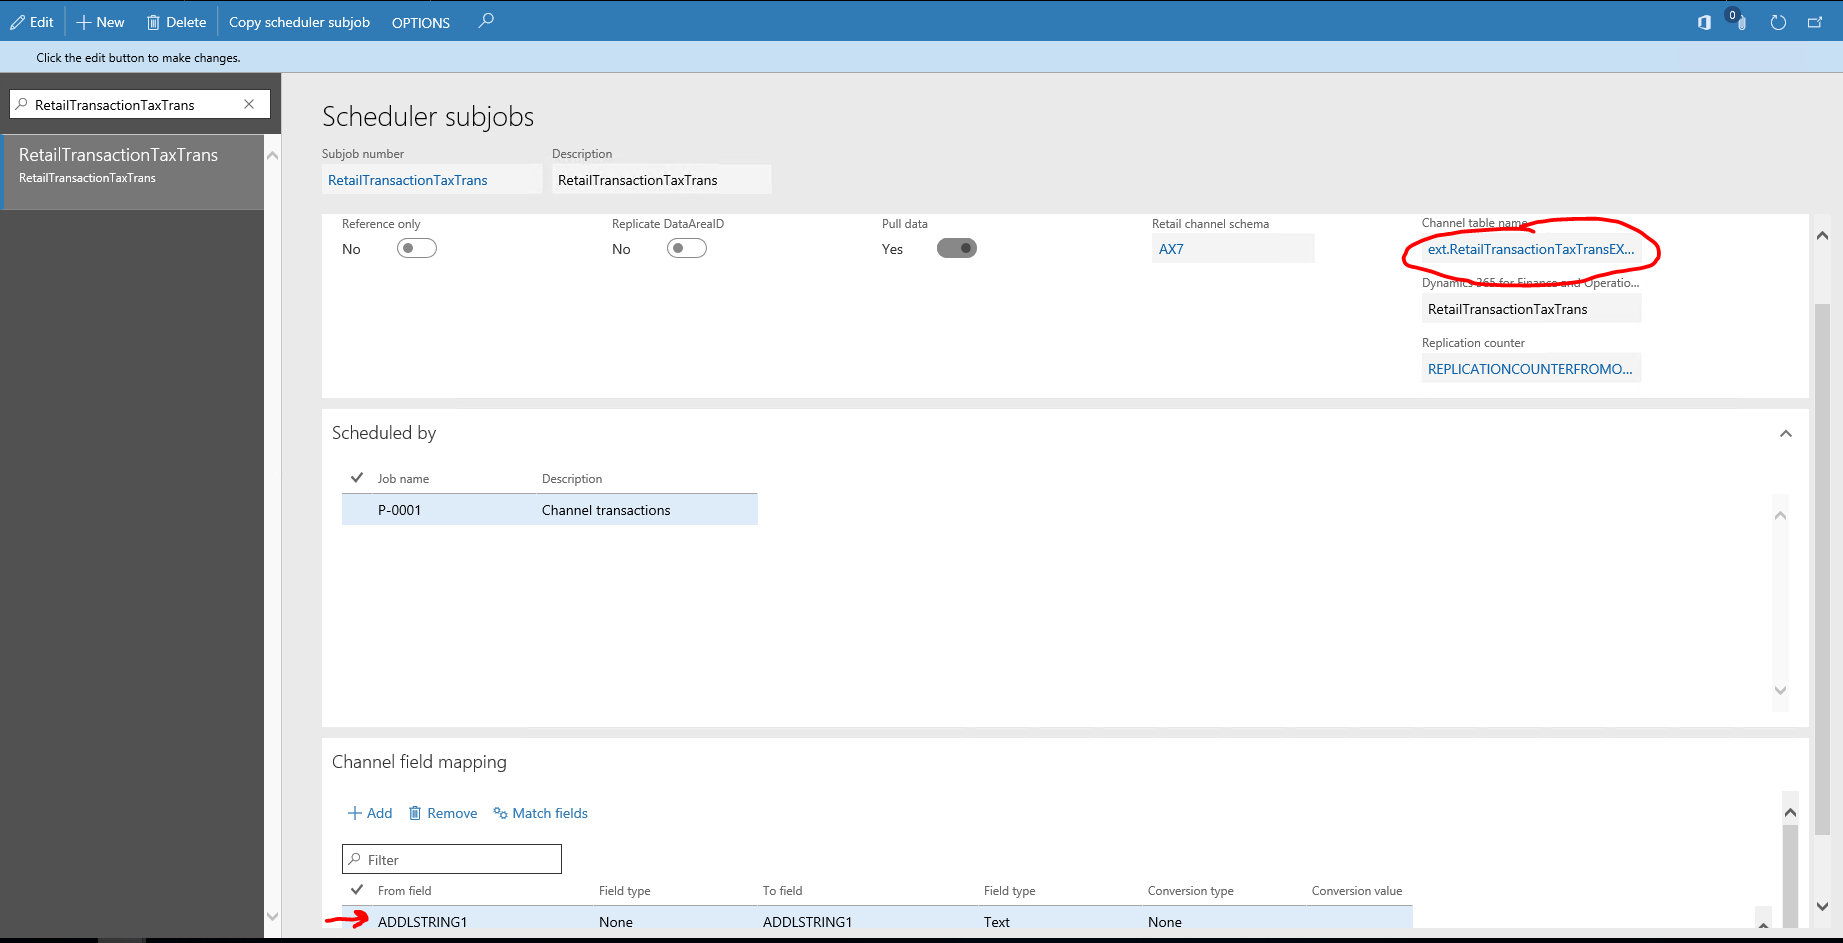
Switch scheduler subjob to use view instead of original table

In “Scheduler subjobs” find the job subjob called “RetailTransactionTaxTrans” and change it table to the newly created one and add the one new column.

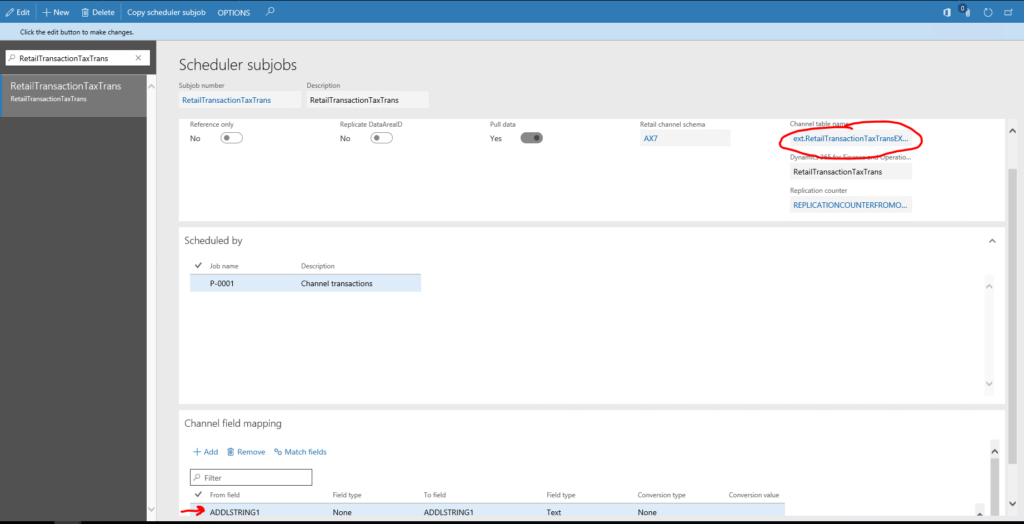
Finally, use the “Generate queries” in the “Retail channel schema” to initialize CDX.

Resource file to automatically configure CDX after deployment

Brand new feature, to be continued at a future time…
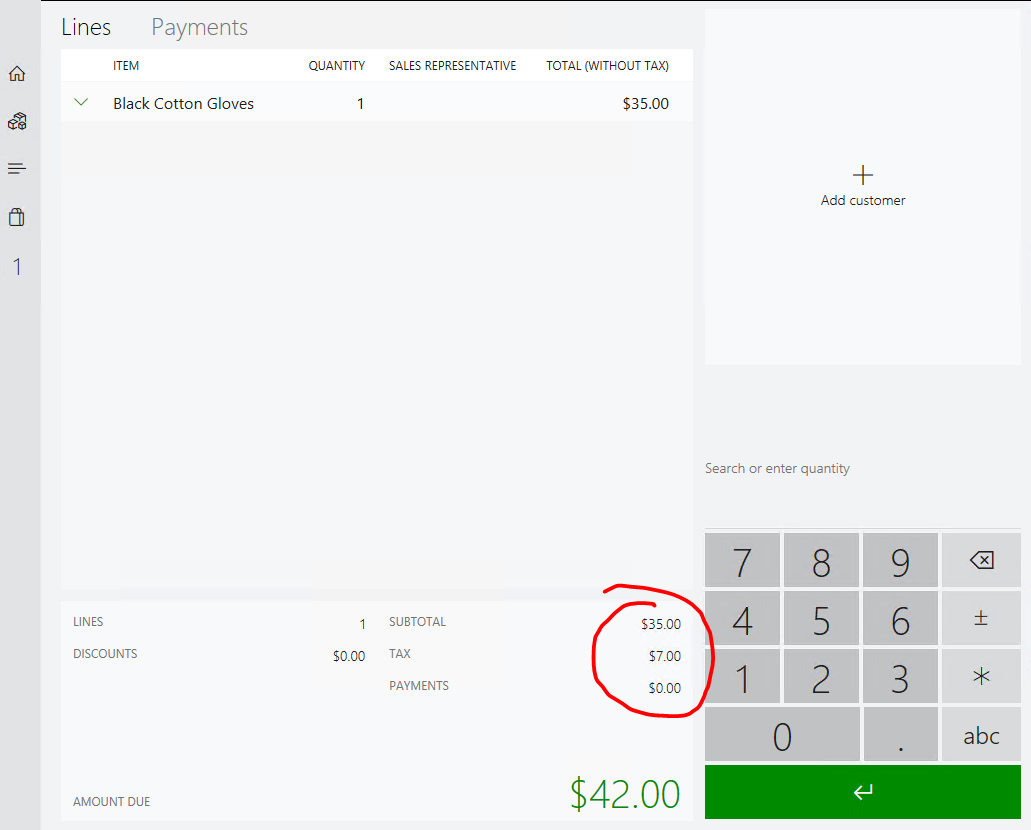
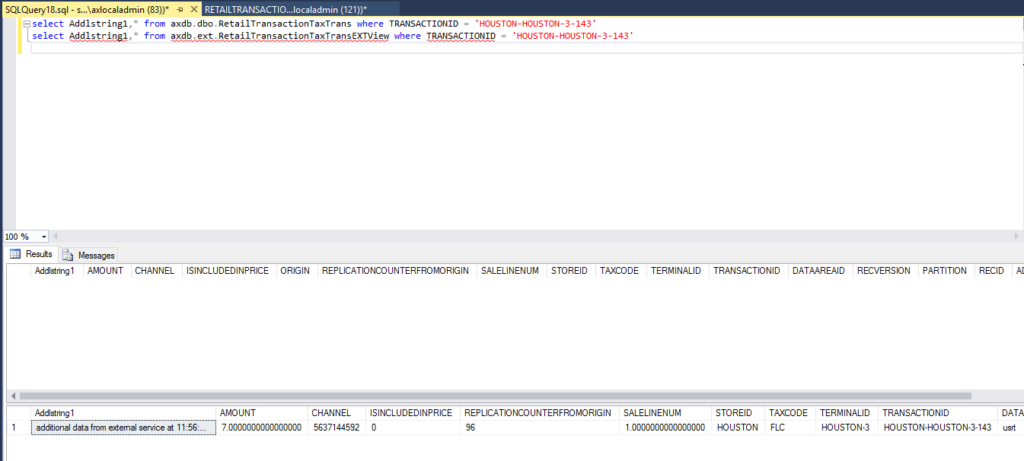
Testing

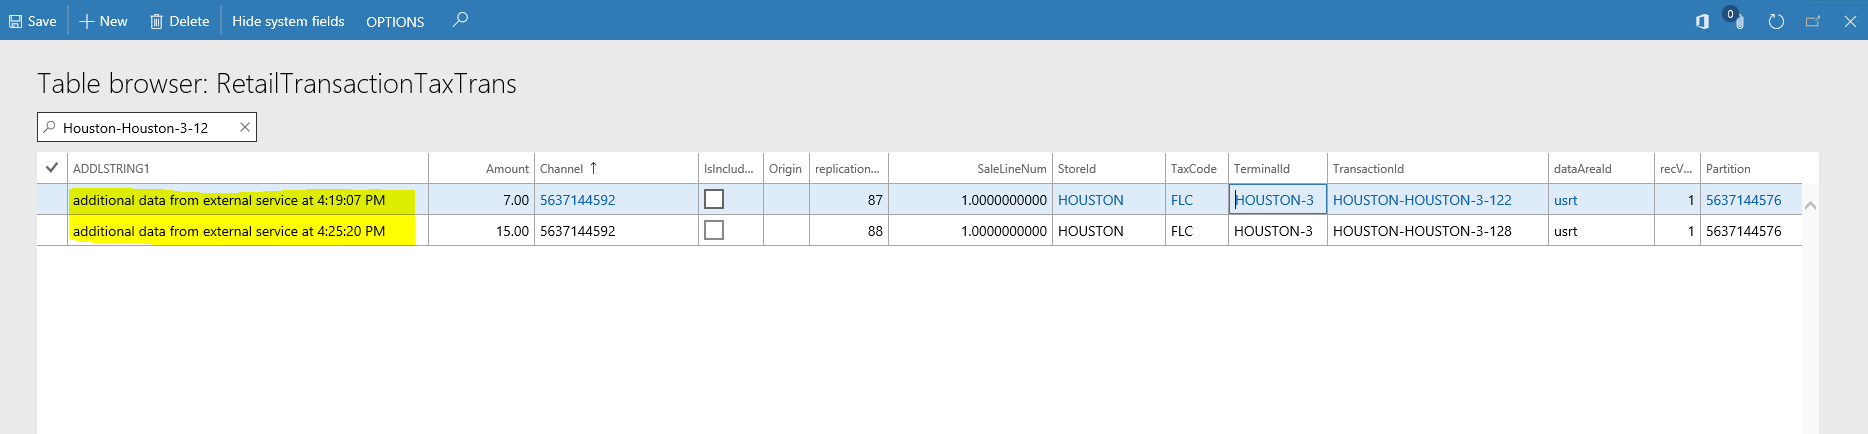
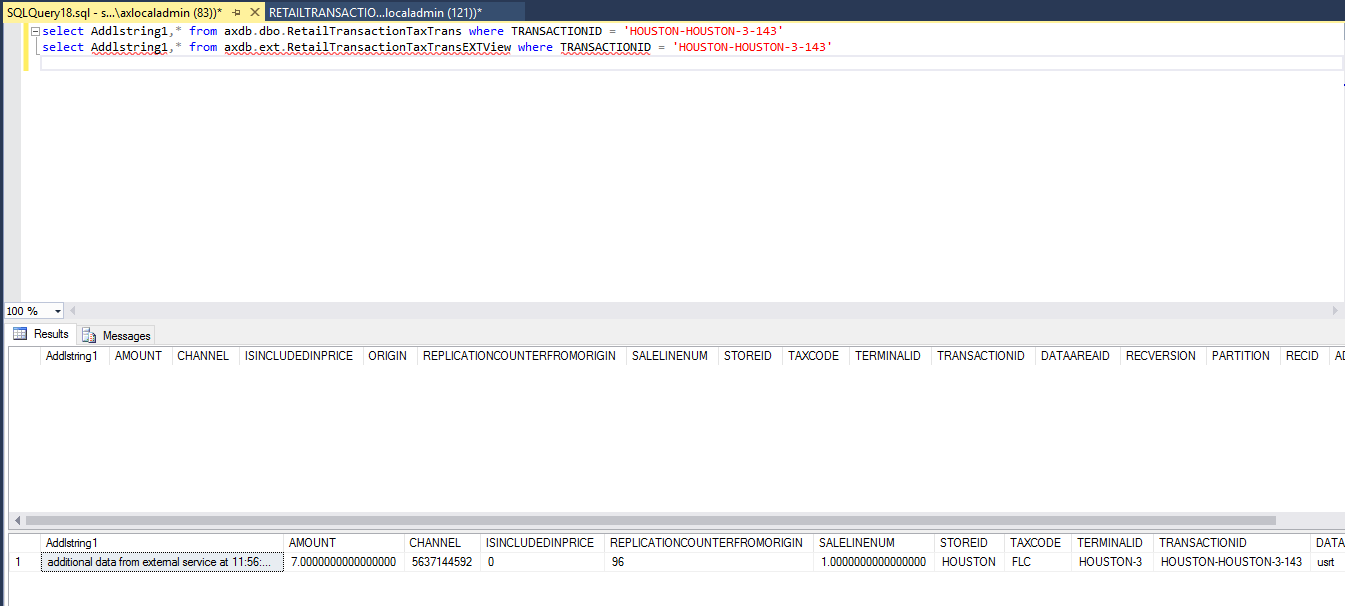
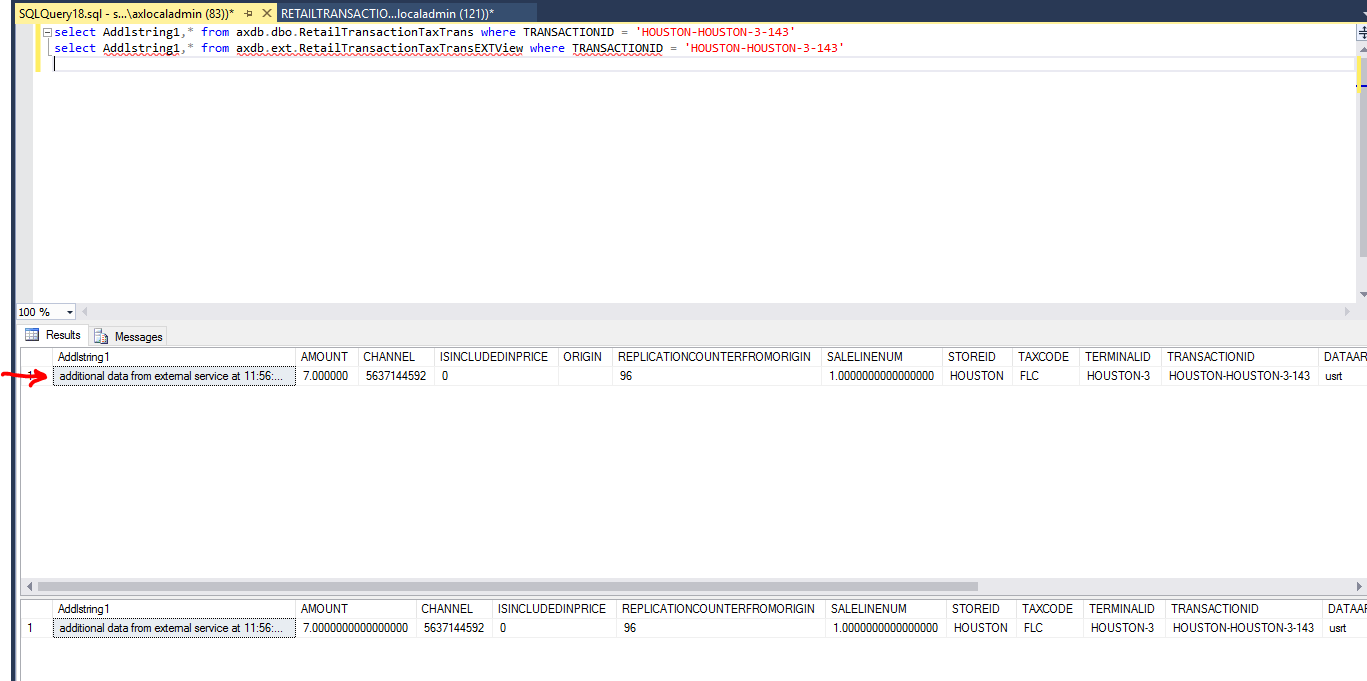
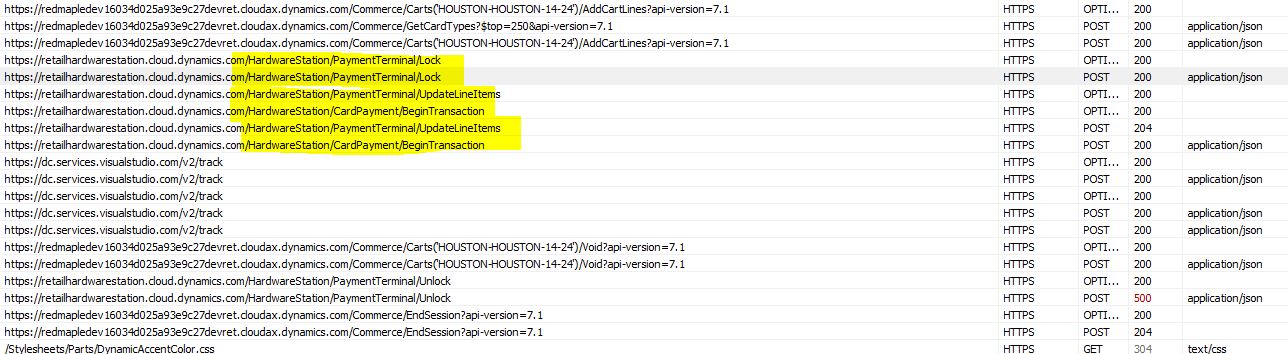
Run through your scenario in your POS client to save a transaction. Then look in the database before and after to see that the extension table gets populated and synced with the P-0001 job.


Extensions.MyTaxTransExtensionDataServiceBlog

Simple local caching CommerceRuntime service (LocalCacheService)


Note: This can be implemented with any Dynamics 365 or older CommerceRuntime versions. Sample code can be downloaded at the end of this blog.

In some extensibility scenarios it may be useful to cache data in CRT memory. It could be data that may need to be frequently reused and does not change often, especially, if it may be expensive to calculate the data or fetch the data from the database. There are multiple examples for cases when we may need such a service.

One example could be pieces of secure information from HQ (AX) that we do not want to store in the channel database (i.e. SecureAppSettings sample).

Another example may be the fetching of product attributes in multiple extension dlls. In some places we have the attribute values already available, in others we do not, so it would have to be re-queried (i.e. SimpleProduct).  One could off course extend the CRT further to pass the queried product attribute down to where we need it later (via extension properties), but I have found it may be sometimes more trouble than it is worth. Even further, if we have multiple RetailServer requests involved, extension properties are not automatically persisted, so we would have to find another place to save this state.

In these and other examples, a simple cache makes the coding simpler.  Just make sure the data that get cached does not change very frequently. One thing to note is that this cache lives in the memory of the host of the CRT (RetailServer or MPOSOffline), so in a production environment there will be multiple cache instances, one for each host process. In many cases, this may not really matter much. In other cases, it may be better to use a distributed cache instead (topic for a future blog).

This simple local cache solution is based on the .NET MemoryCache object.  No SQL is needed. A client can use a single line to fetch (try to fetch) the data with this code:

var getFromCacheRequest = new GetFromLocalCacheRequest(cacheKeyExternalProductTaxId);
object cachedValueExternalProductTaxId = context.Runtime.Execute(getFromCacheRequest, context).Value;
if (cachedValueExternalProductTaxId != null)
{
   // 
}

and can push a new item onto the cache with this code:

//cache productId to externalProductTaxId mapping for 30 min
var saveToCacheRequest = new SaveToLocalCacheRequest(cacheKeyExternalProductTaxId, externalProductTaxId, 30 * 60);
context.Runtime.Execute(saveToCacheRequest, context);

The LocalCacheService implements as usual for CRT services the IREquestHandler. Below is some of the crucial code for reference. In case you want to look at all the code (or reuse it in some of your projects), download the zipped up version below.

public Response Execute(Request request)
{
    Type requestType = request.GetType();
    Response response;
    if (requestType == typeof(GetFromLocalCacheRequest))
    {
        var cacheKey = ((GetFromLocalCacheRequest)request).Key;
        var cacheValue = cache.Get(cacheKey);
        string logMessage = string.Empty;
        if (cacheValue != null)
        {
            logMessage = "GetFromLocalCacheRequest successfully fetched item from cache for key '{0}'.";
        }
        else
        {
            logMessage = "GetFromLocalCacheRequest could not find item in cache for key '{0}'.";
        }

        RetailLogger.Log.ExtendedInformationalEvent(logMessage, cacheKey);
        response = new GetFromLocalCacheResponse(cacheValue);
    }
    else if (requestType == typeof(SaveToLocalCacheRequest))
    {
        var cacheKey = ((SaveToLocalCacheRequest)request).Key;
        var cacheValue = ((SaveToLocalCacheRequest)request).Value;
        var cacheLifeInSeconds = ((SaveToLocalCacheRequest)request).CacheLifeInSeconds;
        cache.Set(cacheKey, cacheValue, DateTimeOffset.Now.AddSeconds(cacheLifeInSeconds));
        RetailLogger.Log.ExtendedInformationalEvent("SaveToLocalCacheRequest saved item for key '{0}'", cacheKey);
        response = new NullResponse();
    }
    else
    {
        throw new NotSupportedException(string.Format(CultureInfo.InvariantCulture, "Request '{0}' is not supported.", request.GetType()));
    }

    return response;
}

Extensions.MyLocalCacheServiceBlog

Product attribute usage in the channel


Note: Implemented with Dynamics 365 version 7.2.* (but likely working fine with lower or higher versions). Sample code can be downloaded at the end of this blog.

This information explains how to setup product attributes in Dynamics 365 for Operations (and similar products) and use it in code in the channel (in a CRT service).

Before we can see any new values in POS or write code against, there are some setup steps needed.

Setup

Adding a new product attribute

Steps for adding a new product attribute (e.g.: ExternalTaxId) to a category of products (e.g: Gloves and Scarves in fashion hierarchy) to the Houston channel:

  1. Create a new type under “Attribute type” (e.g.: ExternalTaxId)
  2. Create a new attribute (e.g: ExternalTaxId) under “Attributes” with the attribute type created in #1. In this same form, make sure to open the Filter settings and save it once, even if you are not making any changes
  3. Add the created attribute to a new attribute group under “Attribute groups” (e.g.: ExternalTaxId)
  4. Go to “Channel navigation categories” and select the navigation hierarchy (fashion navigation hierarchy) for the specific category (Gloves and Scarves). Under “product attribute groups” tab, add the new attribute GROUP.
  5. Go to “Channel categories and product attributes”. Set attribute metadata for channel = Houston. Find the attribute (season) and set Include attribute to yes and save.
  6. Publish channel updates on same form.

Saving values for product attributes

Browse to a product that is in the same category for which we added the new attributes (Products by category) and use “Setup/Product attributes” to save values.

Update the channel with changes

Go to distribution schedule and run the distribution jobs 1040, 1070,1150

Usage

You could now use MPOS for the respective channel to view the new value:

If you wanted to use CRT code, you can simply query for the attribute:

var channelId = context.Runtime.CurrentPrincipal.ChannelId;
int catalogId = 0;
var settings = QueryResultSettings.AllRecords;
var request = new GetProductAttributeValuesServiceRequest(channelId, catalogId, productId, settings);
var response = context.Runtime.Execute(request, context);
var externalProductTaxIdAttributeValue = response.AttributeValues.FirstOrDefault(av => av.Name == "ExternalTaxId");

if (externalProductTaxIdAttributeValue != null)
{
    externalTaxId = externalProductTaxIdAttributeValue.TextValue;
}

Inquiring version information of a Dynamics 365 for Finance and Operations deployment

There are two ways to find out the version information. Either use LCS or look at individual files on the box (in case the VM is not hosted on LCS).

In the LCS case, browse to the environment in question and follow the “View detailed version information” link. The following information will be available:

    • Platform update version (blue)
    • Binary hotfixes (red)
    • Application/X++ hotfixes (black)

    • Microsoft modules versions (incl. Retail)

    • custom modules versions

Getting started with HardwareStation IPaymentDevice development

The following article outlines the steps to carry out in order to be able to use, develop and debug a simple IPaymentDevice-derived peripheral that can be used by the Dynamics 365 for Retail and Operations HardwareStation.

The following steps should be carried out on a development box.

Configure Hardware profile and settings

I used HW0002 profile. We need to use the PinPad device type and set some new parameters. Lets use “SAMPLEDEVICE2”. Notice that the originally shipped Microsoft code already uses “SAMPLEDEVICE”, so I deliberately choose a different string.

Edit as seen in the screenshot and save.
Next, pick the store you want to use for development and testing. I picked Houston. Go into the store settings and update the HardwareStation settings, make sure you match the same hardware profile from above.

Note, that I am running all components (HQ and store) on the same cloud-hosted box. There is a certificate for all sites already installed, so I decided to use the same url, in order to re-use the SSL certificate (pick it during the installation). I choose hardwarestation.cloud.dynamics.com. It could be anything, but you will have to get through some additional steps to get the SSL cert or self-signed cert to work properly.
Once these things are all setup and saved, we need to push these changes to the channel, via the 1090 (Registers) job. Run it and make sure the changes have been applied (via “Download sessions” form)

Development setup

Go back to the same screen for the Houston store, and download the hardware station installer. Once downloaded, install it on the development box. You also need to add a hosts file entry for the development box:

127.0.0.1 retailhardwarestation.cloud.dynamics.com

and a host header of

retailhardwarestation.cloud.dynamics.com

for the newly installed website.
At the end of the installation, make sure the final ping works to the newly installed station succeeds (url is https://retailhardwarestation.cloud.dynamics.com/HardwareStation/ping).

Your first payment connector

Re-use the HardwareStation.Peripherals.Desktop project from the Retail Sdk but strip out everything we do not need. At the end, only leave the SampleManagerDevice.cs, make sure to rename it to “SAMPLEDEVICE2” in the class export attribute and remove any binary references to HardwareStation.Peripherals.*. We are doing that so we won’t need to drop all these other binaries. Its unfortunate that the simple Retail Sdk sample has that many dependencies. Here we are going for the simplest way to get started, so we remove all of these references.

Compile the code.

Drop the dll and pdb into the HardwareStation’s binary folder. For me, that was at “C:\Program Files (x86)\Microsoft Dynamics 365\70\Retail Hardware Station\Package\bin”.

Last but not least, add the assembly to the HWST’s web.config file at the //hardwarestation/composition node, at the top. I added this entry:

<add source=”assembly” value=”SampleExtensionLibrary” />
(I renamed it, but any assembly name will work for you here.)

Test and step through the debugger

We need POS (Modern POS or Cloud POS) and pair the hardware station. The quickest way would be to use Cloud POS as no installation is needed. Once you paired the station with POS (via the “Select HardwareStation” button) you should log off once.

A good way to verify that the HardwareStation is being used is to use F12 Developer tools or Fiddler. Whenever an item gets added to the cart, we should see certain calls to the HWST:

At this point, we are ready to debug. Attach to the w3wp.exe project for the HardwareStation (i.e use ProcessExplorer to find out the process ID) and set breakpoints in your SAMPLEDEVICE2 payment device (i.e. OpenAsync method).

Hook all this into the Retail Sdk

In order to make sure that our officially built HardwareStation has everything we need, we need to carry out these steps on files that are under source control:

  • Edit Customization.settings to include our new dll into $(ISV_HardwareStation_CustomizableFile)
  • Edit RetailSDK\Packages\HardwareStation\Web.Config with the registration of the new dll
  • add your new project with the IPaymentDevice implementation into the RetailSdk, so it is part of the build (with dirs.proj or a *.sln file)
  • submit the changes to VSTS, do a build and deploy the Retail combined package to your D365 environment. (at that point the download from the store page should give you a HardwareStation package with the right files)

Now we are in a position to try, debug, evaluate the calls and can implement the “real” code. Happy coding.

Dynamics 365 for Finance and Operations hotfix and deployment cheat sheet (including Retail)


Overview

There are a few wikis at https://docs.microsoft.com/en-us/dynamics365/unified-operations/dev-itpro/index?toc=dynamics365/unified-operations/fin-and-ops/toc.json which help with specific dev ALM and deployment topics. I found myself and from questions of others that it is difficult to pull all this information together into a single process. This write-up hopefully helps somebody that wants to update to follow the process without errors. It will certainly help me next time I need to take a hotfix since I can just follow a simple cheat sheet. So lets get started.

There are 3 different update types. 1) A platform update is fully backwards compatible with the application, its of binary nature, and it can simply be deployed. 2) A X++ application hotfix ships fixes in X++ source code that can be integrated into ones own code (code merged), sort of like a customization. And finally, 3) a binary hotfix is an application update for other tools, binaries, and Retail source code. The latter is cumulative, so you will always get the latest.  For that reason, use a good naming convention for the packages you download (and upload to the Asset library) as this helps later when you need to bring multiple environments to the same hotfix level.

Recommended (best) practices:

    • Download to and upload from the cloud development box. That way these files get transferred much faster and your intranet is not used.
    • If you have multiple development boxes, the steps below should be taken by one. Once all looks good, the other development boxes should get the changes via syncing VSTS (not via deployable package).
    • Some binary hotfixes depend on X++ hotfixes. Deploy these first (either by deployable package or VSTS), then tackle the binary update.
    • The LCS Asset library has a feature that allows for package merging. If you use it, you can decrease the overall deployment time. Unfortunately, merging does not work if the
    • Retail combined package is involved. Merging X++ deployable package, binary hotfix works.
    • Installed platform version, X++ hotfix (KB number) and binary hotfix (build version) can be inquired on the LCS detailed version info. See here for details.
    • There is no easy way to infer the KB number of a binary hotfix from the build version. One thing to deal with this is to include build version and download date into the package name. Then you can tell with high likelihood that a KB that is older then the binary package date is included. A KB with a newer date is likely not included in the package.


    See the picture below to see an overall flow of the process. Refer to it while reviewing the following sections.

    Note, that there are 4 total different deployment packages that could be deployed (purple boxes). See the details below how to get them.

    Note: For the following steps, the integration of the Retail Sdk’s build with the Dynamics 365 for Operations build is assumed. If you do not have this setup, follow Retail Sdk and Dynamics 365 build definition.

    Platform updates

    Platform updates are the easiest. There is no code merge required, not VSTS needed, you just move it to the Asset library and deploy it. See more information at FAQ monthly platform updates.

    X++ application hotfixes

    X++ hotfixes are not cumulative, so there may be some code merging needed, if you pick multiple. Visual Studio and the Dynamics Operations VS addin will help with that.

    Download the hotfix

    Ideally, you pick the hotfix you need and be done with it. However, I have found it to be better in the long run to take all hotfixes. It incurs slightly more testing up-front, but less testing when updating to the next major version. Additionally, other fixed issues you may just not have not encountered will get fixed before you see them.

      • Logon to LCS on the development box, chose the right environment and hit the X++ hotfix tile

    • Select All and hit Add button
    • Download package
    • Select all and download
    • Name it with meaningful data so you can identify the package later. I use environment name, date of download, the fact that this is not a binary update but an X++ update etc. (i.e. NewX++HotfixesForSpringEnv170903)
    • Unblock and unzip the package

    Backup PackageLocalDirectory

    I got burned by a failed hotfix application after my dev box became corrupted. I could not tell for sure which files had been touched… Since then, I do a simple robocopy-backup to be able to rollback if something happens.

    • Open a cmd.exe window with elevated privileges (runas admin)
    • Change directory into the parent of your PackagesLocalDirectory folder (here K:\AosService, might be in J: also)
    • robocopy PackagesLocalDirectory PLD_BeforeHFWork_170803 /E /NFL /NDL

    Prepare VSTS for the X++ hotfixes

    I have had issues with the VS addin in the past, so I always use the command line version. Additionally, it is important to understand the –prepare statement. Use it! Otherwise, code merges you may need to do later will be hard.

    Update:
    Below is a batch script that I add to each Metadata folder (VSTS too). Just update the environment variables, and remove the commented lines one by one, first -prepare, then -install. See below for details. here is the contents of the script:

    setlocal
    
    set HotfixPackageBundlePath=C:\Temp\Downloads\AllX++HotfixesTill06192018\HotfixPackageBundle.axscdppkg
    set PLD=k:\AosService\PackagesLocalDirectory
    set TFSUri=https://xxxx.visualstudio.com/defaultcollection
    
    rem bin\SCDPBundleInstall.exe -prepare -packagepath=%HotfixPackageBundlePath% -metadatastorepath=%PLD% -tfsworkspacepath=%PLD% -tfsprojecturi=%TFSUri%
    rem bin\SCDPBundleInstall.exe -install -packagepath=%HotfixPackageBundlePath% -metadatastorepath=%PLD% -tfsworkspacepath=%PLD% -tfsprojecturi=%TFSUri%
    
    endlocal

    Save it with a name like UpdateAppHotfixes.cmd. Run it from an elevated cmd console, while the local directory is the PackagesLocalDirectory.

        • Open Visual Studio and make sure you are logged in with the same account that is going to be used to access VSTS. If you are not sure, logout and log back in. All we want to get is a new valid authentication token so the steps below will succeed.
        • Close all VS instances
        • Open a cmd.exe window with elevated privileges (runas admin)
        • Change directory into PackagesLocalDirectory\bin folder (here K:\AosService\PackagesLocalDirectory\Bin, might be in J: also)
        • SCDPBundleInstall.exe -prepare -packagepath=C:\Temp\Downloads\NewX++HotfixesForSpringEnv170903\HotfixPackageBundle.axscdppkg -metadatastorepath=k:\AosService\PackagesLocalDirectory -tfsworkspacepath=k:\AosService\PackagesLocalDirectory -tfsprojecturi=https://XXXXX.visualstudio.com/defaultcollection
        • Once the command finished, open Visual Studio and submit the newly added files with a meaningful changelist name

      Apply the hotfixes

      This step will apply the actual changes to the files that were prepared in the previous step.

        • close all VS instances and keep using same cmd.exe instance from above
        • SCDPBundleInstall.exe -install -packagepath=C:\Temp\Downloads\NewX++HotfixesForSpringEnv170903\HotfixPackageBundle.axscdppkg -metadatastorepath=k:\AosService\PackagesLocalDirectory -tfsworkspacepath=k:\AosService\PackagesLocalDirectory -tfsprojecturi=https://XXXXX.visualstudio.com/defaultcollection
        • Once the command finished, check for conflicts: open Visual Studio, Select Dynamics 365/Addings/Create project from conflicts
          If there are conflicts, you need to resolve them
        • Do a full build: Dynamics 365/Build models/Packages-select all/Options-use default plus select sync database and then hit the Build button
        • When the build succeeded without errors, submit the changed files with a meaningful changelist name

      Binary hotfixes

      Binary hotfixes are cumulative. You need to pick one of them, and you will get the latest. If Retail channel components are not customized, then there is no code merge needed.

      Download the binary hotfix

        • Logon to LCS on the development box, chose the right environment

      • Click the download binaries button
      • Name it with meaningful data so you can identify the package later. I date of download (i.e. AllBinary72UpdatesLatestPlatform170903)
      • Unblock the zip file and then unzip it
      • Upload the zipped package to LCS’s Asset library

      Apply the binary hotfix

      Use the LCS environment’s Maintain menu to deploy this package.

      Only in case of Retail channel customizations: Update the Retail Sdk mirror branch

      In order to effectively do code merges, it is suggested to use 2 branches. For more details, check Retail Sdk Overview (at the end of the wiki page).

      Ideally, the Retail Sdk branch would be hosted in the same VSTS project, in parallel to the Trunk folder.

      In order to update it:

        • Make sure the mirror branch/folder is fully synced to latest version.
        • Close all but one Visual Studio instances
        • In a first Windows Explorer window, find the new Retail Sdk which we will use to update the mirror. On a brand new environment, find it in the service drive (K:\ or J:\) under “Retail Sdk”. If this is a binary hotfix, unzip the hotfix package as you downloaded it, and find the SDK in the RetailSDK\Code folder.

      • In a second Windows Explorer window open the location of the outdated mirror Retail Sdk branch/folder (where it is mapped from VSTS to local folder)
      • Delete all files in the outdated mirror Retail Sdk branch/folder (open in the second Windows Explorer Window)
      • Copy and paste all files from the new Retail Sdk into the folder you just cleaned (copy from second to first Windows Explorer window)
      • (Optional) If you have any doubt whether the shipped Retail Sdk has a build error, carry out these steps to verify:
      • (Optional) Make a temporary copy of the new Retail Sdk (from the hotfix) to any other place of your choice
      • (Optional) Open a Visual Studio 2015 msbuild command prompt and change directory to the temporary location
      • (Optional) Type “msbuild” and hit Enter (if this shows any build errors, please open a support request or bug as the shipped Retail Sdk should build without errors)
      • Delete all files in the mirror branch in Windows explorer, and add the new Retail Sdk back. This will ensure that removed files are properly being removed from the source control.
      • In “Source Control Explorer”, right click the mirror branch, “Add items to Folder…”, Add all folders from the same source location back. Make sure there are no “excluded items”, and hit Finish.
      • Make sure there are no files from the mirror branch listed under “Team Explorer”, “Pending Changes”, “Excluded Changes” and “Detected”. If there are, promote them to the “Included Changes”
      • Check In the changes.

      Only in case of Retail channel customizations: Code merge the Retail Sdk customization branch

      • Make sure you do not have any changed files in the customization branch before you start. If this is difficult to accomplish create a new client mapping, get the customization branch into a different folder or machine and do the merge there. Do not start merging if you have opened files.
      • In Source Control Explorer, right click the mirror branch and select “Branching and Merge…”, Merge
      • Make sure that the source is the mirror branch and destination is your customization branch
      • Hit Next and Finish
      • Resolve any possible merge conflicts
      • Watch closely that all “Included files” are the correct files. These should only be the merged files, or updated files in the mirror
        Watch closely that all “Excluded files” only include generated files. Do not promote them

      Only in case of Retail channel customizations: Test local Retail Sdk customization build and submit to VSTS

      Before checking in these changes, lets make sure that all builds fine. Open a Visual Studio MSBuild developer command window, and type “msbuild” at the root of the Retail Sdk customization branch. Once all builds fine, submit the changes with a meaningful changeset name.

    Run build on build machine

    Inspect the submitted changes in the VSTS code branch. In the example below, I see 2 checkins for the X++ hotfixes, one other code change, one to update the Retail Sdk mirror branch and one to code merge the Retail Sdk customization branch.

    Upload the AX and Retail deployable packages to LCS

    Find the packages in VSTS and upload them to LCS.

    Deploy AX and Retail deployable packages

    Deploy the packages from the LCS asset library (in the image below the 3rd and 4th).  The RetailDeployablePackage is only needed in case of Retail channel customizations.

    Once the deployment succeeded, you should see the tile count go down.

    Retail only: Update channel components

    Follow the wiki about how to deploy the store components (Modern POS, Modern POS Offline, Hardware station, Retail Store Scale Unit)

Using a Magnetic strip reader (MSR) to login to Dynamics 365 Retail POS


Note: Implemented with Dynamics 365 version 7.2.* (but likely working fine with lower or higher versions). Sample code can be downloaded at the end of this blog.

A little-known feature is the ability to log into POS with a barcode scanner or MSR. All the low-level plumbing is already implemented in POS to accept the data and to call the right RetailServer activity. Also, CRT handlers exist that carry out the mapping from the scanned/swiped data to the credential Id, which is then ultimately used to look up a user. This handler is being called as part of the authentication pipeline of the CRT.

Functional walkthrough

A manager must first assign a worker’s credential. For that add the operation called “Extended log on” an appropriate button layout and sync the download job that pushes the data for the registers (by default 1090). When that button is clicked, the following screen can be used to assign credential ids (insert/update):


Use the scanner or MSR when the application indicates it. Once saved, you are all set to try the login. For that, just scan/swipe on the logon dialog and the credential id is being looked up (read):

If the credential was found, the correct user will be logged in without any further prompt.

Technical details

If you want to use this functionality, you will very likely want to adjust the code that maps the scanned/swiped data to a credential id. The default implementation takes the first 5 characters and throws the rest away. What if the information in the scanned/swiped data is the same for the first 5 characters and only differs further down the string? We will need to implement our own CRT handler(s) so we can replace the mapping functions. The following example uses MSR data simulated by the Peripheral Simulator for Retail.
Note: The crt.STAFFCREDENTIALSVIEW view shows what information is stored for any staff member. The good thing is we do not need to touch any of that code, we just need to adjust the 3 CRT request handlers that need the mapping from scanned/swiped data to the credential id.

  1. Create a new CRT service with 3 new handlers for GetUserEnrollmentDetailsServiceRequest, ConfirmUserAuthenticationServiceRequest, and GetUserAuthenticationCredentialIdServiceRequest
    namespace MyCompany.Commerce.Runtime.MyExtendedAuthService
    {
        using Microsoft.Dynamics.Commerce.Runtime;
        using Microsoft.Dynamics.Commerce.Runtime.Handlers;
        using Microsoft.Dynamics.Commerce.Runtime.Messages;
        using Microsoft.Dynamics.Commerce.Runtime.Services.Messages;
        using System;
        using System.Collections.Generic;
        using System.Globalization;
    
        public class UniqueSecretExtendedAuthenticationService : INamedRequestHandler
        {
            public IEnumerable SupportedRequestTypes
            {
                get
                {
                    return new[]
                    {
                            typeof(GetUserEnrollmentDetailsServiceRequest),
                            typeof(GetUserAuthenticationCredentialIdServiceRequest),
                            typeof(ConfirmUserAuthenticationServiceRequest)
                    };
                }
            }
    
            public string HandlerName
            {
                get
                {
                    return "auth://example.auth.contoso.com/msr";
                }
            }
    
            public Response Execute(Request request)
            {
                if (request == null)
                {
                    throw new ArgumentNullException("request");
                }
    
                Response response;
                Type requestType = request.GetType();
    
                if (requestType == typeof(GetUserEnrollmentDetailsServiceRequest))
                {
                    response = this.GetUserEnrollmentDetails((GetUserEnrollmentDetailsServiceRequest)request);
                }
                else if (requestType == typeof(GetUserAuthenticationCredentialIdServiceRequest))
                {
                    response = this.GetUserAuthenticationCredentialId((GetUserAuthenticationCredentialIdServiceRequest)request);
                }
                else if (requestType == typeof(ConfirmUserAuthenticationServiceRequest))
                {
                    response = this.ConfirmUserAuthentication((ConfirmUserAuthenticationServiceRequest)request);
                }
                else
                {
                    throw new NotSupportedException(string.Format(CultureInfo.InvariantCulture, "Request '{0}' is not supported.", request));
                }
    
                return response;
            }
    
            private GetUserAuthenticationCredentialIdServiceResponse GetUserAuthenticationCredentialId(GetUserAuthenticationCredentialIdServiceRequest request)
            {
                return this.GetUserAuthenticationCredentialId(request.Credential, request.RequestContext);
            }
    
            private GetUserAuthenticationCredentialIdServiceResponse GetUserAuthenticationCredentialId(string credential, RequestContext requestContext)
            {
                // TODO: this is the place where you can customize the mapping between what was scanned/swiped and what the credential id is in the StaffCredentialsview
                string credentialId = credential;
    
                return new GetUserAuthenticationCredentialIdServiceResponse(credentialId);
            }
    
            private GetUserEnrollmentDetailsServiceResponse GetUserEnrollmentDetails(GetUserEnrollmentDetailsServiceRequest request)
            {
                string credentialId = this.GetUserAuthenticationCredentialId(request.Credential, request.RequestContext).CredentialId;
                return new GetUserEnrollmentDetailsServiceResponse(credentialId, string.Empty);
            }
    
            private Response ConfirmUserAuthentication(ConfirmUserAuthenticationServiceRequest request)
            {
                return new NullResponse();
            }
        }
    }
    
  2. Put the class into a project and update the C# project file so it can be built by the Retail sdk (imports at top and bottom)
  3. drop the dll into your RetailServer bin\ext folder (for testing only)
  4. update your RetailServer bin\ext\commerceruntime.ext.config file to include the new assembly
  5. Update your Customizations.settings file to include this file as part of your customizations

Note: The changes in Customization.settings and commerceruntime.exe.config need to be made in the RetailSdk under VSTS, so these changes will be used by the build and package generation.
A fully working zipped up project can be found below. Just add the project to the SampleExtensions\CommerceRuntime folder and compile.
Extensions.MyExtendedAuthService

CDX extensibility – Synchronizing data from channel to HQ via P-job


By default, there are very few tables that get synchronized from the store to the HQ. These are mostly tables related to the transactions being generated. However, there are scenarios where customers may want to create other data in their own tables in the channel and bring it back to HQ. In many cases, that may not need to happen in real-time and this task can be accomplished by using the pull job architecture. Below are the steps how to set this up.

Dynamics 365 for Operations table creation

Since the records will trickle in from multiple channels, stores, terminals, the table’s index must include the data that differentiate the records. A good example is the RetailTransactionTable to look at how it’s done.
Create the table with the AOT and follow these guidelines:

  • A column called “REPLICATIONCOUNTERFROMORIGIN” of type RetailReplicationCounter needs to be added.
  • Add the other data columns that you would like to synchronize (in this example, FieldStr1 and FieldInt1)
  • Set “Created Date Time” and “Modfied Date Time” to Yes.
  • Create an index that includes the fields that are needed to differentiate the records well. For retail stores, that could be Channel, Store, Staff, Terminal and the id of the record as called ChannelOriginatedDataId in this example.


Note: How to put this file into VSTS so the change is reproducible and deployable into other environments is omitted here.

Create the table schema for the Channel database

Create a table with the same name but schema [ax] in SSMS. Here are some specific requirements to follow:

  • Include columns called [REPLICATIONCOUNTERFROMORIGIN], [ROWVERSION], [CREATEDDATETIME] and [MODIFIEDDATETIME] (details below)
  • If the table in HQ is per company (SaveDataPerCompany = yes), include a column [DataAreaId]
  • Create a clustered unique index for column [REPLICATIONCOUNTERFROMORIGIN]
  • Create a nonclustered primary key index for columns that uniquely differenciate the records, including [DATAAREAID] if data is saved per company
IF (SELECT OBJECT_ID('ax.CHANNELORIGINATEDDATATABLE')) IS NULL 
BEGIN
	CREATE TABLE [ax].[CHANNELORIGINATEDDATATABLE](
		[CHANNELORIGINATEDDATAID] [nvarchar](44) NOT NULL,
		[FIELDSTR1] [nvarchar](200) NOT NULL DEFAULT (''),
		[FIELDINT1] [int] NOT NULL DEFAULT (0),
		[CHANNEL] [bigint] NOT NULL,
		[STORE] [nvarchar](10) NOT NULL,
		[TERMINAL] [nvarchar](10) NOT NULL,
		[STAFF] [nvarchar](25) NOT NULL,
		[CREATEDDATETIME] [datetime] NOT NULL,
		[MODIFIEDDATETIME] [datetime] NOT NULL,
		[REPLICATIONCOUNTERFROMORIGIN] [int] IDENTITY(1,1) NOT NULL,
		[DATAAREAID] [nvarchar](4) NOT NULL,
		[ROWVERSION] [timestamp] NOT NULL,
	 CONSTRAINT [I_AX_CHANNELORIGINATEDDATATABLE_PK] PRIMARY KEY NONCLUSTERED 
	(
		[CHANNEL] ASC,
		[STORE] ASC,
		[TERMINAL] ASC,
		[CHANNELORIGINATEDDATAID] ASC,
		[DATAAREAID] ASC
	)WITH (PAD_INDEX = OFF, STATISTICS_NORECOMPUTE = OFF, IGNORE_DUP_KEY = OFF, ALLOW_ROW_LOCKS = ON, ALLOW_PAGE_LOCKS = ON) ON [PRIMARY],
	 CONSTRAINT [I_AX_CHANNELORIGINATEDDATATABLE_REPLICATIONCOUNTERFROMORIGIN] UNIQUE CLUSTERED 
	(
		[REPLICATIONCOUNTERFROMORIGIN] ASC
	)WITH (PAD_INDEX = OFF, STATISTICS_NORECOMPUTE = OFF, IGNORE_DUP_KEY = OFF, ALLOW_ROW_LOCKS = ON, ALLOW_PAGE_LOCKS = ON) ON [PRIMARY]
	) ON [PRIMARY]
END
GO

GRANT SELECT,INSERT,UPDATE,DELETE ON [ax].CHANNELORIGINATEDDATATABLE TO [DataSyncUsersRole]
GRANT INSERT ON [ax].[CHANNELORIGINATEDDATATABLE] TO [UsersRole]

Note: How to put this file into VSTS and registered in the Retail Sdk’s Customization.settings file so the change is reproducible and deployable into other environments is omitted here.

Add the new table to the list of Channel tables

CDX needs to be aware of the schema of the channel table in order to map and sync it with the HQ table. In Retail and commerce > Headquarters setup > Retail Scheduler > Retail channel schema, click Channel tables and add a new table with the new fields:

Add a new scheduler subjob

In Retail and commerce > Headquarters setup > Retail Scheduler > Scheduler subjobs create a new subjob that maps both HQ and channel table. Make sure that:

  • the special column [REPLICATIONCOUNTERFROMORIGIN] is both mapped in the field mapping and used in the replication counter field, and
  • the slider for “Pull Data” is set to Yes.

Add the subjob to the job

In Retail and commerce > Headquarters setup > Retail Scheduler > Scheduler jobs add the subjob to a job. You could reuse the existing P-0001 job as in this example:

Finally, in Retail and commerce > Headquarters setup > Retail Scheduler you must regenerate the sync helper classes with “Generate queries”.
Note: The previous steps in the Dynamics 365 for Operations user interface to configure CDX are shown here for better illustration. Ideally, these should be coded in X++ to get reliable and automatic deployments into other environments.

Verification

Add some data into the table in the channel side ([ax] schema) and run the pull job. Then inspect the data in the HQ side:

Data access in the CommerceRuntime


Below are some code samples for reading and writing data in Channel database. This is just for Channel database. This does not necessary mean that the data needs to go to D365 HQ. It may, either via CDX pull job or via Real-time service call. This information is only for simple reads and writes in Channel db.

Prerequisites:
Dynamics 365 for Operations (1611)
KB3214687
KB3214679

First, create the SQL table in ax schema and a view in crt schema:

    CREATE TABLE [ax].[MY_EXTENSION](
		[DATAAREAID] [nvarchar](4) NOT NULL,
		[RECID] [bigint] NOT NULL,
		[COL1] [int] NOT NULL,
		[COL2] [nvarchar](100) NOT NULL,
		[COL3] [bit] NOT NULL,
		[ACCOUNTNUM] [nvarchar](20) NOT NULL)
    . . .
    END
    GO

    CREATE VIEW [crt].[MY_EXTENSIONVIEW] AS
    (
        SELECT ACCOUNTNUM, DATAAREAID, COL1, COL2, COL3 FROM [ax].[MY_EXTENSION]
    )
    GO

    GRANT SELECT ON [crt].[MY_EXTENSIONVIEW] TO [UsersRole];
    GO

The shown sample adds 3 columns to be stored from 3 extension properties.

Grant the right permissions to table and view. This is the list of supported SQL roles:

DataSyncUsersRole Used by CDX process account
PublishersRole Used by publishing process account (eCommerce)
ReportUsersRole Used by reporting user account
UsersRole Used by runtime user (RetailServer)

Next, create a sproc for updating:

CREATE PROCEDURE [crt].[MY_UPDATEEXTENSIONPROPERTIES]
    @TVP_EXTENSIONPROPERTIESTABLETYPE         [crt].EXTENSIONPROPERTIESTABLETYPE READONLY
AS
BEGIN
	DECLARE @nvc_DataAreaId NVARCHAR(4);
	DECLARE @recId bigint;
	DECLARE @accountNum [nvarchar](20);

	DECLARE @Col1Value int = 0;
	DECLARE @Col2Value nvarchar(100) = '';
	DECLARE @Col3Value bit = 0;
	
       SELECT DISTINCT TOP 1 @recId = tp.PARENTRECID, @nvc_DataAreaId = ct.DATAAREAID, @accountNum = ct.ACCOUNTNUM
       FROM @TVP_EXTENSIONPROPERTIESTABLETYPE tp
       JOIN [ax].CUSTTABLE ct on ct.RECID = tp.PARENTRECID
       WHERE tp.PARENTRECID <> 0
			
	SELECT @Col1Value = COALESCE(tp.PROPERTYVALUE, 0)
	FROM @TVP_EXTENSIONPROPERTIESTABLETYPE tp 
	where tp.PARENTRECID <> 0 and tp.PROPERTYNAME = 'COL1'
	
	SELECT @Col2Value = COALESCE(tp.PROPERTYVALUE, '')
	FROM @TVP_EXTENSIONPROPERTIESTABLETYPE tp 
	where tp.PARENTRECID <> 0 and tp.PROPERTYNAME = 'COL2'
	
	SELECT @Col3Value = CAST(CASE WHEN tp.PROPERTYVALUE = 'True' THEN 1 ELSE 0 END AS BIT)
	FROM @TVP_EXTENSIONPROPERTIESTABLETYPE tp 
	where tp.PARENTRECID <> 0 and tp.PROPERTYNAME = 'COL3'

	MERGE INTO [ax].[MY_CUSTOMEREXTENSION] dest
	USING (SELECT @accountNum as ACCOUNTNUM) as source on  dest.ACCOUNTNUM = source.ACCOUNTNUM
	WHEN matched then
		update set dest.COL1 = @Col1Value, dest.COL2 = @Col2Value, dest.COL3 = @Col3Value
	when not matched then
		INSERT (RECID, ACCOUNTNUM, DATAAREAID, COL1, COL2, COL3)
		VALUES (@recId, @accountNum, @nvc_DataAreaId, @Col1Value, @Col2Value, @Col3Value);
END
GO

GRANT EXECUTE ON [crt].[MY_UPDATECUSTOMEREXTENSIONPROPERTIES] TO [UsersRole];
GO

Note the MERGE INTO statement. This allows to either create or update a record.

For reading in the CRT, here especially for extension properties, use SQLPagedQuery, SQLServerDatabaseContext and ExtensionsEntity:

var query = new SqlPagedQuery(QueryResultSettings.SingleRecord)
{
    Select = new ColumnSet(new string[] { "COL1", "COL2", "COL3" }),
    From = "MY_EXTENSIONVIEW",
    Where = "ACCOUNTNUM = @accountNum AND DATAAREAID = @dataAreaId",
};

query.Parameters["@accountNum"] = customer.AccountNumber;
query.Parameters["@dataAreaId"] = request.RequestContext.GetChannelConfiguration().InventLocationDataAreaId;
using (var databaseContext = new SqlServerDatabaseContext(request))
{
    ExtensionsEntity extensions = databaseContext.ReadEntity(query).FirstOrDefault();
    if (extensions != null)
    {
        var col1 = extensions.GetProperty("COL1");
        if (col1 != null)
        {
            customer.SetProperty("COL1", col1);
        }
        else
        {
            customer.SetProperty("COL1", 0);
        }
 	 
        . . .
    }
    else
    {
        customer.SetProperty("COL1", 0);
    }
}

In order to write the data to the db, use this code to call the sproc shown above:

using (var databaseContext = new SqlServerDatabaseContext(r))
using (var transactionScope = new TransactionScope())
{
    if (!r.Customer.ExtensionProperties.IsNullOrEmpty())
    {
        ParameterSet parameters = new ParameterSet();
        parameters["@TVP_EXTENSIONPROPERTIESTABLETYPE"] = new ExtensionPropertiesTableType(r.Customer.RecordId, r.Customer.ExtensionProperties).DataTable;
        databaseContext.ExecuteStoredProcedureNonQuery("MY_UPDATEEXTENSIONPROPERTIES", parameters);
    }

    transactionScope.Complete();
}

In the case of you want to write other data to the database (no extension properties to entities), build the SqlParameters one by one and match in your sproc. For reading, it may be easier to just treat it as extension properties, then convert to whatever you want. Or you could create your own entity and query for that.

Hosting a downloaded dev VHD of Dynamics 365 for Operations

In order to save cost or time, it may be practical for partners/customers to host their own version of the VHD that is based on the official downloadable VHD by Microsoft. One scenario could be that the Contoso demo data is good enough for development, but some additional data setup, hotfix application or code customizations may be needed. These steps could be carried out once by one person, and then that VHD could be re-used. Some partners may be on a monthly cadence to “rev” their dev environments. There are two options to do this:

  1. Reuse the VHD and host it locally in HyperV or similar virtualization technologies
  2. Reuse the VHD and host it in Azure

The option 1) is straightforward and many will opt for this. There are some cases where it is useful to host in Azure though, mostly for simpler sharing of a VM or because an appropriate host for the VM is not available (i.e. laptop not powerful enough). Here is a step-by-step guide that worked for me to bring up the VHD to Azure so I can simply spin up a new instance in relatively short time:

  1. Download the VHD from https://connect.microsoft.com/ and unpack it
  2. (optional) prepare the VHD with data, binary fixes or customizations
  3. Upload the VHD to your Azure subscription. If you have not done already, you need to install the Windows Azure Sdk. If you have not done already, you need to create a management certificate for Azure on the local machine and upload it to Azure (basically this grants access to the Azure subscription). Then follow this: https://docs.microsoft.com/en-us/azure/virtual-machines/virtual-machines-windows-classic-createupload-vhd. I did not have to run sysprep on the downloaded VHD from Microsoft. I think this step is needed if you carry out step 2).
    When the steps are done, you should see the new VHD ready to be used as a template for creating new VMs.
  4. Create a new VM based on that VHD: https://docs.microsoft.com/en-us/azure/virtual-machines/virtual-machines-windows-classic-createportal?toc=%2fazure%2fvirtual-machines%2fwindows%2fclassic%2ftoc.json(optional but suggested) Update the administrator password to something else, so nobody else can hijack your VM (if they somehow had the RDP connection)

Update 3/30/2017:
I have added a PowerShell script that is ready do be executed after changing some of the variables:
UploadD365VHDUpdate5.ps1

Move POS screen layouts from one environment to another

Using the POS screen layout designer is a tedious work and very likely you would not want to do this in every environment over and over again (production, sandbox, dev, etc.). The solution to this (and similar tasks) is to use the DIXF framework to import and export entities. For this particular task of moving POS screen layouts, here are the steps to follow:

  1. Configure the data source
    1. Enter the “Data management” workspace
    2. Click on “Configure data source”
    3. Select “CSV-Unicode” and edit
    4. Set the “text qualifier” to ~ (tilde)
    5. Save the data source
  2. Export
    1. configure the data source as above
    2. Start a new export project with target data source set to “CSV-Unicode”
    3. Add the following entities:
      1. RetailImagesEntity (POS layout images)
      2. RetailButtonGridEntity (POS button grid)
      3. RetailButtonGridButtonsEntity (POS button grid buttons)
        1. Click “View map” and “Mapping details”
        2. Enable text qualifier for DisplayText and Save
      4. RetailTilllayoutEntity (POS screen layouts)
        1. follow same steps to edit “Mapping details” but enable text qualifier for all fields
      5. RetailTillLayoutZoneEntity (POS screen layout zones)
      6. RetailTillLayoutButtonGridZoneEntity (POS screen layout button grid zones)
      7. RetailTillLayoutImageZoneEntity (POS screen layout images zones)
      8. RetailTillLayoutReportZoneEntity (POS screen layout report zones)
    4. Download the package
  3. Import
    1. configure the data source as above
    2. Start a new import project and pick source data format “Package”
    3. Upload the package and import it

Auto-Installing most needed dev tools with Chocolatey

I deploy new development boxes on a fairly regular basis. And every time I do this, the same procedure follows. I install the same software so I can be more productive.

I guess this can be automated, and below is a Chocolatey script (package manager for Windows) that can be used to install most tools I need. Adjust it for your needs.  Currently, it installs these (that I need for AX7, Retail dev and troubleshooting work):

  • Notepad++
  • Adobe Reader
  • WindirStat
  • ProcessExplorer
  • ProcessMonitor
  • Putty
  • WinMerge
  • Google Chrome
  • Visual Studio Code
  • Node.JS
  • Yarn
  • Git
  • Agent Ransack
  • change windows prompt to include date and time

Download, rename to *.cmd, open a console as administrator and run it. That’s it!
WindowsChocoInstaller.cmd

Looking for AX/Retail errors in the EventLog but do not know where to look for?

One solution is to look at all EventLog entries for anything “Dynamics”. Here is how to do it:

Open the EventViewer.
Custom Views/Create new custom view.
Select Event levels you want to see.
Select the Event logs you want to see.  Here, make sure you select Applications and Services Logs/Microsoft/Dynamics
Hit OK and call it “Dynamics”.

dynamicseventlogfilter

RetailTransactionService (Real-time service) customization sample – Secure app settings

This video demonstrates how to store application settings securely and manage them in AX. These settings are needed for AX business logic and CommerceRuntime business logic. The data is fetched via a RetailTransactionServiceEx call. The CommerceRuntime service takes care of calling the RTS and caching for a configurable period.  Video also shows how to test this by exposing it via RetailServer and using the RetailServer TestClient.

Retail Sdk customization branch update

This video shows the steps involved to code merge a new Retail Sdk into your current customization branch. In this case, I am updating my AX 7 RTW Retail Sdk (with customizations) to the AX 7 Update 1 Sdk. Same steps apply if you snap to a hotfix or to another update. It is a good practice to use a mirror branch as it makes code merges much easier. The update of the mirror branch is a prerequisite for this step, and was shown in a separate video.

Retail Sdk mirror branch update

This video shows the steps involved to update your VSTS-based Retail Sdk mirror branch with a newer build. In this case, I am updating my AX 7 RTW Retail Sdk to the AX 7 Update 1 Sdk. Same steps apply if you snap to a hotfix or to another update. It is a good practice to use a mirror branch as it makes code merges much easier. The code merge (as the next step) will be shown in a separate video.

Final note: If you take the Sdk from a new development VM, it may be installed at the C:\ or J:\ drive as shown in the video. If you however take a hotfix, the Retail Sdk can be found in the ‘Code’ subfolder:

RetailSdk location in hotfix package

DIXF recurring file imports fail for data packages. What now?


Applicable to all AX7 releases.

If you are following https://ax.help.dynamics.com/en/wiki/recurring-integrations/ to setup your recurring imports, and if you are trying to use a data package with multiple entities, you may notice that the server shows a “preprocessing failure”. This is a bug. Until this is fixed, a workaround is to over-layer the ApplicationFoundation:

Create a new class:

class DMFSchedulerStatusUpdate
{
    using Microsoft.Dynamics.AX.Framework.Tools.DataManagement.Serialization;
    [DataEventHandler(tableStr(Batch), DataEventType::Updated)]
    public static void Batch_onUpdated(Common sender, DataEventArgs e)
    {
        Batch task = sender;
        if(task.Status == BatchStatus::Finished || task.Status == BatchStatus::Error && task.ClassNumber == className2Id(identifierStr(DMFImportTaskScheduler)))
        {
            container params = task.Parameters;
            DMFExecutionId executionId = conPeek(params,3);
            DMFIntegrationBridge::updateStatus_New(executionId);
        }
    }
}

Customize DMFIntegrationBridge:

public static void updateStatus_New(dmfExecutionId executionId)
{
    IntegrationActivityMessageTable messageStatusTable;
    IntegrationActivityRuntimeExecutionTable runtimeExecutionTable;
    select firstonly messageStatusTable
    join 
    runtimeExecutionTable where runtimeExecutionTable.ExecutionId == executionId && 
    runtimeExecutionTable.MessageIdentifier == messageStatusTable.MessageId;

    DMFIntegrationBridge bridge = new DMFIntegrationBridge();
    ActivityMessageContext ActivityMessageContext = new ActivityMessageContext();
    ActivityMessageContext.MessageId = guid2Str(messageStatusTable.MessageId);
    ActivityMessageContext.ExecutionCorrelationId = str2Guid(messageStatusTable.ExternalCorrelationId);
    // Get status for bridge result
    IntegrationBridgeResults bridgeResult = DMFIntegrationBridgeHelper::GetStateOfExecution(executionId, false);
    // Set post processing state
    bridge.postProcessMessage(ActivityMessageContext, executionId, bridgeResult);
}


DIXF recurring file downloads must be forced to be HTTPS


Applicable to all AX7 releases.

If you are following https://ax.help.dynamics.com/en/wiki/recurring-integrations/ to setup your recurring exports, you may notice that the download URL that the dequeue call returns is wrong. This may be caused by the load balancer in a production environment. In any case, the client code that fetches the data can use simple code to solve the issue.  In C#, it would look like this:

var newDownloadLocation = new UriBuilder(dataMessage.DownloadLocation)
{
    Scheme = Uri.UriSchemeHttps,
    Port = -1,
};

Once the download URL is “fixed up”, download with a normal GET request.

Update your Retail Sdk to add payment packaging and deployment support (AX 7 RTW and Update 1)

Update 8/8/2016: Hotfix to Update 1 is now available: “KB 3183058: Retail Sdk update for packaging and deployment of payment files.”. If you can update, that is recommended, if you cannot, this article still applies.

The steps below allow you to update some files in your Retail Sdk so that payment packages can be built as well.  The same code changes as in this zip package will be released as part of Update 2 and possibly even as a hotfix to Update 1.

Benefits

The update allows you to generate all packages with all payment files (payment device assemblies, payment connector assemblies, and payment web files) embedded. All you would need to do is to get the payment files from the 3rd party, place them into the 3 locations dedicated for them and build. Whether built manually on command line or via VSTS automated build, the packages would include the files correctly.
Furthermore, the deployment of these packages will place the file in the correct locations. The packages that include these files are RetailServer, ModermPOS, ModernPOSOffline, CloudPOS, HardwareStation and AOS. The developer is not needed to know where the files need to be deployed too.

One-time setup steps

  1. Make sure you do not have any open files in your current VSTS client. If you do, look at RetailSdk-PaymentIncremental.zip and make sure at least these files are not in edit mode.
  2. Take the RetailSdk-PaymentIncremental.zip (link is below) and unpack it into the Retail Sdk customization branch (Note: At a future date, these changes will come through an update, at that point a simple code merge will have to be done). Make sure that the top folders of the zip file are being copied into the root of the Retail Sdk ($RetailSdk).
    SdkPaymentPackagingZipContents
  3. In Visual Studio, look at the changes and make sure no customizations (to the same files) were overwritten. If they were, merge the files rather than just copy them in. However, the chances are high none of these files were customized.
  4. Add the payment files from the 3rd party vendor to the Sdk, under the PaymentExternals folder. You should have gotten 3 different folders, and these should be matching the new Sdk folders.
  5. Do a local verification build. Open a Visual Studio 2015 Developer command window and issue a “msbuild /v:Rebuild” from the top of the Retail Sdk.
  6. If it built successfully, this part is done.

Verification

  1. After doing the build, verify that $RetailSdk\Packages\AosPaymentsPackage\content.folder\AOSService\Code\WebArtifacts has the files from the $RetailSdk\PaymentExternals\PaymentWebFiles folder.
  2. Verify, that $RetailSdk\Packages\AosPaymentsPackage\content.folder\AOSService\Code\Assemblies has the files from $RetailSdk\PaymentExternals\IPaymentProcessorAssemblies
  3. Verify that $RetailSdk\Packages\ModernPOS\bin\Debug\content.folder\CustomizedFiles\ClientBroker has the files from $RetailSdk\PaymentExternals\IPaymentDeviceAssemblies.
  4. Deploy the packages via runbook and verify functionality (on development or sandbox environment).
  5. If there are any issues with the payment assemblies themselves (not with packaging or deployment), contact the party that released the files
  6. Once everything worked (one-time steps and verification with payment files and deployment), submit the changes from the zip file plus the payment files to your VSTS.

Deployment

There is no difference for deployment of the existing packages. One thing to note is that the new package AOSPaymentPackage must be installed by itself and last.  The deployment for production environments is exactly the same (via DSE if Microsoft-hosted). The AosPaymentPackage must be installed last.


RetailSdk-PaymentIncremental-RTWandUpdate1