Overriding CommerceRuntime tax calculation with a 3rd party implementation


Note: Implemented with Dynamics 365 version 7.2.* (but likely working fine with lower or higher versions). Sample code can be downloaded at the end of this blog.

This information explains how to override tax calculation in the CRT in Dynamics 365 for Operations (and similar products). This is a simple example how integrate the calls to external tax providers and how to embed the returned values back into the CRT. The code is of non-production quality; its main purpose is to show the concepts only.

High-level overview

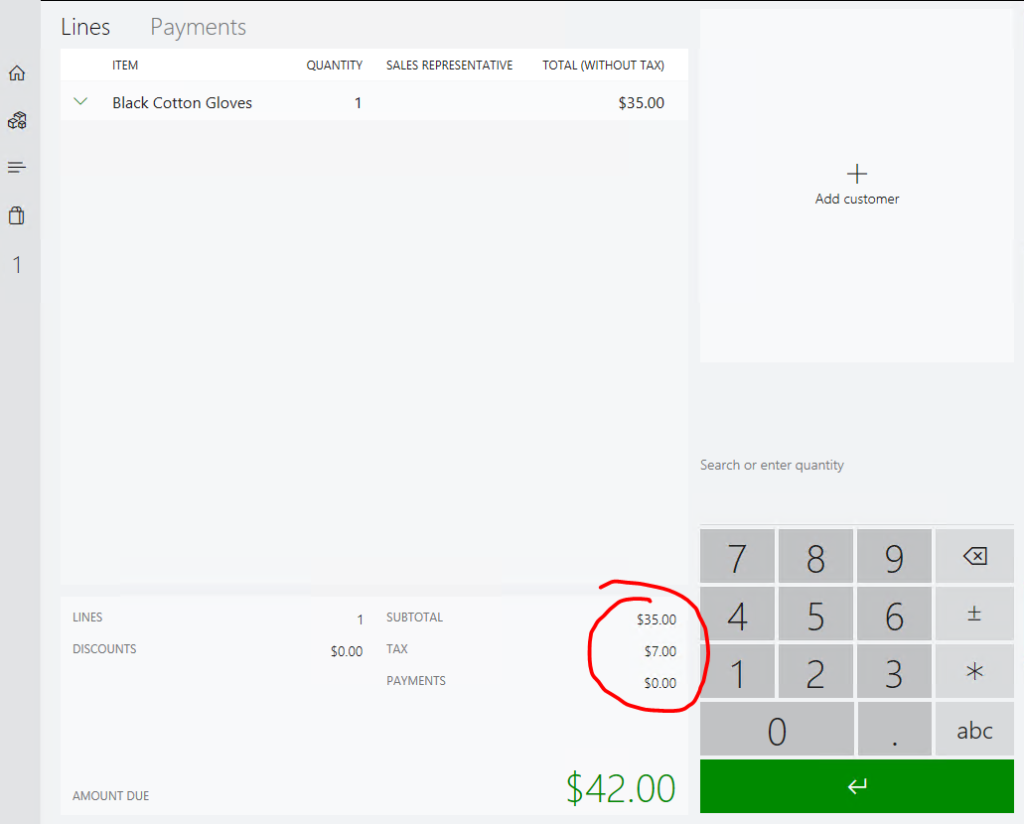
In this example, I demonstrate how to short-circuit any CRT tax calculations (by implementing my own IRequestHandler) and forward the individual line items on the cart in one large payload to a call to an external system. The external system will calculate a 20% tax rate on each item (a simplification). Our new implementation of the tax service will then take the return values and save the information on the transaction as it is expected by the CRT and CDX frameworks.

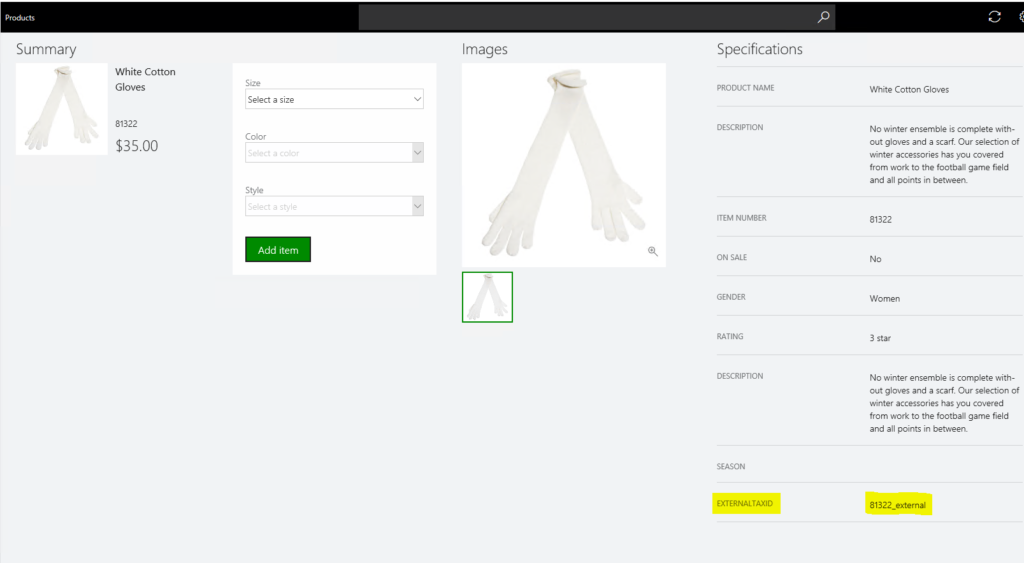
The identifier of the product in the external system is modelled to be different from ItemId or ProductId in Dynamics. Here, I showcase the use of the product attribute framework to add an attribute called “ExternalTaxId”. As part of the newly implemented code, we must fetch the value of this attribute and forward it to the external provider. As an optimization, the fetching of this attribute is cached. This should help with limiting the number of calls to a minimum (per IIS process). There are other approaches that could be taken, but this seemed to be the simplest.

Finally, imagine that we have “additional” data coming from the external tax provider to be saved per sales tax line and to be brought back to Dynamics HQ. This shows the use of a table extension in X++, an extension table in the channel database and the inclusion of this data in the transaction upload job (P-job).
When all work is finished, we will see the 20% tax rate in the POS clients:

After running the P-0001 job, we can also see the data in AX:

Details

There are 3 tax-related CRT request handlers that can be overridden for tax-related purposes.

  • CalculateTaxServiceRequest: Re-calculates taxes for individual items and whole transaction
  • AssignTaxCodesServiceRequest: Fetches and assigns sales tax codes. Since we do not calculate the taxes locally, this is not really needed. However, there is no negative impact to just leave that code untouched.
  • PopulateTaxRatesRequest: Since we will override CalculateTaxServiceRequest, there is no need for this handler. We will just provide with our own empty implementation.

In the overridden CalculateTaxServiceRequest, we carry out these steps:

  • Use the passed in SalesTransaction, loop through all active sales line items and get the external product id (from the product attributes). For the steps how to setup product attributes see this blog post
  • cache the external product id for later calls (see blog post for more detailed discussion)
  • pass the sales line information and external product id to the external tax service
  • dummy tax service returns a single tax code per sales line item with 20% tax and some other string value that must be stored on the tax line
  • the CRT tax service builds the right data structure with tax lines and calculates final total taxes
  • CRT tax service adds additional string value as Extension property on each tax line
  • CRT tax service returns the SalesTransaction

In addition, we need to hook into the transaction save process. Therefore, we implement the SaveSalesTransactionDataRequest post trigger. More details in this blog post.

The full source code can be found Extensions.MyTaxServiceBlog

Extending a transactional Retail Channel table with additional data (HQ X++ table extension, CDX, extension table, CRT data service)


Note: Implemented with Dynamics 365 version 7.2.11792.62628, or App Update 4 (may not work with lower versions). Sample code can be downloaded at the end of this blog.

A frequent customization need is to store more transactional data in the channel database in order to synchronize it back to HQ. There is a list of tables that holds these data, i.e. RetailTransactionTable, RetailTransactionSalesTrans, RetailTransactionTaxTrans tables, and a few others.

In this example, I am going to show how to extend the RetailTransactionTaxTrans table, how to write to it from a CRT data service, how to create a view to sync it back to AX and how to configure CDX. The single string that the tax line is extended with, is being passed in by means of an CRT Extension property. This sample is part of a larger sample to override the CRT’s tax calculation.

Lets work on the pieces from bottom up to the top.

HQ table extension (X++)

Build an X++ table extension for the table RetailTransactionTaxTrans by use of the AOT and Visual Studio. Before you do that, create a new Dynamics 365 package and model. In the screenshot below you can see I created a package called “Extensibility” and a model called “Extensibility” and added a new string column called ADDLSTRING1.
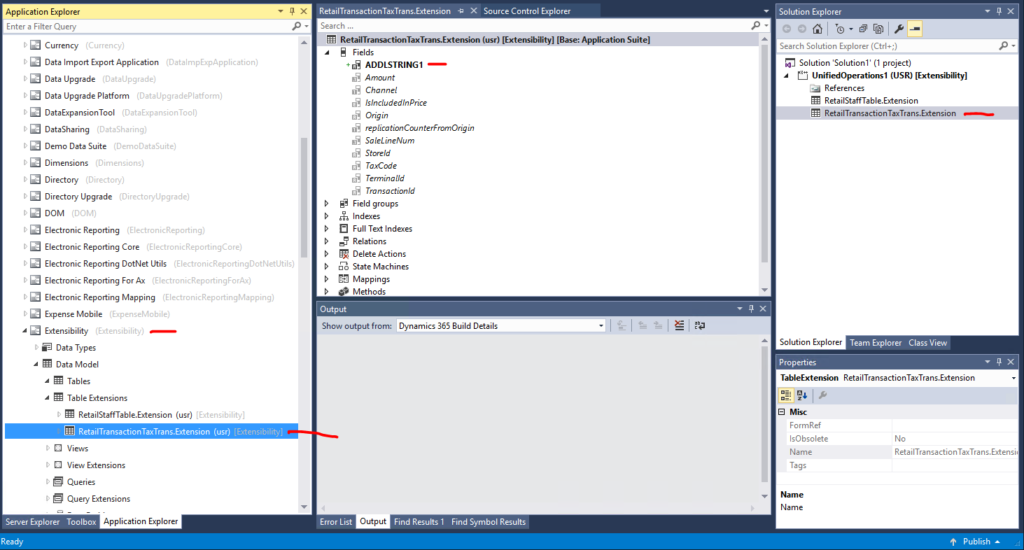
Make sure to build and db sync, and when all looks good to add the new package to VSTS.

Channel database extension (SQL)

Since we want to get the data from the channel to the HQ, we must store it initially in the channel (or even in the ModernPOSOffline db). In order to do that, we must develop some SQL for the channel database.

The new way for doing this is to create any new SQL on the db schema “[ext]” and NOT in any preexisting schemas, i.e. [ax], [dbo], [crt]. At this point you can reference Microsoft’s schemas, but we careful to not take too many dependencies. SQL objects cannot be considered a real interface, so the more assumptions your SQL makes on Microsoft’s SQL, the higher the probability you may need to fix something someday when taking an update. In the SQL I show here, you will see that all the new SQL objects live in the [ext] schema.

New table

We need to store the new column in a new table. Since, in this sample we want to store one more string value, we must at least have this new column in the table, plus all the other columns that allow us to reference the corresponding record in the original table (base table). The correct approach is to add all PK columns from the original table to the new table as well. In addition, it is a good practice (but not required) to add columns for creation and modification time.
Also, make sure that the PK on the new table is the same as on the original one. This is needed so CDX can find the data correctly.
Lastly, we need to provide CRUD privileges on the table to the DataSyncUsersRole (CDX) and insert privileges to the UsersRole (CRT process).

    CREATE TABLE [ext].[RETAILTRANSACTIONTAXTRANS](
		[CHANNEL] [bigint] NOT NULL,
		[SALELINENUM] [numeric](32, 16) NOT NULL,
		[STOREID] [nvarchar](10) NOT NULL,
		[TAXCODE] [nvarchar](10) NOT NULL,
		[TERMINALID] [nvarchar](10) NOT NULL,
		[TRANSACTIONID] [nvarchar](44) NOT NULL,
		[DATAAREAID] [nvarchar](4) NOT NULL,
		[CREATEDDATETIME] [datetime] NOT NULL,
		[MODIFIEDDATETIME] [datetime] NOT NULL,
		[ROWVERSION] [timestamp] NOT NULL,
		[ADDLSTRING1] [nvarchar](200) NOT NULL DEFAULT (''),
		 CONSTRAINT [I_EXT_RETAILTRANSACTIONTAXTRANS_PK] PRIMARY KEY NONCLUSTERED 
		(
			[CHANNEL] ASC,
			[TERMINALID] ASC,
			[STOREID] ASC,
			[TRANSACTIONID] ASC,
			[SALELINENUM] ASC,
			[TAXCODE] ASC,
			[DATAAREAID] ASC
		)WITH (PAD_INDEX = OFF, STATISTICS_NORECOMPUTE = OFF, IGNORE_DUP_KEY = OFF, ALLOW_ROW_LOCKS = ON, ALLOW_PAGE_LOCKS = ON) ON [PRIMARY]
		) ON [PRIMARY]

END
GO

GRANT SELECT,INSERT,UPDATE,DELETE ON [ext].[RETAILTRANSACTIONTAXTRANS] TO [DataSyncUsersRole]
GRANT INSERT ON [ext].[RETAILTRANSACTIONTAXTRANS] TO [UsersRole]
GO

New view

Consider that the view should represent the exact same columns as the original table before, plus the new column. As explained already above, we have the same PK on both tables, so we will use these to LEFT JOIN the two.
Grant the priviledge to SELECT by the DataSyncUsersRole (CDX).

CREATE VIEW [ext].[RETAILTRANSACTIONTAXTRANSEXTVIEW] AS
(
	SELECT
	tt.[AMOUNT],
	tt.[CHANNEL],
	tt.[ISINCLUDEDINPRICE],
	tt.[REPLICATIONCOUNTERFROMORIGIN],
	tt.[SALELINENUM],
	tt.[STOREID],
	tt.[TAXCODE],
	tt.[TERMINALID],
	tt.[TRANSACTIONID],
	tt.[DATAAREAID],
	tt.[ROWVERSION],
	exttt.[ADDLSTRING1],
	exttt.MODIFIEDDATETIME,
	exttt.CREATEDDATETIME
	 from [ax].RetailTransactionTaxTrans tt
	LEFT JOIN [ext].[RETAILTRANSACTIONTAXTRANS] exttt
	ON 
		tt.[CHANNEL] = exttt.[CHANNEL] AND
		tt.[TERMINALID] = exttt.[TERMINALID] AND
		tt.[STOREID] = exttt.[STOREID] AND
		tt.[TRANSACTIONID] = exttt.[TRANSACTIONID] AND
		tt.[SALELINENUM] = exttt.[SALELINENUM] AND
		tt.[TAXCODE] = exttt.[TAXCODE] AND
		tt.[DATAAREAID] = exttt.[DATAAREAID]
)
GO
GRANT SELECT ON [ext].[RETAILTRANSACTIONTAXTRANSEXTVIEW] TO [DataSyncUsersRole]
GO

New table type (TVP)

A table value type is a convenient way to “pass around a data table”. Eventually, we want to call a stored procedure and pass in a whole data table in order to be more efficient. An alternative would be to just pass in the individual parameters for each column and call the stored procedure multiple times. In this sample, since we want to create tax lines, we will create usually a few rows in one call (5 sales items with 2 different tax codes each would produce 10 rows). I created the TVP by copying the original one, and expanded it with the new column.

CREATE TYPE [crt].[EXTRETAILTRANSACTIONTAXTRANSTABLETYPE] AS TABLE(
	[DATAAREAID] [nvarchar](4) NULL,
	[SALELINENUM] [numeric](32, 16) NULL,
	[STOREID] [nvarchar](10) NULL,
	[TAXCODE] [nvarchar](10) NULL,
	[TERMINALID] [nvarchar](10) NULL,
	[TRANSACTIONID] [nvarchar](44) NULL,
	[ADDLSTRING1] [nvarchar](200) NOT NULL)
GO
GRANT EXECUTE ON TYPE::[crt].[EXTRETAILTRANSACTIONTAXTRANSTABLETYPE] TO [UsersRole];
GO

New stored procedure (sproc)

The sproc will get supplied by the TVP and the channel Id. This sproc will be called by our CRT data service below.

CREATE PROCEDURE [ext].[INSERTRETAILTRANSACTIONTAXTRANS]
			   (@bi_ChannelId		bigint,
			   @tvp_ExtRetailTransactionTaxTrans		[crt].[EXTRETAILTRANSACTIONTAXTRANSTABLETYPE] READONLY)
AS
BEGIN
...

CRT data service to write to the new table

Each CRT service (for data or other purposes) requires a Request class. In this example, we want to store additional tax line data from the transaction. So we can pass the SalesTransaction instance to our service via the Request.

public sealed class InsertTaxTransExtensionDataRequest : DataRequest
{
    public InsertTaxTransExtensionDataRequest(SalesTransaction transaction)
    {
        this.Transaction = transaction;
    }

    [DataMember]
    [Required]
    public SalesTransaction Transaction { get; private set; }
}

The data service must find the data we want to store and build a DataTable with multiple DataRows that corresponds to the TVP in SQL. Make sure the columns are in the same order. Then we use the DatabaseContext class to make the call to the sproc, by passing in the expected parameters.

using (DataTable taxTable = new DataTable("EXTRETAILTRANSACTIONTAXTRANSTABLETYPE"))
{
    taxTable.Columns.Add(DataAreaIdColumn, typeof(string)).DefaultValue = string.Empty;
    taxTable.Columns.Add(SaleLineNumColumn, typeof(decimal)).DefaultValue = 0m;
    taxTable.Columns.Add(StoreIdColumn, typeof(string)).DefaultValue = string.Empty;
    taxTable.Columns.Add(TaxCodeColumn, typeof(string)).DefaultValue = string.Empty;
    taxTable.Columns.Add(TerminalIdColumn, typeof(string)).DefaultValue = string.Empty;
    taxTable.Columns.Add(TransactionIdColumn, typeof(string)).DefaultValue = string.Empty;
    taxTable.Columns.Add(ADDLSTRING1Column, typeof(string)).DefaultValue = string.Empty;

    foreach (var line in tx.ActiveSalesLines)
    {
        foreach (var taxItem in line.TaxLines)
        {
            DataRow row = taxTable.NewRow();
            row[DataAreaIdColumn] = request.RequestContext.GetChannelConfiguration().InventLocationDataAreaId;
            row[SaleLineNumColumn] = line.LineNumber;
            row[StoreIdColumn] = tx.StoreId;
            row[TaxCodeColumn] = taxItem.TaxCode;
            row[TerminalIdColumn] = tx.TerminalId;
            row[TransactionIdColumn] = tx.Id;
            object oAddlString = taxItem.GetProperty("AdditionalString1");
            string addlString = string.Empty;
            if (oAddlString != null)
            {
                addlString = (string)oAddlString;
            }

            row[ADDLSTRING1Column] = addlString;
            taxTable.Rows.Add(row);
        }
    }

    ParameterSet parameters = new ParameterSet();
    parameters[ChannelIdVariableName] = request.RequestContext.GetPrincipal().ChannelId;
    parameters[TVPVariableName] = taxTable;

    int errorCode;
    using (var databaseContext = new SqlServerDatabaseContext(request))
    {
        errorCode = databaseContext.ExecuteStoredProcedureNonQuery("[ext].INSERTRETAILTRANSACTIONTAXTRANS", parameters);
    }

Finally, register this CRT data service with the CRT, in the commerceruntime.ext.config (RS) and the commerceruntime.ext.offline.config (MPOS offline).

Implement trigger in the appropriate place to call CRT data service

For our use case, it is perfect to piggy-bag onto the SaveSalesTransactionDataRequest CRT request and provided an implementation for a post-trigger to call our new data service. In that trigger, we initialize the request to our new data service and let the CRT take care of routing the call.

class SaveSalesTransactionDataRequestTrigger : IRequestTrigger
{
    public IEnumerable SupportedRequestTypes
    {
        get
        {
            return new[] { typeof(SaveSalesTransactionDataRequest) };
        }
    }

    public void OnExecuted(Request request, Response response)
    {
        ThrowIf.Null(request, "request");
        ThrowIf.Null(response, "response");

        var newRequest = new InsertTaxTransExtensionDataRequest(((SaveSalesTransactionDataRequest)request).SalesTransaction);
        request.RequestContext.Execute(newRequest);
    }

    public void OnExecuting(Request request)
    {
    }
}

Do not forget to register the trigger in the commerceruntime.ext.config (RS) and the commerceruntime.ext.offline.config (MPOS offline), similarly as shown above.

Configure CDX

New AX7 schema table

Create a new AX7 schema table called “ext.RetailTransactionTaxTransEXTView” in the “Retail Channel schema” page for AX7 schema. Make sure the same columns are used as in the original table called “ax.RETAILTRANSACTIONTAXTRANS”, plus the new ADDLSTRING1 column.
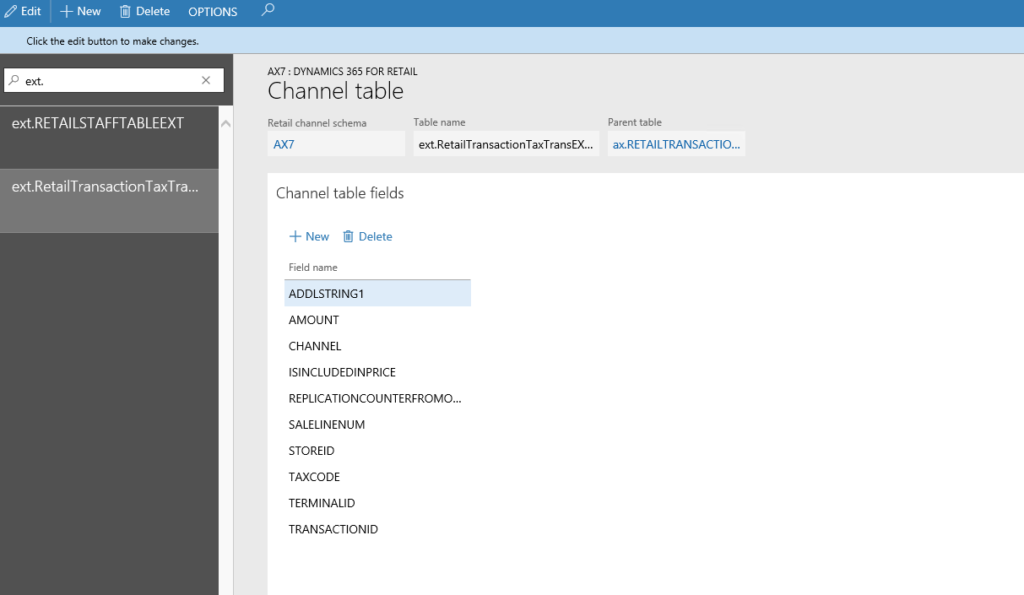
Switch scheduler subjob to use view instead of original table

In “Scheduler subjobs” find the job subjob called “RetailTransactionTaxTrans” and change it table to the newly created one and add the one new column.
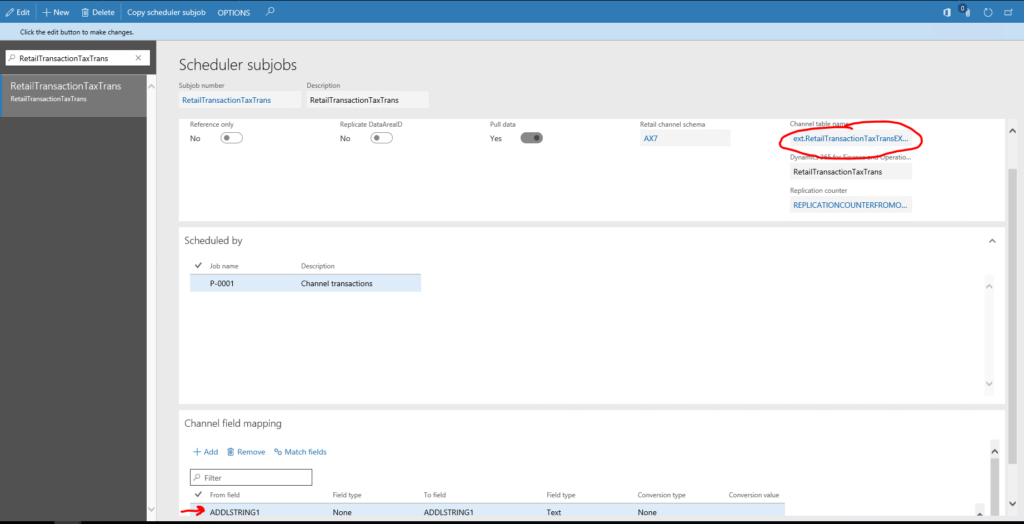
Finally, use the “Generate queries” in the “Retail channel schema” to initialize CDX.

Resource file to automatically configure CDX after deployment

Brand new feature, to be continued at a future time…

Testing

Run through your scenario in your POS client to save a transaction. Then look in the database before and after to see that the extension table gets populated and synced with the P-0001 job.
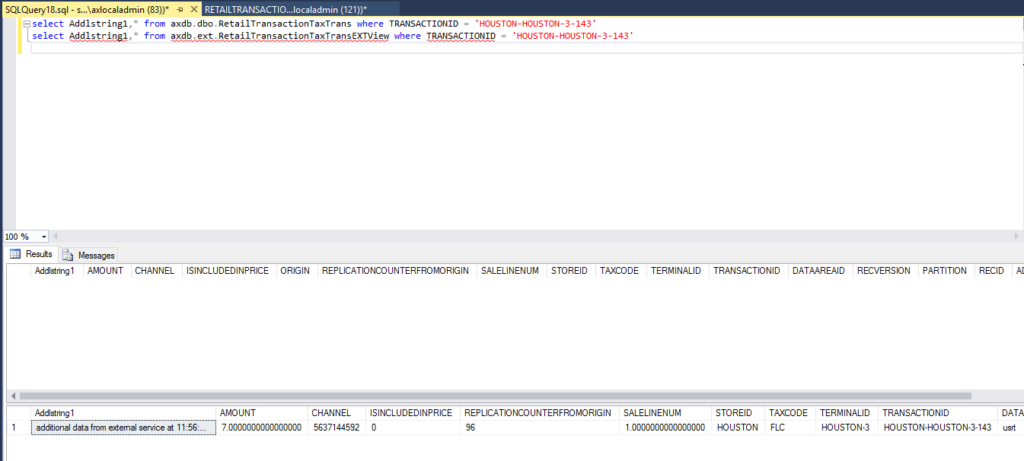
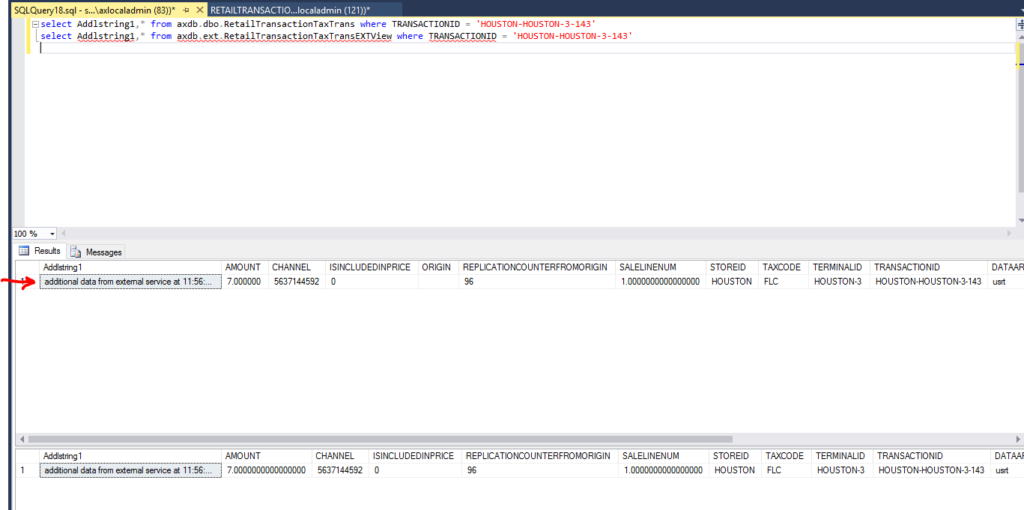
Extensions.MyTaxTransExtensionDataServiceBlog
Simple local caching CommerceRuntime service (LocalCacheService)


Note: This can be implemented with any Dynamics 365 or older CommerceRuntime versions. Sample code can be downloaded at the end of this blog.

In some extensibility scenarios it may be useful to cache data in CRT memory. It could be data that may need to be frequently reused and does not change often, especially, if it may be expensive to calculate the data or fetch the data from the database. There are multiple examples for cases when we may need such a service.

One example could be pieces of secure information from HQ (AX) that we do not want to store in the channel database (i.e. SecureAppSettings sample).

Another example may be the fetching of product attributes in multiple extension dlls. In some places we have the attribute values already available, in others we do not, so it would have to be re-queried (i.e. SimpleProduct).  One could off course extend the CRT further to pass the queried product attribute down to where we need it later (via extension properties), but I have found it may be sometimes more trouble than it is worth. Even further, if we have multiple RetailServer requests involved, extension properties are not automatically persisted, so we would have to find another place to save this state.

In these and other examples, a simple cache makes the coding simpler.  Just make sure the data that get cached does not change very frequently. One thing to note is that this cache lives in the memory of the host of the CRT (RetailServer or MPOSOffline), so in a production environment there will be multiple cache instances, one for each host process. In many cases, this may not really matter much. In other cases, it may be better to use a distributed cache instead (topic for a future blog).

This simple local cache solution is based on the .NET MemoryCache object.  No SQL is needed. A client can use a single line to fetch (try to fetch) the data with this code:

var getFromCacheRequest = new GetFromLocalCacheRequest(cacheKeyExternalProductTaxId);
object cachedValueExternalProductTaxId = context.Runtime.Execute(getFromCacheRequest, context).Value;
if (cachedValueExternalProductTaxId != null)
{
   // 
}

and can push a new item onto the cache with this code:

//cache productId to externalProductTaxId mapping for 30 min
var saveToCacheRequest = new SaveToLocalCacheRequest(cacheKeyExternalProductTaxId, externalProductTaxId, 30 * 60);
context.Runtime.Execute(saveToCacheRequest, context);

The LocalCacheService implements as usual for CRT services the IREquestHandler. Below is some of the crucial code for reference. In case you want to look at all the code (or reuse it in some of your projects), download the zipped up version below.

public Response Execute(Request request)
{
    Type requestType = request.GetType();
    Response response;
    if (requestType == typeof(GetFromLocalCacheRequest))
    {
        var cacheKey = ((GetFromLocalCacheRequest)request).Key;
        var cacheValue = cache.Get(cacheKey);
        string logMessage = string.Empty;
        if (cacheValue != null)
        {
            logMessage = "GetFromLocalCacheRequest successfully fetched item from cache for key '{0}'.";
        }
        else
        {
            logMessage = "GetFromLocalCacheRequest could not find item in cache for key '{0}'.";
        }

        RetailLogger.Log.ExtendedInformationalEvent(logMessage, cacheKey);
        response = new GetFromLocalCacheResponse(cacheValue);
    }
    else if (requestType == typeof(SaveToLocalCacheRequest))
    {
        var cacheKey = ((SaveToLocalCacheRequest)request).Key;
        var cacheValue = ((SaveToLocalCacheRequest)request).Value;
        var cacheLifeInSeconds = ((SaveToLocalCacheRequest)request).CacheLifeInSeconds;
        cache.Set(cacheKey, cacheValue, DateTimeOffset.Now.AddSeconds(cacheLifeInSeconds));
        RetailLogger.Log.ExtendedInformationalEvent("SaveToLocalCacheRequest saved item for key '{0}'", cacheKey);
        response = new NullResponse();
    }
    else
    {
        throw new NotSupportedException(string.Format(CultureInfo.InvariantCulture, "Request '{0}' is not supported.", request.GetType()));
    }

    return response;
}

Extensions.MyLocalCacheServiceBlog

Product attribute usage in the channel


Note: Implemented with Dynamics 365 version 7.2.* (but likely working fine with lower or higher versions). Sample code can be downloaded at the end of this blog.

This information explains how to setup product attributes in Dynamics 365 for Operations (and similar products) and use it in code in the channel (in a CRT service).

Before we can see any new values in POS or write code against, there are some setup steps needed.

Setup

Adding a new product attribute

Steps for adding a new product attribute (e.g.: ExternalTaxId) to a category of products (e.g: Gloves and Scarves in fashion hierarchy) to the Houston channel:

  1. Create a new type under “Attribute type” (e.g.: ExternalTaxId)
  2. Create a new attribute (e.g: ExternalTaxId) under “Attributes” with the attribute type created in #1. In this same form, make sure to open the Filter settings and save it once, even if you are not making any changes
  3. Add the created attribute to a new attribute group under “Attribute groups” (e.g.: ExternalTaxId)
  4. Go to “Channel navigation categories” and select the navigation hierarchy (fashion navigation hierarchy) for the specific category (Gloves and Scarves). Under “product attribute groups” tab, add the new attribute GROUP.
  5. Go to “Channel categories and product attributes”. Set attribute metadata for channel = Houston. Find the attribute (season) and set Include attribute to yes and save.
  6. Publish channel updates on same form.

Saving values for product attributes

Browse to a product that is in the same category for which we added the new attributes (Products by category) and use “Setup/Product attributes” to save values.

Update the channel with changes

Go to distribution schedule and run the distribution jobs 1040, 1070,1150

Usage

You could now use MPOS for the respective channel to view the new value:

If you wanted to use CRT code, you can simply query for the attribute:

var channelId = context.Runtime.CurrentPrincipal.ChannelId;
int catalogId = 0;
var settings = QueryResultSettings.AllRecords;
var request = new GetProductAttributeValuesServiceRequest(channelId, catalogId, productId, settings);
var response = context.Runtime.Execute(request, context);
var externalProductTaxIdAttributeValue = response.AttributeValues.FirstOrDefault(av => av.Name == "ExternalTaxId");

if (externalProductTaxIdAttributeValue != null)
{
    externalTaxId = externalProductTaxIdAttributeValue.TextValue;
}

Inquiring version information of a Dynamics 365 for Finance and Operations deployment

There are two ways to find out the version information. Either use LCS or look at individual files on the box (in case the VM is not hosted on LCS).

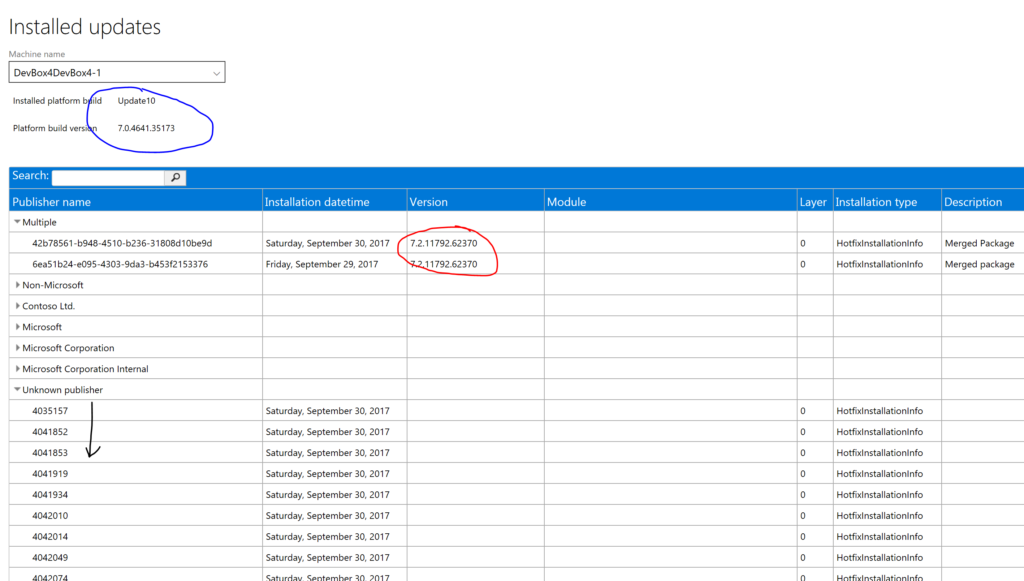
In the LCS case, browse to the environment in question and follow the “View detailed version information” link. The following information will be available:

    • Platform update version (blue)
    • Binary hotfixes (red)
    • Application/X++ hotfixes (black)

    • Microsoft modules versions (incl. Retail)

    • custom modules versions