Optimize a D365F&O development VM for both performance and cost

Overview

A typical D365 Finance and Operations implementation project usually requires multiple tier-1s developer environments. Each developer needs her own and they are also often used for prototyping, testing, and housing golden configurations. The accumulated cost can be pretty substantial. On the other hand, users often complain that the performance of the default-sized VMs is not great and try to increase the size for better experience.

Cost and performance are hard to get a handle on together. To put it simply, it seems to be an either-or situation. I have asked myself how an optimum can be found. Personally, I would define the optimum to be a very fast user experience when I use the VM at a very small additional cost. I use two approaches that help me. Since I noticed that many struggle with the same issue, I am sharing the two things I do to manage it. However, note that it is a requirement to have administrative privileges for the VM in the Azure portal.

Set up a daily Auto-Shutdown

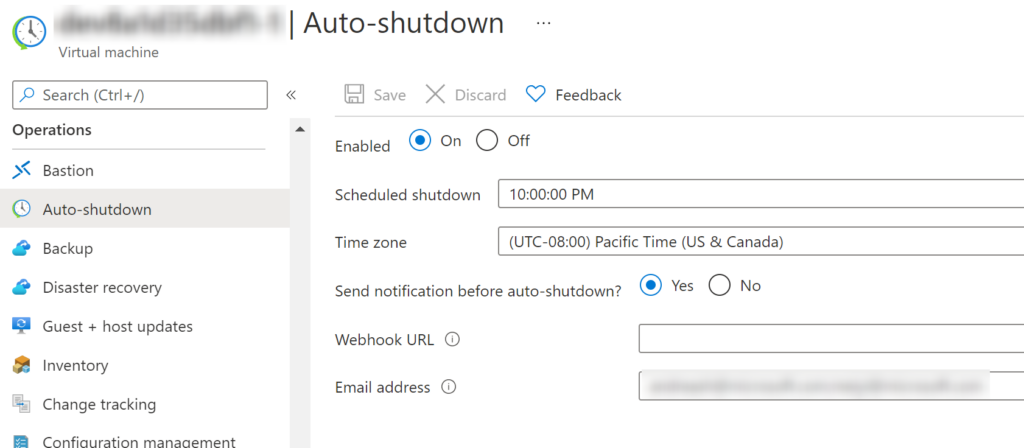
I setup the VM to be shut down automatically every night. I get an email about it 30 mins in advance so I could change my mind in case I am still using the VM. It’s a way to keep the running time of the VM down, in case I forget to shut it down manually. With that setting, the VM has to be explicitly started again, so often I have the VM off for a few days which saves cost. Below is the setting in the Azure portal.

I usually start and stop my VMs manually.

Scale VM and disk sizes up and down

Consider the time a VM is actually running versus when it is stopped (when you do not need it). In my case, the running time is a small percentage. Because of that, I can justify scaling up the sizing at additional cost for the few times I use it.

There is a lot of public documentation about VM sizes and disk sizes and what workloads are better for some than others. I am not repeating this here, but just want to share my approach. I encourage you to experiment and share your comments.

Important note: The disk sizes incur cost even when the VM is stopped. It is not enough to stop a VM, it must be also scaled down. Make sure to understand this!

My Low-cost config for a stopped VM (cheap)

VM size (VM/Settings/Size): Standard B8ms (8 vcpus, 32 GiB memory)

Disk size for all disks (each disk/Settings/Size + performance): Standard HDD LRS

My High-performance config for a started vm (very fast)

VM size (VM/Settings/Size): Standard DS13_v2 (8 vcpus, 56 GiB memory)

Disk size for all disks (each disk/Settings/Size + performance): Premium SSD LRS

Powershell scripts to scale up and down

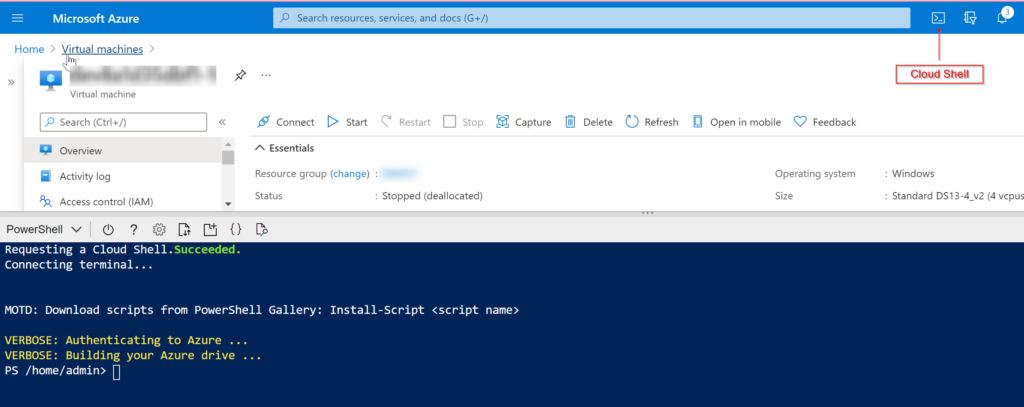
I am sharing 2 scripts that take care of the scaling. You can run them right in the Azure portal’s Cloud Shell. Just configure your resource group name and VM name, save the scripts and upload them to the Cloud Shell’s home directory.

When I want to use the VM, I run the scale up script and when the script finished, the VM is started.

When I am done using the VM, I run the scale down script (which also stops the VM).

Scale up script
# start config
$rgName = '****'
$vmName = '****'
# end config


$dataDiskStorageType = 'Premium_LRS'
$vmSize = 'Standard_DS13_v2'

cls
Write-Host 'Scaling up VM ' $vm.Name
Stop-AzVM -ResourceGroupName $rgName -Name $vmName -Force
$vm = Get-AzVM -Name $vmName -resourceGroupName $rgName
$vm.HardwareProfile.VmSize = $vmSize

foreach($dataDiskStorageProfile in $vm.StorageProfile.DataDisks)
{
    Set-AzVMDataDisk -VM $vm -Name $dataDiskStorageProfile.Name -Caching ReadWrite
}

Update-AzVM -VM $vm -ResourceGroupName $rgName

$currentFoundDisk = $null
foreach ($disk in Get-AzDisk -ResourceGroupName $rgName )
{
    if($disk.ManagedBy -eq $vm.Id)
    {
        $currentFoundDisk = $disk
        Write-Host 'found disk' $disk.Name
        $diskUpdateConfig = New-AzDiskUpdateConfig –AccountType $dataDiskStorageType
        Update-AzDisk -DiskUpdate $diskUpdateConfig -ResourceGroupName $rgName -DiskName $disk.Name
    }
}

Start-AzVM -ResourceGroupName $rgName -Name $vmName
Scale down script
# start config
$rgName = '***'
$vmName = '***'
# end config

$dataDiskStorageType = 'Standard_LRS'
$vmSize = 'Standard_B8ms'

cls
Write-Host 'Scaling down VM ' $vm.Name
Stop-AzVM -ResourceGroupName $rgName -Name $vmName -Force
$vm = Get-AzVM -Name $vmName -resourceGroupName $rgName
$vm.HardwareProfile.VmSize = $vmSize
Update-AzVM -VM $vm -ResourceGroupName $rgName

$currentFoundDisk = $null
foreach ($disk in Get-AzDisk -ResourceGroupName $rgName )
{
    if($disk.ManagedBy -eq $vm.Id)
    {
        $currentFoundDisk = $disk
        Write-Host 'found disk ' $disk.Name
        $diskUpdateConfig = New-AzDiskUpdateConfig –AccountType $dataDiskStorageType
        Update-AzDisk -DiskUpdate $diskUpdateConfig -ResourceGroupName $rgName -DiskName $disk.Name
    }
}


Boost your productivity: Use Dynamics 365 F&O live tiles and dashboards

Are there a few F&O forms that you use over and over again as part of you role in your business? Maybe to check on batch job status? Or Commerce CDX sync job failures? Or to check on available inventory counts in the warehouses?

If you carry out these or similar steps on a regular basis, you will realize that you keep doing the exact same clicks, and quite a few clicks, in order to get to the form as you need it. You have to get to the form, possibly adjust filtering and change sorting…

Do yourself a favor and use live tiles to your advantage. A live tile is a quick link to the form of your choice including filtering and sorting stored as part of the tile. Even better, it will show you a quick count of rows right on the tile. If you add a few live tiles onto a dashboard, you can then quickly build your own simple dashboard. Here is a sample dashboard I built.

How do you create a dashboard like this? Follow the steps:

  1. Create a new workspace. I called it my Health dashboard.
  1. As an example I will use the “Download sessions” form. Edit the filters and apply the specific filter criteria that gets your job done. Consult the documentation about Advanced filtering query syntax for more details and examples.
  1. Click options, Add to Workspace, pick your workspace you created earlier. Configure it as a tile, name it appropriately and choose whether you want to show the count. Then hit OK.
  1. Clone this query by using the tile to navigate to the form and make some changes. If you wanted to just change the timeframe, make that small query adjustment, and add another live tile to the workspace.
  1. Build other queries for other well visited forms.
Query for failed batch jobs

All done. Now you can go to the dashboard and see immediately if there is something you need to take care right away. Or you can just use the tiles as quick entry points to where you need to go…

Thanks for listening,
Andreas

Productivity: Logging into multiple Cloud Point Of Sale terminals and eCommerce accounts from the same computer

If you are like me, you sometimes need to quickly activate a new
Dynamics Cloud POS terminal to test new functionality or log into another eCommerce site you have been working with. And, you may even need to compare the behavior between different logins.

The challenge is that doing the above in your default browser instance and default profile will overwrite your previously activated POS terminal or log your other eCommerce user out. After all, you can only have one identity at a time.

Some users use different browsers to solve this problem. Use Microsoft’s Edge to activate HOUSTON-16 terminal and Google’s Chrome to activate HOUSTON-19. These could be both point to the same RetailServer or Cloud Scale Unit or to entirely different ones. Good solution, but keep reading for a more convenient option.

Browser profiles to the rescue. A browser profile can store bookmarks, passwords, search history, extension and other settings. The moment the browser switches over to a different user profile, all these different data are switches as well. We can use this to our advantage. Also, this is feature is available in most browsers.

The idea is to create a profile per user that you are simulating. You can then save user and password and bookmarks and start page to that profile, give the profile a meaningful name that helps you remember what this “client” connects to. All you need to do is to click on the little avatar in the right upper corner of the browser and either “Add profile” or “Manage profile settings”. When done, you could have 3 different Cloud POS terminals and 2 eCommerce logins all neatly organized in your favorite browser. That’s exactly what I did:

Microsoft Edge profiles for different terminals and authenticated eCommerce logins

Now, you can quickly launch any of these and even use them all at the same time:

5 browser sessions at the same time

Multi-tasking while LCS is doing its thing…

Have you deployed Microsoft Dynamics 365 F&O environments, packages, moved databases etc. using Microsoft Dynamics Lifecycle Services (LCS) before? If you have, you know that all of these operations take time, and in order to see how far it has progressed, you need to refresh the page. Also, you may waste time working on something else and forgetting to refresh the LCS page once in a while.


A simple solution to the problem that works well for me is to use a Google Chrome extension “Auto-Refresh” that allows for automatic and configurable tab page refreshes. With that you can have the browser sit in a corner of your screen, and when the LCS operation is done you will see it, without having to refresh the page.

Steps:
– Install the “Auto-Refresh” Google Chrome extension
– allow incognito browser sessions to use the extension too (as often I impersonate other users and use incognito for that)
– click the extension’s icon and configure your refresh time. Be reasonable, a good refresh time is every 5 mins
– now work on something else useful till you see the LCS operation is done

Configuring CommerceRuntime extensions properly

The CommerceRuntime is the business logic for Retail POS and other channels. Here are a couple of good rules how to correctly configure it.

  1. In both of the commerceRuntime.*.ext files, be specific about what handlers you want. Do not use a wildcard inclusion for the whole assembly. If you do the latter, you have no choice about what handlers are disabled, etc.  The example below should help.
  2. Even though you could write code that figures out where the runtime context is online or offline, its not a good practice. Its better practice to use the config file to control that. See example below.
  3. To enable different functionality for online and offline scenarios, you have multiple options:
    1. If you do not want/need offline mode at all, either disable the feature for that register OR install the installer that does not include the offline part.
    2. If you want just the built-in offline features (fewer features than online), you can have an empty CommerceRuntime.MPOSOffline.Ext.config file
    3. If you want what you get in 3.2) with the addition of a few custom-built features, you can have some of the entries in the CommerceRuntime.MPOSOffline.Ext.config file.
    4. If you want what you get in 3.2) and all of your custom-built features, you should have the same entries in CommerceRuntime.MPOSOffline.Ext.config and CommerceRuntime.Ext.config

Notice that the config files are almost the same, with the one difference that the online version has 3 more handlers (ProductAvailability, PurchaseOrder related). Those are based on RTS calls which cannot be done in offline mode.

CommerceRuntime.exe.config:

<?xml version="1.0" encoding="utf-8"?>
<commerceRuntimeExtensions>
  <composition>
    <!--New Handlers-->
    <add source="type" value="FOO.Commerce.Runtime.Extensions.Receipts.CustomReceiptsRequestHandler, FOO.Commerce.Runtime.Extensions.Receipts" />
    <add source="type" value="FOO.Commerce.Runtime.Extensions.Customer.CreateCustomerRequestHandler, FOO.Commerce.Runtime.Extensions.Customer" />
    <add source="type" value="FOO.Commerce.Runtime.Extensions.Customer.UpdateCustomerRequestHandler, FOO.Commerce.Runtime.Extensions.Customer" />
       <add source="type" value="FOO.Commerce.Runtime.Extensions.ProductAvailability.SaveCartRequestHandler, FOO.Commerce.Runtime.Extensions.ProductAvailability" />
       <add source="type" value="FOO.Commerce.Runtime.Extensions.ProductAvailability.ValidateCartForCheckoutRequestHandler, FOO.Commerce.Runtime.Extensions.ProductAvailability" />
       <add source="type" value="FOO.Commerce.Runtime.Extensions.PurchaseOrder.SavePurchaseOrderRealtimeRequestHandler, FOO.Commerce.Runtime.Extensions.PurchaseOrder" />
  
    <!--Extended Handlers-->
    <add source="type" value="FOO.Commerce.Runtime.Extensions.StoreWalkin.StoreHourWalkinDataService, FOO.Commerce.Runtime.Extensions.StoreWalkin" />

    <!--Extended Triggers-->
    <add source="type" value="FOO.Commerce.Runtime.Extensions.ReturnPolicy.GetSalesOrderDetailsByTransactionIdServiceTrigger, FOO.Commerce.Runtime.Extensions.ReturnPolicy" />
  </composition>
</commerceRuntimeExtensions>

CommerceRuntime.offline.exe.config:

<?xml version="1.0" encoding="utf-8"?>
<commerceRuntimeExtensions>
  <composition>
    <!--New Handlers-->
    <add source="type" value="FOO.Commerce.Runtime.Extensions.Receipts.CustomReceiptsRequestHandler, FOO.Commerce.Runtime.Extensions.Receipts" />
    <add source="type" value="FOO.Commerce.Runtime.Extensions.Customer.CreateCustomerRequestHandler, FOO.Commerce.Runtime.Extensions.Customer" />
    <add source="type" value="FOO.Commerce.Runtime.Extensions.Customer.UpdateCustomerRequestHandler, FOO.Commerce.Runtime.Extensions.Customer" />
  
    <!--Extended Handlers-->
    <add source="type" value="FOO.Commerce.Runtime.Extensions.StoreWalkin.StoreHourWalkinDataService, FOO.Commerce.Runtime.Extensions.StoreWalkin" />

    <!--Extended Triggers-->
    <add source="type" value="FOO.Commerce.Runtime.Extensions.ReturnPolicy.GetSalesOrderDetailsByTransactionIdServiceTrigger, FOO.Commerce.Runtime.Extensions.ReturnPolicy" />
  </composition>
</commerceRuntimeExtensions>

Dynamics 365 for Finance and Operations hotfix and deployment cheat sheet (including Retail)


Overview

There are a few wikis at https://docs.microsoft.com/en-us/dynamics365/unified-operations/dev-itpro/index?toc=dynamics365/unified-operations/fin-and-ops/toc.json which help with specific dev ALM and deployment topics. I found myself and from questions of others that it is difficult to pull all this information together into a single process. This write-up hopefully helps somebody that wants to update to follow the process without errors. It will certainly help me next time I need to take a hotfix since I can just follow a simple cheat sheet. So lets get started.

There are 3 different update types. 1) A platform update is fully backwards compatible with the application, its of binary nature, and it can simply be deployed. 2) A X++ application hotfix ships fixes in X++ source code that can be integrated into ones own code (code merged), sort of like a customization. And finally, 3) a binary hotfix is an application update for other tools, binaries, and Retail source code. The latter is cumulative, so you will always get the latest.  For that reason, use a good naming convention for the packages you download (and upload to the Asset library) as this helps later when you need to bring multiple environments to the same hotfix level.

Recommended (best) practices:

    • Download to and upload from the cloud development box. That way these files get transferred much faster and your intranet is not used.
    • If you have multiple development boxes, the steps below should be taken by one. Once all looks good, the other development boxes should get the changes via syncing VSTS (not via deployable package).
    • Some binary hotfixes depend on X++ hotfixes. Deploy these first (either by deployable package or VSTS), then tackle the binary update.
    • The LCS Asset library has a feature that allows for package merging. If you use it, you can decrease the overall deployment time. Unfortunately, merging does not work if the
    • Retail combined package is involved. Merging X++ deployable package, binary hotfix works.
    • Installed platform version, X++ hotfix (KB number) and binary hotfix (build version) can be inquired on the LCS detailed version info. See here for details.
    • There is no easy way to infer the KB number of a binary hotfix from the build version. One thing to deal with this is to include build version and download date into the package name. Then you can tell with high likelihood that a KB that is older then the binary package date is included. A KB with a newer date is likely not included in the package.


    See the picture below to see an overall flow of the process. Refer to it while reviewing the following sections.

    Note, that there are 4 total different deployment packages that could be deployed (purple boxes). See the details below how to get them.

    Note: For the following steps, the integration of the Retail Sdk’s build with the Dynamics 365 for Operations build is assumed. If you do not have this setup, follow Retail Sdk and Dynamics 365 build definition.

    Platform updates

    Platform updates are the easiest. There is no code merge required, not VSTS needed, you just move it to the Asset library and deploy it. See more information at FAQ monthly platform updates.

    X++ application hotfixes

    X++ hotfixes are not cumulative, so there may be some code merging needed, if you pick multiple. Visual Studio and the Dynamics Operations VS addin will help with that.

    Download the hotfix

    Ideally, you pick the hotfix you need and be done with it. However, I have found it to be better in the long run to take all hotfixes. It incurs slightly more testing up-front, but less testing when updating to the next major version. Additionally, other fixed issues you may just not have not encountered will get fixed before you see them.

      • Logon to LCS on the development box, chose the right environment and hit the X++ hotfix tile

    • Select All and hit Add button
    • Download package
    • Select all and download
    • Name it with meaningful data so you can identify the package later. I use environment name, date of download, the fact that this is not a binary update but an X++ update etc. (i.e. NewX++HotfixesForSpringEnv170903)
    • Unblock and unzip the package

    Backup PackageLocalDirectory

    I got burned by a failed hotfix application after my dev box became corrupted. I could not tell for sure which files had been touched… Since then, I do a simple robocopy-backup to be able to rollback if something happens.

    • Open a cmd.exe window with elevated privileges (runas admin)
    • Change directory into the parent of your PackagesLocalDirectory folder (here K:\AosService, might be in J: also)
    • robocopy PackagesLocalDirectory PLD_BeforeHFWork_170803 /E /NFL /NDL

    Prepare VSTS for the X++ hotfixes

    I have had issues with the VS addin in the past, so I always use the command line version. Additionally, it is important to understand the –prepare statement. Use it! Otherwise, code merges you may need to do later will be hard.

    Update:
    Below is a batch script that I add to each Metadata folder (VSTS too). Just update the environment variables, and remove the commented lines one by one, first -prepare, then -install. See below for details. here is the contents of the script:

    setlocal
    
    set HotfixPackageBundlePath=C:\Temp\Downloads\AllX++HotfixesTill06192018\HotfixPackageBundle.axscdppkg
    set PLD=k:\AosService\PackagesLocalDirectory
    set TFSUri=https://xxxx.visualstudio.com/defaultcollection
    
    rem bin\SCDPBundleInstall.exe -prepare -packagepath=%HotfixPackageBundlePath% -metadatastorepath=%PLD% -tfsworkspacepath=%PLD% -tfsprojecturi=%TFSUri%
    rem bin\SCDPBundleInstall.exe -install -packagepath=%HotfixPackageBundlePath% -metadatastorepath=%PLD% -tfsworkspacepath=%PLD% -tfsprojecturi=%TFSUri%
    
    endlocal

    Save it with a name like UpdateAppHotfixes.cmd. Run it from an elevated cmd console, while the local directory is the PackagesLocalDirectory.

        • Open Visual Studio and make sure you are logged in with the same account that is going to be used to access VSTS. If you are not sure, logout and log back in. All we want to get is a new valid authentication token so the steps below will succeed.
        • Close all VS instances
        • Open a cmd.exe window with elevated privileges (runas admin)
        • Change directory into PackagesLocalDirectory\bin folder (here K:\AosService\PackagesLocalDirectory\Bin, might be in J: also)
        • SCDPBundleInstall.exe -prepare -packagepath=C:\Temp\Downloads\NewX++HotfixesForSpringEnv170903\HotfixPackageBundle.axscdppkg -metadatastorepath=k:\AosService\PackagesLocalDirectory -tfsworkspacepath=k:\AosService\PackagesLocalDirectory -tfsprojecturi=https://XXXXX.visualstudio.com/defaultcollection
        • Once the command finished, open Visual Studio and submit the newly added files with a meaningful changelist name

      Apply the hotfixes

      This step will apply the actual changes to the files that were prepared in the previous step.

        • close all VS instances and keep using same cmd.exe instance from above
        • SCDPBundleInstall.exe -install -packagepath=C:\Temp\Downloads\NewX++HotfixesForSpringEnv170903\HotfixPackageBundle.axscdppkg -metadatastorepath=k:\AosService\PackagesLocalDirectory -tfsworkspacepath=k:\AosService\PackagesLocalDirectory -tfsprojecturi=https://XXXXX.visualstudio.com/defaultcollection
        • Once the command finished, check for conflicts: open Visual Studio, Select Dynamics 365/Addings/Create project from conflicts
          If there are conflicts, you need to resolve them
        • Do a full build: Dynamics 365/Build models/Packages-select all/Options-use default plus select sync database and then hit the Build button
        • When the build succeeded without errors, submit the changed files with a meaningful changelist name

      Binary hotfixes

      Binary hotfixes are cumulative. You need to pick one of them, and you will get the latest. If Retail channel components are not customized, then there is no code merge needed.

      Download the binary hotfix

        • Logon to LCS on the development box, chose the right environment

      • Click the download binaries button
      • Name it with meaningful data so you can identify the package later. I date of download (i.e. AllBinary72UpdatesLatestPlatform170903)
      • Unblock the zip file and then unzip it
      • Upload the zipped package to LCS’s Asset library

      Apply the binary hotfix

      Use the LCS environment’s Maintain menu to deploy this package.

      Only in case of Retail channel customizations: Update the Retail Sdk mirror branch

      In order to effectively do code merges, it is suggested to use 2 branches. For more details, check Retail Sdk Overview (at the end of the wiki page).

      Ideally, the Retail Sdk branch would be hosted in the same VSTS project, in parallel to the Trunk folder.

      In order to update it:

        • Make sure the mirror branch/folder is fully synced to latest version.
        • Close all but one Visual Studio instances
        • In a first Windows Explorer window, find the new Retail Sdk which we will use to update the mirror. On a brand new environment, find it in the service drive (K:\ or J:\) under “Retail Sdk”. If this is a binary hotfix, unzip the hotfix package as you downloaded it, and find the SDK in the RetailSDK\Code folder.

      • In a second Windows Explorer window open the location of the outdated mirror Retail Sdk branch/folder (where it is mapped from VSTS to local folder)
      • Delete all files in the outdated mirror Retail Sdk branch/folder (open in the second Windows Explorer Window)
      • Copy and paste all files from the new Retail Sdk into the folder you just cleaned (copy from second to first Windows Explorer window)
      • (Optional) If you have any doubt whether the shipped Retail Sdk has a build error, carry out these steps to verify:
      • (Optional) Make a temporary copy of the new Retail Sdk (from the hotfix) to any other place of your choice
      • (Optional) Open a Visual Studio 2015 msbuild command prompt and change directory to the temporary location
      • (Optional) Type “msbuild” and hit Enter (if this shows any build errors, please open a support request or bug as the shipped Retail Sdk should build without errors)
      • Delete all files in the mirror branch in Windows explorer, and add the new Retail Sdk back. This will ensure that removed files are properly being removed from the source control.
      • In “Source Control Explorer”, right click the mirror branch, “Add items to Folder…”, Add all folders from the same source location back. Make sure there are no “excluded items”, and hit Finish.
      • Make sure there are no files from the mirror branch listed under “Team Explorer”, “Pending Changes”, “Excluded Changes” and “Detected”. If there are, promote them to the “Included Changes”
      • Check In the changes.

      Only in case of Retail channel customizations: Code merge the Retail Sdk customization branch

      • Make sure you do not have any changed files in the customization branch before you start. If this is difficult to accomplish create a new client mapping, get the customization branch into a different folder or machine and do the merge there. Do not start merging if you have opened files.
      • In Source Control Explorer, right click the mirror branch and select “Branching and Merge…”, Merge
      • Make sure that the source is the mirror branch and destination is your customization branch
      • Hit Next and Finish
      • Resolve any possible merge conflicts
      • Watch closely that all “Included files” are the correct files. These should only be the merged files, or updated files in the mirror
        Watch closely that all “Excluded files” only include generated files. Do not promote them

      Only in case of Retail channel customizations: Test local Retail Sdk customization build and submit to VSTS

      Before checking in these changes, lets make sure that all builds fine. Open a Visual Studio MSBuild developer command window, and type “msbuild” at the root of the Retail Sdk customization branch. Once all builds fine, submit the changes with a meaningful changeset name.

    Run build on build machine

    Inspect the submitted changes in the VSTS code branch. In the example below, I see 2 checkins for the X++ hotfixes, one other code change, one to update the Retail Sdk mirror branch and one to code merge the Retail Sdk customization branch.

    Upload the AX and Retail deployable packages to LCS

    Find the packages in VSTS and upload them to LCS.

    Deploy AX and Retail deployable packages

    Deploy the packages from the LCS asset library (in the image below the 3rd and 4th).  The RetailDeployablePackage is only needed in case of Retail channel customizations.

    Once the deployment succeeded, you should see the tile count go down.

    Retail only: Update channel components

    Follow the wiki about how to deploy the store components (Modern POS, Modern POS Offline, Hardware station, Retail Store Scale Unit)

Using a Magnetic strip reader (MSR) to login to Dynamics 365 Retail POS


Note: Implemented with Dynamics 365 version 7.2.* (but likely working fine with lower or higher versions). Sample code can be downloaded at the end of this blog.

A little-known feature is the ability to log into POS with a barcode scanner or MSR. All the low-level plumbing is already implemented in POS to accept the data and to call the right RetailServer activity. Also, CRT handlers exist that carry out the mapping from the scanned/swiped data to the credential Id, which is then ultimately used to look up a user. This handler is being called as part of the authentication pipeline of the CRT.

Functional walkthrough

A manager must first assign a worker’s credential. For that add the operation called “Extended log on” an appropriate button layout and sync the download job that pushes the data for the registers (by default 1090). When that button is clicked, the following screen can be used to assign credential ids (insert/update):


Use the scanner or MSR when the application indicates it. Once saved, you are all set to try the login. For that, just scan/swipe on the logon dialog and the credential id is being looked up (read):

If the credential was found, the correct user will be logged in without any further prompt.

Technical details

If you want to use this functionality, you will very likely want to adjust the code that maps the scanned/swiped data to a credential id. The default implementation takes the first 5 characters and throws the rest away. What if the information in the scanned/swiped data is the same for the first 5 characters and only differs further down the string? We will need to implement our own CRT handler(s) so we can replace the mapping functions. The following example uses MSR data simulated by the Peripheral Simulator for Retail.
Note: The crt.STAFFCREDENTIALSVIEW view shows what information is stored for any staff member. The good thing is we do not need to touch any of that code, we just need to adjust the 3 CRT request handlers that need the mapping from scanned/swiped data to the credential id.

  1. Create a new CRT service with 3 new handlers for GetUserEnrollmentDetailsServiceRequest, ConfirmUserAuthenticationServiceRequest, and GetUserAuthenticationCredentialIdServiceRequest
    namespace MyCompany.Commerce.Runtime.MyExtendedAuthService
    {
        using Microsoft.Dynamics.Commerce.Runtime;
        using Microsoft.Dynamics.Commerce.Runtime.Handlers;
        using Microsoft.Dynamics.Commerce.Runtime.Messages;
        using Microsoft.Dynamics.Commerce.Runtime.Services.Messages;
        using System;
        using System.Collections.Generic;
        using System.Globalization;
    
        public class UniqueSecretExtendedAuthenticationService : INamedRequestHandler
        {
            public IEnumerable SupportedRequestTypes
            {
                get
                {
                    return new[]
                    {
                            typeof(GetUserEnrollmentDetailsServiceRequest),
                            typeof(GetUserAuthenticationCredentialIdServiceRequest),
                            typeof(ConfirmUserAuthenticationServiceRequest)
                    };
                }
            }
    
            public string HandlerName
            {
                get
                {
                    return "auth://example.auth.contoso.com/msr";
                }
            }
    
            public Response Execute(Request request)
            {
                if (request == null)
                {
                    throw new ArgumentNullException("request");
                }
    
                Response response;
                Type requestType = request.GetType();
    
                if (requestType == typeof(GetUserEnrollmentDetailsServiceRequest))
                {
                    response = this.GetUserEnrollmentDetails((GetUserEnrollmentDetailsServiceRequest)request);
                }
                else if (requestType == typeof(GetUserAuthenticationCredentialIdServiceRequest))
                {
                    response = this.GetUserAuthenticationCredentialId((GetUserAuthenticationCredentialIdServiceRequest)request);
                }
                else if (requestType == typeof(ConfirmUserAuthenticationServiceRequest))
                {
                    response = this.ConfirmUserAuthentication((ConfirmUserAuthenticationServiceRequest)request);
                }
                else
                {
                    throw new NotSupportedException(string.Format(CultureInfo.InvariantCulture, "Request '{0}' is not supported.", request));
                }
    
                return response;
            }
    
            private GetUserAuthenticationCredentialIdServiceResponse GetUserAuthenticationCredentialId(GetUserAuthenticationCredentialIdServiceRequest request)
            {
                return this.GetUserAuthenticationCredentialId(request.Credential, request.RequestContext);
            }
    
            private GetUserAuthenticationCredentialIdServiceResponse GetUserAuthenticationCredentialId(string credential, RequestContext requestContext)
            {
                // TODO: this is the place where you can customize the mapping between what was scanned/swiped and what the credential id is in the StaffCredentialsview
                string credentialId = credential;
    
                return new GetUserAuthenticationCredentialIdServiceResponse(credentialId);
            }
    
            private GetUserEnrollmentDetailsServiceResponse GetUserEnrollmentDetails(GetUserEnrollmentDetailsServiceRequest request)
            {
                string credentialId = this.GetUserAuthenticationCredentialId(request.Credential, request.RequestContext).CredentialId;
                return new GetUserEnrollmentDetailsServiceResponse(credentialId, string.Empty);
            }
    
            private Response ConfirmUserAuthentication(ConfirmUserAuthenticationServiceRequest request)
            {
                return new NullResponse();
            }
        }
    }
    
  2. Put the class into a project and update the C# project file so it can be built by the Retail sdk (imports at top and bottom)
  3. drop the dll into your RetailServer bin\ext folder (for testing only)
  4. update your RetailServer bin\ext\commerceruntime.ext.config file to include the new assembly
  5. Update your Customizations.settings file to include this file as part of your customizations

Note: The changes in Customization.settings and commerceruntime.exe.config need to be made in the RetailSdk under VSTS, so these changes will be used by the build and package generation.
A fully working zipped up project can be found below. Just add the project to the SampleExtensions\CommerceRuntime folder and compile.
Extensions.MyExtendedAuthService

Data access in the CommerceRuntime


Below are some code samples for reading and writing data in Channel database. This is just for Channel database. This does not necessary mean that the data needs to go to D365 HQ. It may, either via CDX pull job or via Real-time service call. This information is only for simple reads and writes in Channel db.

Prerequisites:
Dynamics 365 for Operations (1611)
KB3214687
KB3214679

First, create the SQL table in ax schema and a view in crt schema:

    CREATE TABLE [ax].[MY_EXTENSION](
		[DATAAREAID] [nvarchar](4) NOT NULL,
		[RECID] [bigint] NOT NULL,
		[COL1] [int] NOT NULL,
		[COL2] [nvarchar](100) NOT NULL,
		[COL3] [bit] NOT NULL,
		[ACCOUNTNUM] [nvarchar](20) NOT NULL)
    . . .
    END
    GO

    CREATE VIEW [crt].[MY_EXTENSIONVIEW] AS
    (
        SELECT ACCOUNTNUM, DATAAREAID, COL1, COL2, COL3 FROM [ax].[MY_EXTENSION]
    )
    GO

    GRANT SELECT ON [crt].[MY_EXTENSIONVIEW] TO [UsersRole];
    GO

The shown sample adds 3 columns to be stored from 3 extension properties.

Grant the right permissions to table and view. This is the list of supported SQL roles:

DataSyncUsersRole Used by CDX process account
PublishersRole Used by publishing process account (eCommerce)
ReportUsersRole Used by reporting user account
UsersRole Used by runtime user (RetailServer)

Next, create a sproc for updating:

CREATE PROCEDURE [crt].[MY_UPDATEEXTENSIONPROPERTIES]
    @TVP_EXTENSIONPROPERTIESTABLETYPE         [crt].EXTENSIONPROPERTIESTABLETYPE READONLY
AS
BEGIN
	DECLARE @nvc_DataAreaId NVARCHAR(4);
	DECLARE @recId bigint;
	DECLARE @accountNum [nvarchar](20);

	DECLARE @Col1Value int = 0;
	DECLARE @Col2Value nvarchar(100) = '';
	DECLARE @Col3Value bit = 0;
	
       SELECT DISTINCT TOP 1 @recId = tp.PARENTRECID, @nvc_DataAreaId = ct.DATAAREAID, @accountNum = ct.ACCOUNTNUM
       FROM @TVP_EXTENSIONPROPERTIESTABLETYPE tp
       JOIN [ax].CUSTTABLE ct on ct.RECID = tp.PARENTRECID
       WHERE tp.PARENTRECID <> 0
			
	SELECT @Col1Value = COALESCE(tp.PROPERTYVALUE, 0)
	FROM @TVP_EXTENSIONPROPERTIESTABLETYPE tp 
	where tp.PARENTRECID <> 0 and tp.PROPERTYNAME = 'COL1'
	
	SELECT @Col2Value = COALESCE(tp.PROPERTYVALUE, '')
	FROM @TVP_EXTENSIONPROPERTIESTABLETYPE tp 
	where tp.PARENTRECID <> 0 and tp.PROPERTYNAME = 'COL2'
	
	SELECT @Col3Value = CAST(CASE WHEN tp.PROPERTYVALUE = 'True' THEN 1 ELSE 0 END AS BIT)
	FROM @TVP_EXTENSIONPROPERTIESTABLETYPE tp 
	where tp.PARENTRECID <> 0 and tp.PROPERTYNAME = 'COL3'

	MERGE INTO [ax].[MY_CUSTOMEREXTENSION] dest
	USING (SELECT @accountNum as ACCOUNTNUM) as source on  dest.ACCOUNTNUM = source.ACCOUNTNUM
	WHEN matched then
		update set dest.COL1 = @Col1Value, dest.COL2 = @Col2Value, dest.COL3 = @Col3Value
	when not matched then
		INSERT (RECID, ACCOUNTNUM, DATAAREAID, COL1, COL2, COL3)
		VALUES (@recId, @accountNum, @nvc_DataAreaId, @Col1Value, @Col2Value, @Col3Value);
END
GO

GRANT EXECUTE ON [crt].[MY_UPDATECUSTOMEREXTENSIONPROPERTIES] TO [UsersRole];
GO

Note the MERGE INTO statement. This allows to either create or update a record.

For reading in the CRT, here especially for extension properties, use SQLPagedQuery, SQLServerDatabaseContext and ExtensionsEntity:

var query = new SqlPagedQuery(QueryResultSettings.SingleRecord)
{
    Select = new ColumnSet(new string[] { "COL1", "COL2", "COL3" }),
    From = "MY_EXTENSIONVIEW",
    Where = "ACCOUNTNUM = @accountNum AND DATAAREAID = @dataAreaId",
};

query.Parameters["@accountNum"] = customer.AccountNumber;
query.Parameters["@dataAreaId"] = request.RequestContext.GetChannelConfiguration().InventLocationDataAreaId;
using (var databaseContext = new SqlServerDatabaseContext(request))
{
    ExtensionsEntity extensions = databaseContext.ReadEntity(query).FirstOrDefault();
    if (extensions != null)
    {
        var col1 = extensions.GetProperty("COL1");
        if (col1 != null)
        {
            customer.SetProperty("COL1", col1);
        }
        else
        {
            customer.SetProperty("COL1", 0);
        }
 	 
        . . .
    }
    else
    {
        customer.SetProperty("COL1", 0);
    }
}

In order to write the data to the db, use this code to call the sproc shown above:

using (var databaseContext = new SqlServerDatabaseContext(r))
using (var transactionScope = new TransactionScope())
{
    if (!r.Customer.ExtensionProperties.IsNullOrEmpty())
    {
        ParameterSet parameters = new ParameterSet();
        parameters["@TVP_EXTENSIONPROPERTIESTABLETYPE"] = new ExtensionPropertiesTableType(r.Customer.RecordId, r.Customer.ExtensionProperties).DataTable;
        databaseContext.ExecuteStoredProcedureNonQuery("MY_UPDATEEXTENSIONPROPERTIES", parameters);
    }

    transactionScope.Complete();
}

In the case of you want to write other data to the database (no extension properties to entities), build the SqlParameters one by one and match in your sproc. For reading, it may be easier to just treat it as extension properties, then convert to whatever you want. Or you could create your own entity and query for that.