Dynamics 365 for Finance and Operations hotfix and deployment cheat sheet (including Retail)


Overview

There are a few wikis at https://docs.microsoft.com/en-us/dynamics365/unified-operations/dev-itpro/index?toc=dynamics365/unified-operations/fin-and-ops/toc.json which help with specific dev ALM and deployment topics. I found myself and from questions of others that it is difficult to pull all this information together into a single process. This write-up hopefully helps somebody that wants to update to follow the process without errors. It will certainly help me next time I need to take a hotfix since I can just follow a simple cheat sheet. So lets get started.

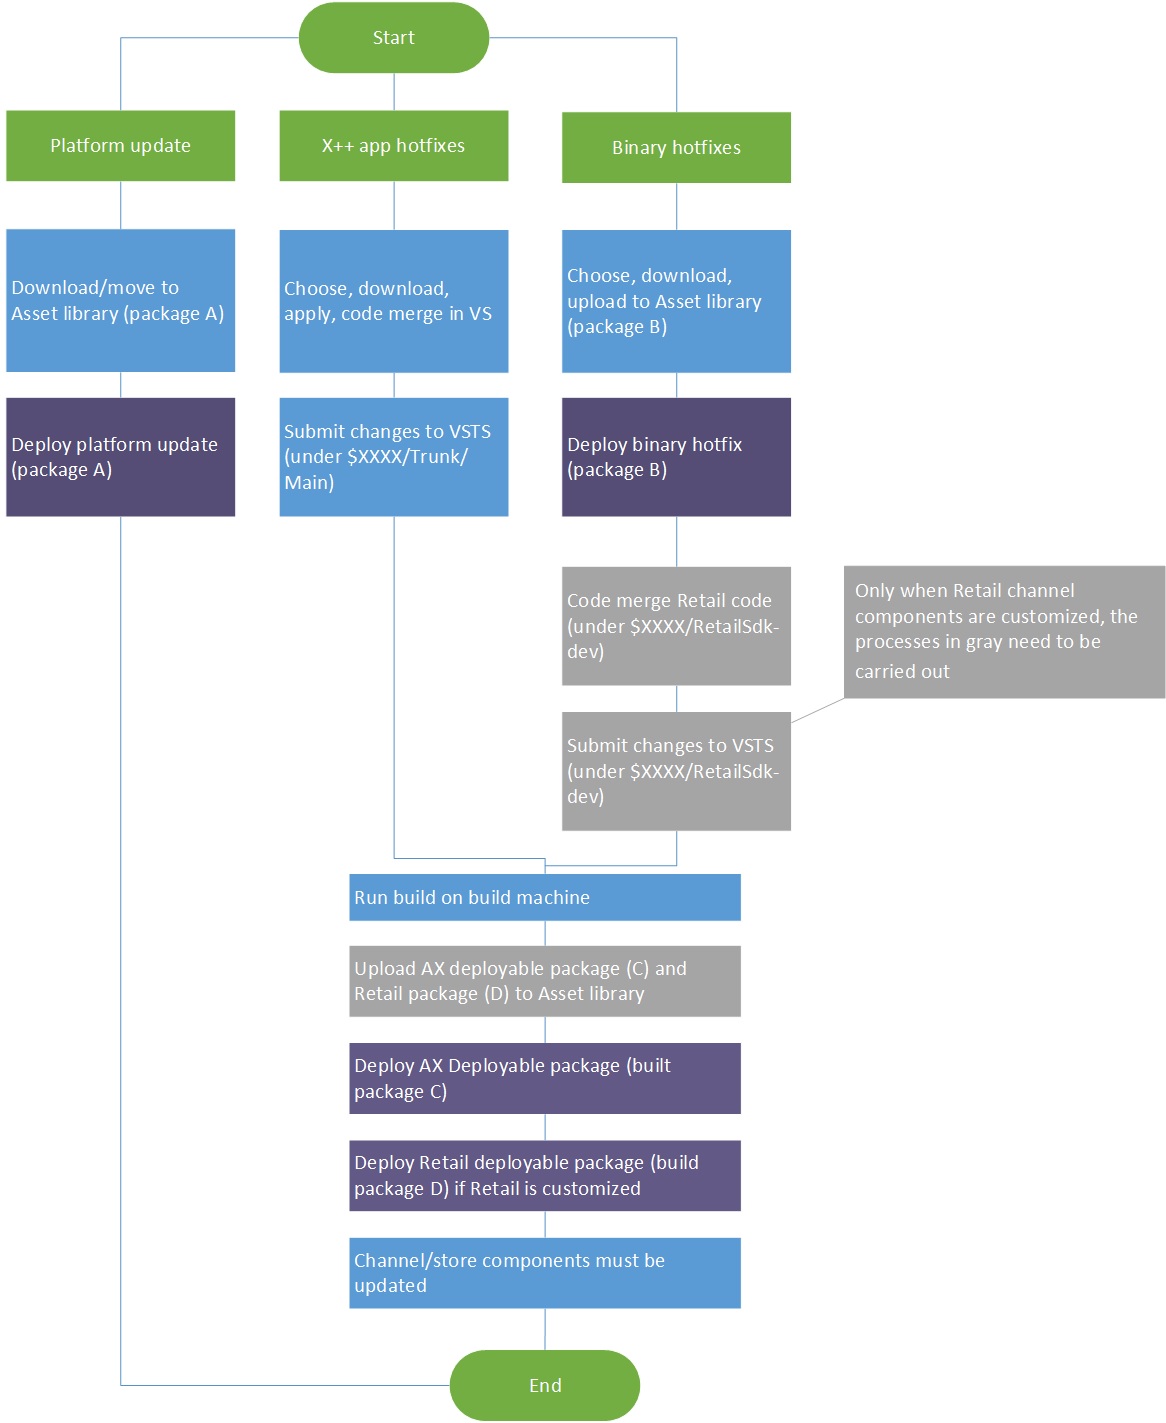
There are 3 different update types. 1) A platform update is fully backwards compatible with the application, its of binary nature, and it can simply be deployed. 2) A X++ application hotfix ships fixes in X++ source code that can be integrated into ones own code (code merged), sort of like a customization. And finally, 3) a binary hotfix is an application update for other tools, binaries, and Retail source code. The latter is cumulative, so you will always get the latest.  For that reason, use a good naming convention for the packages you download (and upload to the Asset library) as this helps later when you need to bring multiple environments to the same hotfix level.

Recommended (best) practices:

    • Download to and upload from the cloud development box. That way these files get transferred much faster and your intranet is not used.
    • If you have multiple development boxes, the steps below should be taken by one. Once all looks good, the other development boxes should get the changes via syncing VSTS (not via deployable package).
    • Some binary hotfixes depend on X++ hotfixes. Deploy these first (either by deployable package or VSTS), then tackle the binary update.
    • The LCS Asset library has a feature that allows for package merging. If you use it, you can decrease the overall deployment time. Unfortunately, merging does not work if the
    • Retail combined package is involved. Merging X++ deployable package, binary hotfix works.
    • Installed platform version, X++ hotfix (KB number) and binary hotfix (build version) can be inquired on the LCS detailed version info. See here for details.
    • There is no easy way to infer the KB number of a binary hotfix from the build version. One thing to deal with this is to include build version and download date into the package name. Then you can tell with high likelihood that a KB that is older then the binary package date is included. A KB with a newer date is likely not included in the package.


    See the picture below to see an overall flow of the process. Refer to it while reviewing the following sections.

    Note, that there are 4 total different deployment packages that could be deployed (purple boxes). See the details below how to get them.

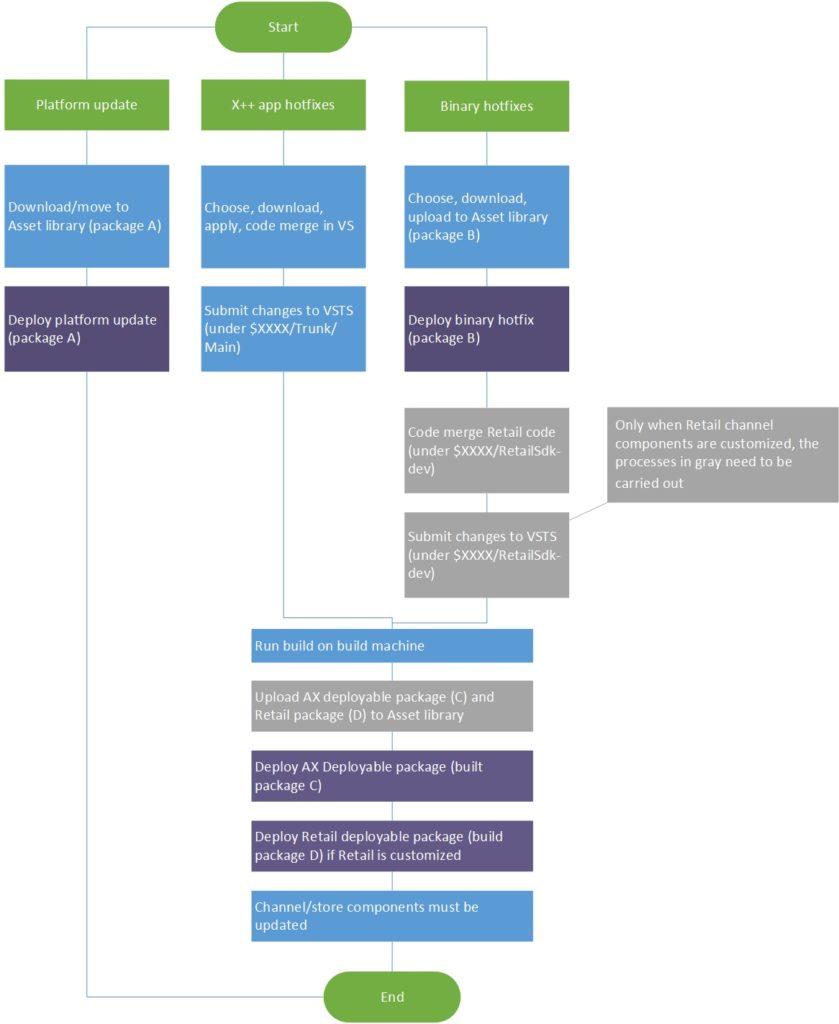
    Note: For the following steps, the integration of the Retail Sdk’s build with the Dynamics 365 for Operations build is assumed. If you do not have this setup, follow Retail Sdk and Dynamics 365 build definition.

    Platform updates

    Platform updates are the easiest. There is no code merge required, not VSTS needed, you just move it to the Asset library and deploy it. See more information at FAQ monthly platform updates.

    X++ application hotfixes

    X++ hotfixes are not cumulative, so there may be some code merging needed, if you pick multiple. Visual Studio and the Dynamics Operations VS addin will help with that.

    Download the hotfix

    Ideally, you pick the hotfix you need and be done with it. However, I have found it to be better in the long run to take all hotfixes. It incurs slightly more testing up-front, but less testing when updating to the next major version. Additionally, other fixed issues you may just not have not encountered will get fixed before you see them.

      • Logon to LCS on the development box, chose the right environment and hit the X++ hotfix tile

    • Select All and hit Add button
    • Download package
    • Select all and download
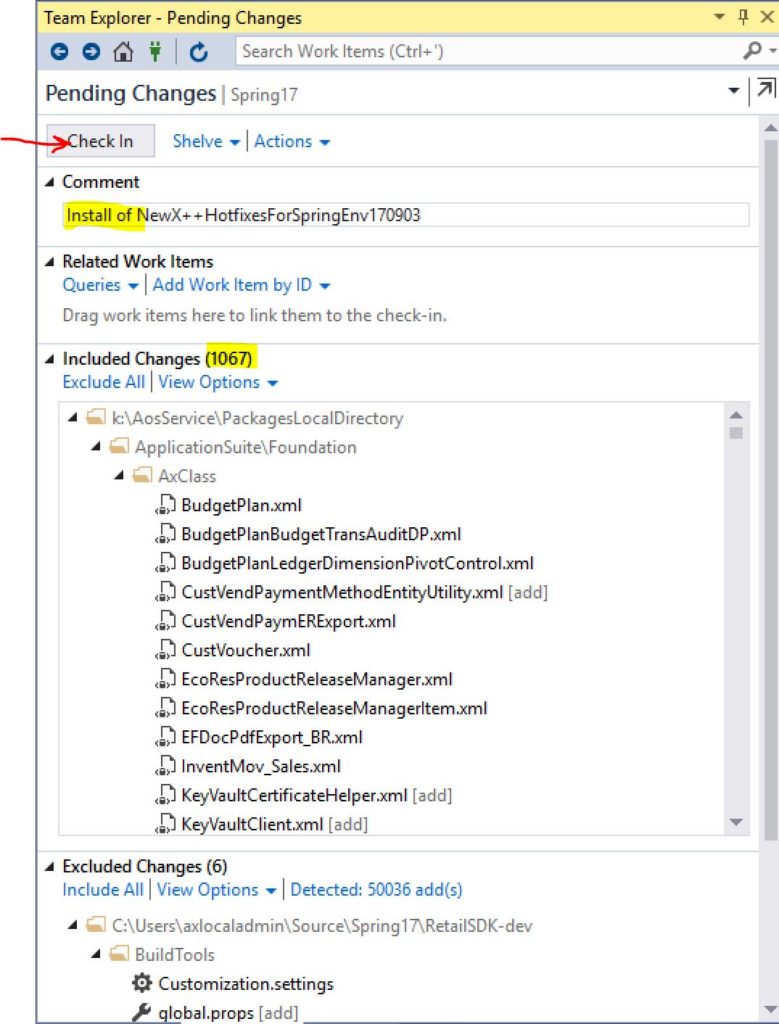
    • Name it with meaningful data so you can identify the package later. I use environment name, date of download, the fact that this is not a binary update but an X++ update etc. (i.e. NewX++HotfixesForSpringEnv170903)
    • Unblock and unzip the package

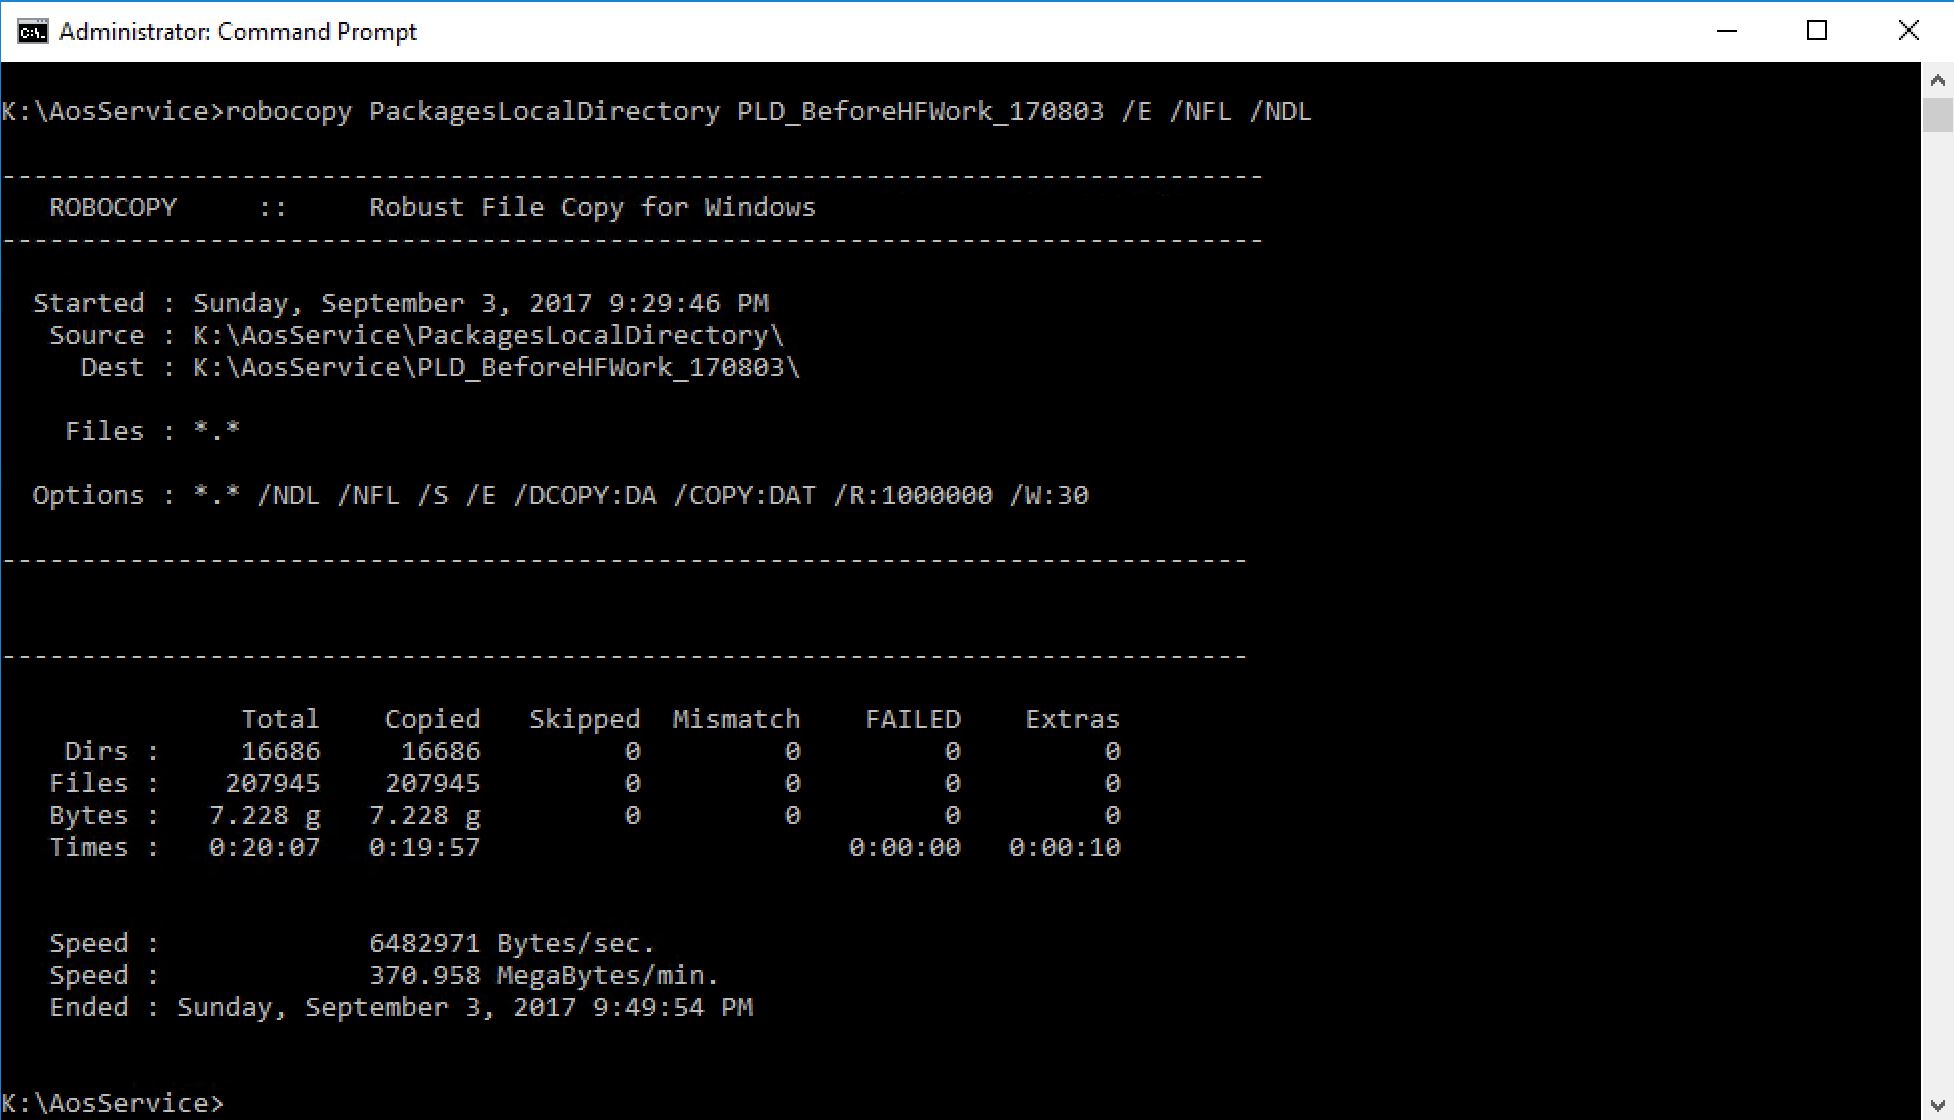
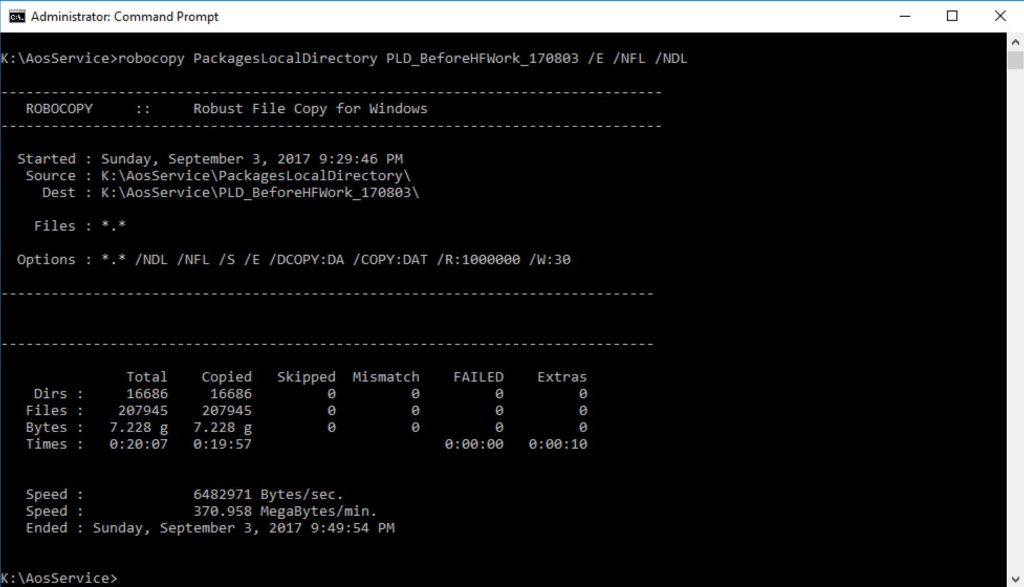
    Backup PackageLocalDirectory

    I got burned by a failed hotfix application after my dev box became corrupted. I could not tell for sure which files had been touched… Since then, I do a simple robocopy-backup to be able to rollback if something happens.

    • Open a cmd.exe window with elevated privileges (runas admin)
    • Change directory into the parent of your PackagesLocalDirectory folder (here K:\AosService, might be in J: also)
    • robocopy PackagesLocalDirectory PLD_BeforeHFWork_170803 /E /NFL /NDL

    Prepare VSTS for the X++ hotfixes

    I have had issues with the VS addin in the past, so I always use the command line version. Additionally, it is important to understand the –prepare statement. Use it! Otherwise, code merges you may need to do later will be hard.

    Update:
    Below is a batch script that I add to each Metadata folder (VSTS too). Just update the environment variables, and remove the commented lines one by one, first -prepare, then -install. See below for details. here is the contents of the script:

    setlocal
    
    set HotfixPackageBundlePath=C:\Temp\Downloads\AllX++HotfixesTill06192018\HotfixPackageBundle.axscdppkg
    set PLD=k:\AosService\PackagesLocalDirectory
    set TFSUri=https://xxxx.visualstudio.com/defaultcollection
    
    rem bin\SCDPBundleInstall.exe -prepare -packagepath=%HotfixPackageBundlePath% -metadatastorepath=%PLD% -tfsworkspacepath=%PLD% -tfsprojecturi=%TFSUri%
    rem bin\SCDPBundleInstall.exe -install -packagepath=%HotfixPackageBundlePath% -metadatastorepath=%PLD% -tfsworkspacepath=%PLD% -tfsprojecturi=%TFSUri%
    
    endlocal

    Save it with a name like UpdateAppHotfixes.cmd. Run it from an elevated cmd console, while the local directory is the PackagesLocalDirectory.

        • Open Visual Studio and make sure you are logged in with the same account that is going to be used to access VSTS. If you are not sure, logout and log back in. All we want to get is a new valid authentication token so the steps below will succeed.
        • Close all VS instances
        • Open a cmd.exe window with elevated privileges (runas admin)
        • Change directory into PackagesLocalDirectory\bin folder (here K:\AosService\PackagesLocalDirectory\Bin, might be in J: also)
        • SCDPBundleInstall.exe -prepare -packagepath=C:\Temp\Downloads\NewX++HotfixesForSpringEnv170903\HotfixPackageBundle.axscdppkg -metadatastorepath=k:\AosService\PackagesLocalDirectory -tfsworkspacepath=k:\AosService\PackagesLocalDirectory -tfsprojecturi=https://XXXXX.visualstudio.com/defaultcollection
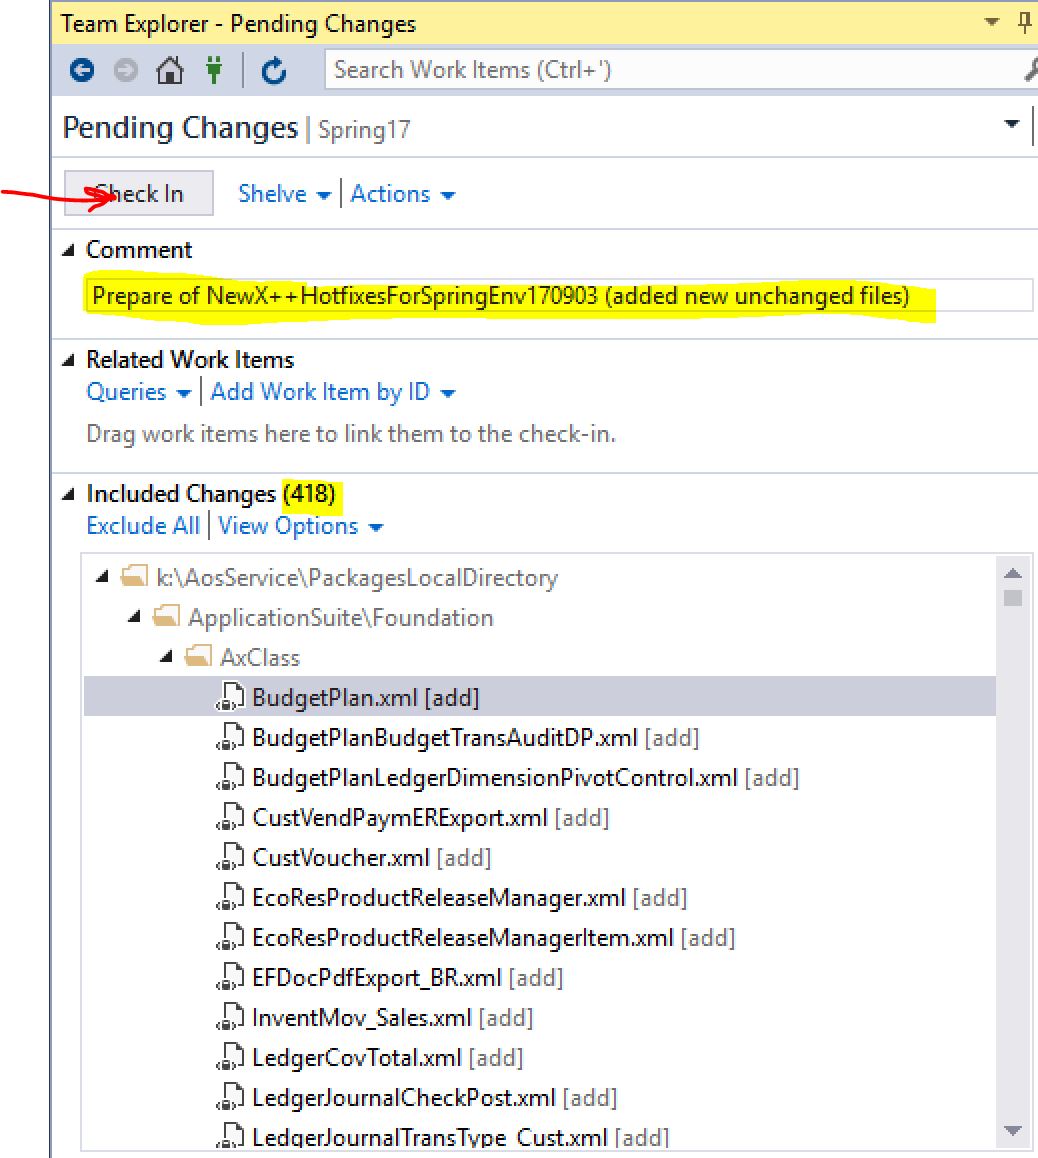
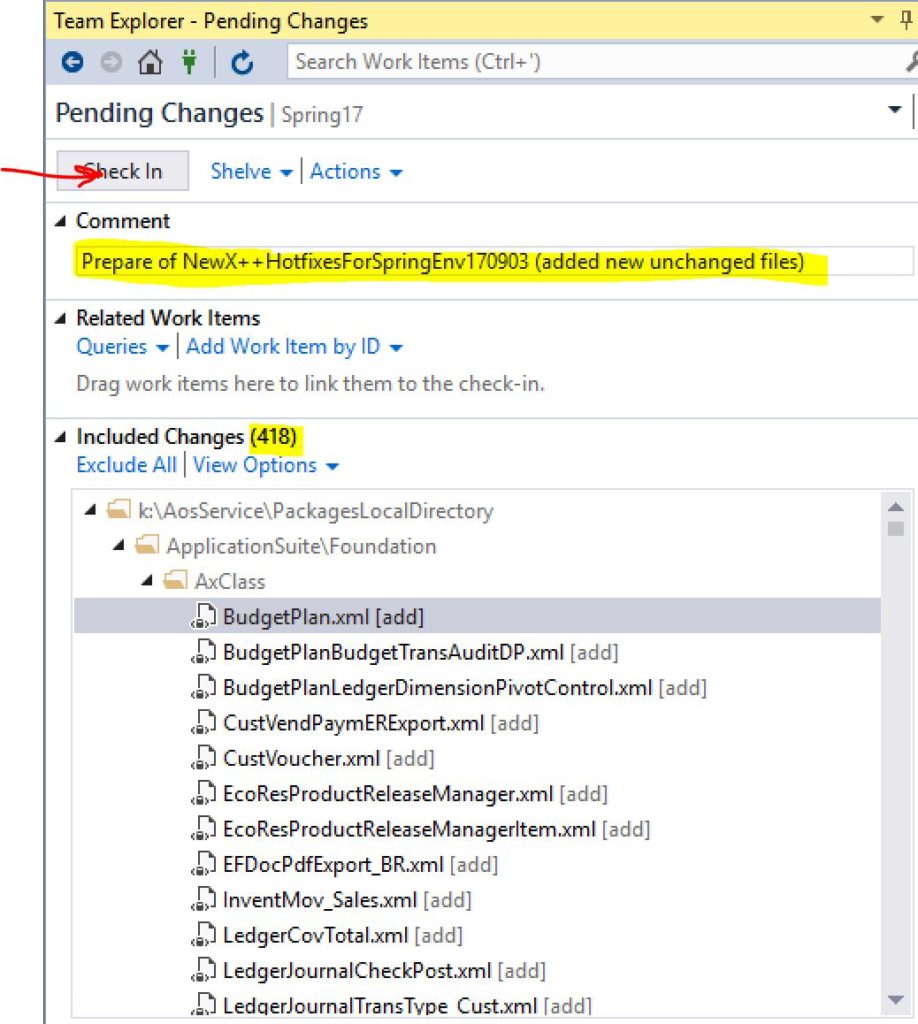
        • Once the command finished, open Visual Studio and submit the newly added files with a meaningful changelist name

      Apply the hotfixes

      This step will apply the actual changes to the files that were prepared in the previous step.

        • close all VS instances and keep using same cmd.exe instance from above
        • SCDPBundleInstall.exe -install -packagepath=C:\Temp\Downloads\NewX++HotfixesForSpringEnv170903\HotfixPackageBundle.axscdppkg -metadatastorepath=k:\AosService\PackagesLocalDirectory -tfsworkspacepath=k:\AosService\PackagesLocalDirectory -tfsprojecturi=https://XXXXX.visualstudio.com/defaultcollection
        • Once the command finished, check for conflicts: open Visual Studio, Select Dynamics 365/Addings/Create project from conflicts
          If there are conflicts, you need to resolve them
        • Do a full build: Dynamics 365/Build models/Packages-select all/Options-use default plus select sync database and then hit the Build button
        • When the build succeeded without errors, submit the changed files with a meaningful changelist name

      Binary hotfixes

      Binary hotfixes are cumulative. You need to pick one of them, and you will get the latest. If Retail channel components are not customized, then there is no code merge needed.

      Download the binary hotfix

        • Logon to LCS on the development box, chose the right environment

      • Click the download binaries button
      • Name it with meaningful data so you can identify the package later. I date of download (i.e. AllBinary72UpdatesLatestPlatform170903)
      • Unblock the zip file and then unzip it
      • Upload the zipped package to LCS’s Asset library

      Apply the binary hotfix

      Use the LCS environment’s Maintain menu to deploy this package.

      Only in case of Retail channel customizations: Update the Retail Sdk mirror branch

      In order to effectively do code merges, it is suggested to use 2 branches. For more details, check Retail Sdk Overview (at the end of the wiki page).

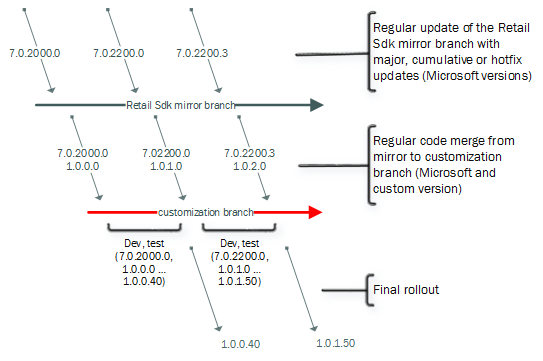
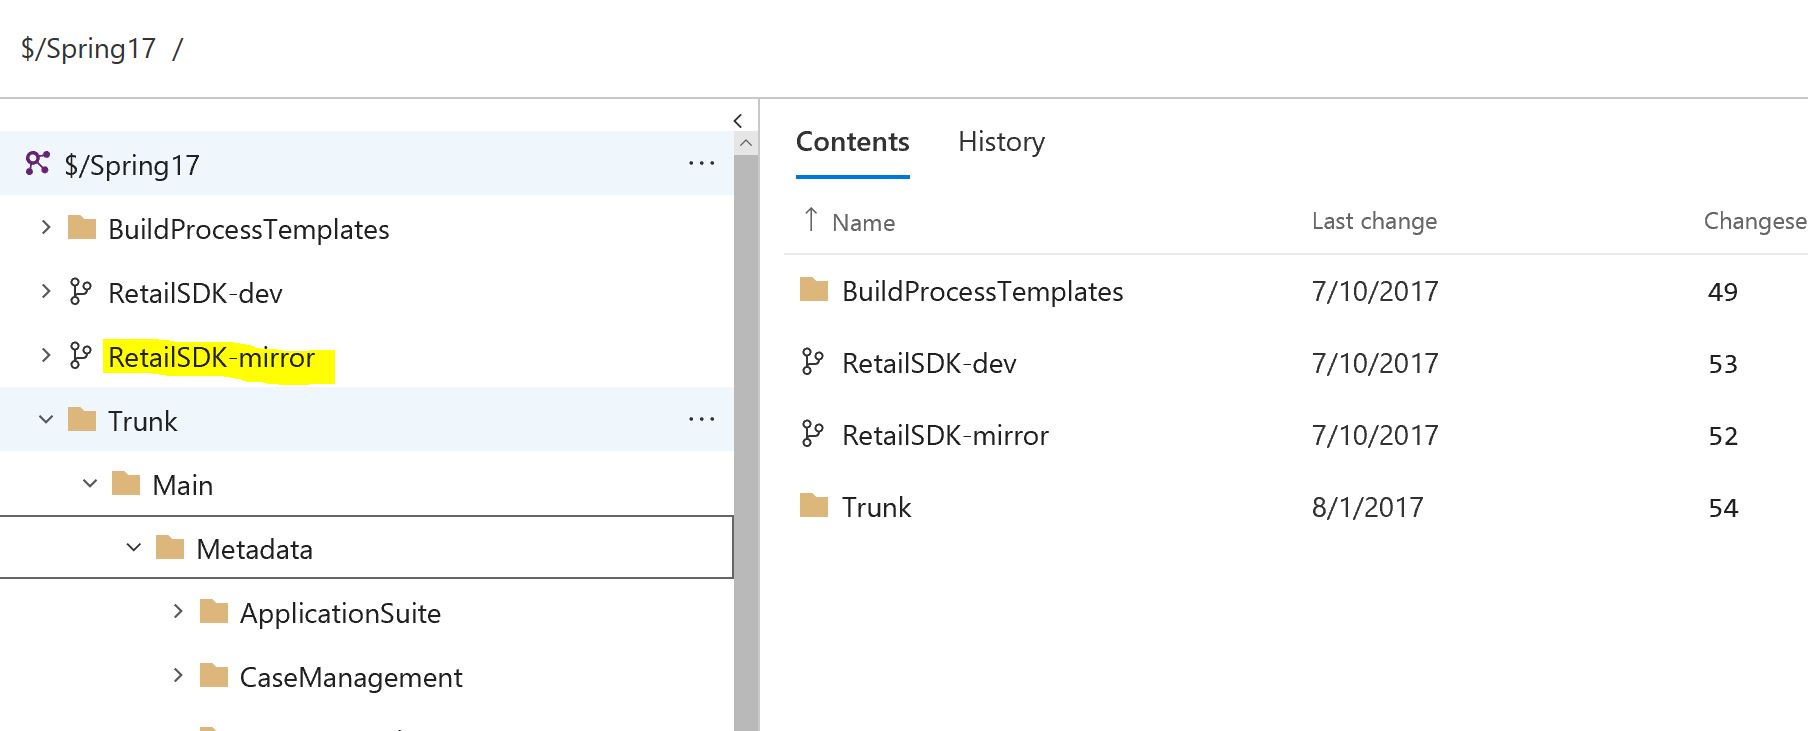
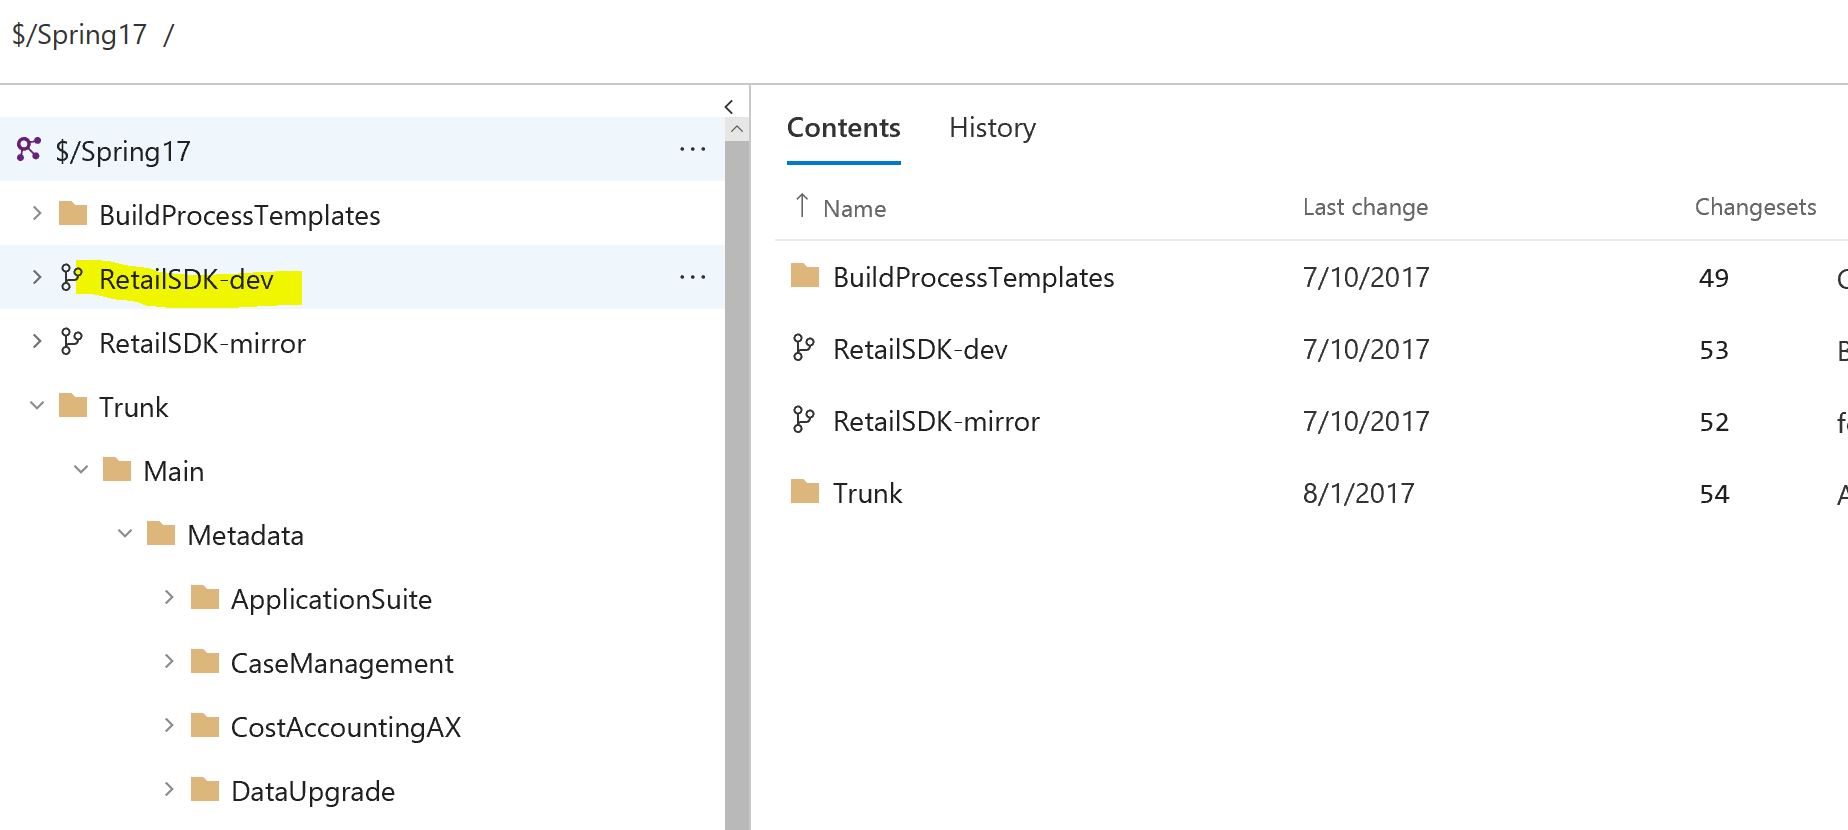
      Ideally, the Retail Sdk branch would be hosted in the same VSTS project, in parallel to the Trunk folder.

      In order to update it:

        • Make sure the mirror branch/folder is fully synced to latest version.
        • Close all but one Visual Studio instances
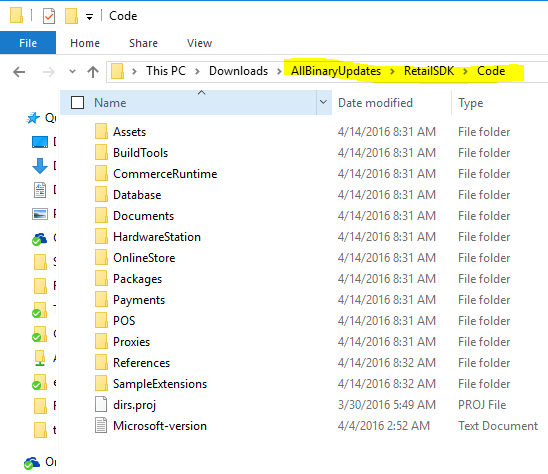
        • In a first Windows Explorer window, find the new Retail Sdk which we will use to update the mirror. On a brand new environment, find it in the service drive (K:\ or J:\) under “Retail Sdk”. If this is a binary hotfix, unzip the hotfix package as you downloaded it, and find the SDK in the RetailSDK\Code folder.

      • In a second Windows Explorer window open the location of the outdated mirror Retail Sdk branch/folder (where it is mapped from VSTS to local folder)
      • Delete all files in the outdated mirror Retail Sdk branch/folder (open in the second Windows Explorer Window)
      • Copy and paste all files from the new Retail Sdk into the folder you just cleaned (copy from second to first Windows Explorer window)
      • (Optional) If you have any doubt whether the shipped Retail Sdk has a build error, carry out these steps to verify:
      • (Optional) Make a temporary copy of the new Retail Sdk (from the hotfix) to any other place of your choice
      • (Optional) Open a Visual Studio 2015 msbuild command prompt and change directory to the temporary location
      • (Optional) Type “msbuild” and hit Enter (if this shows any build errors, please open a support request or bug as the shipped Retail Sdk should build without errors)
      • Delete all files in the mirror branch in Windows explorer, and add the new Retail Sdk back. This will ensure that removed files are properly being removed from the source control.
      • In “Source Control Explorer”, right click the mirror branch, “Add items to Folder…”, Add all folders from the same source location back. Make sure there are no “excluded items”, and hit Finish.
      • Make sure there are no files from the mirror branch listed under “Team Explorer”, “Pending Changes”, “Excluded Changes” and “Detected”. If there are, promote them to the “Included Changes”
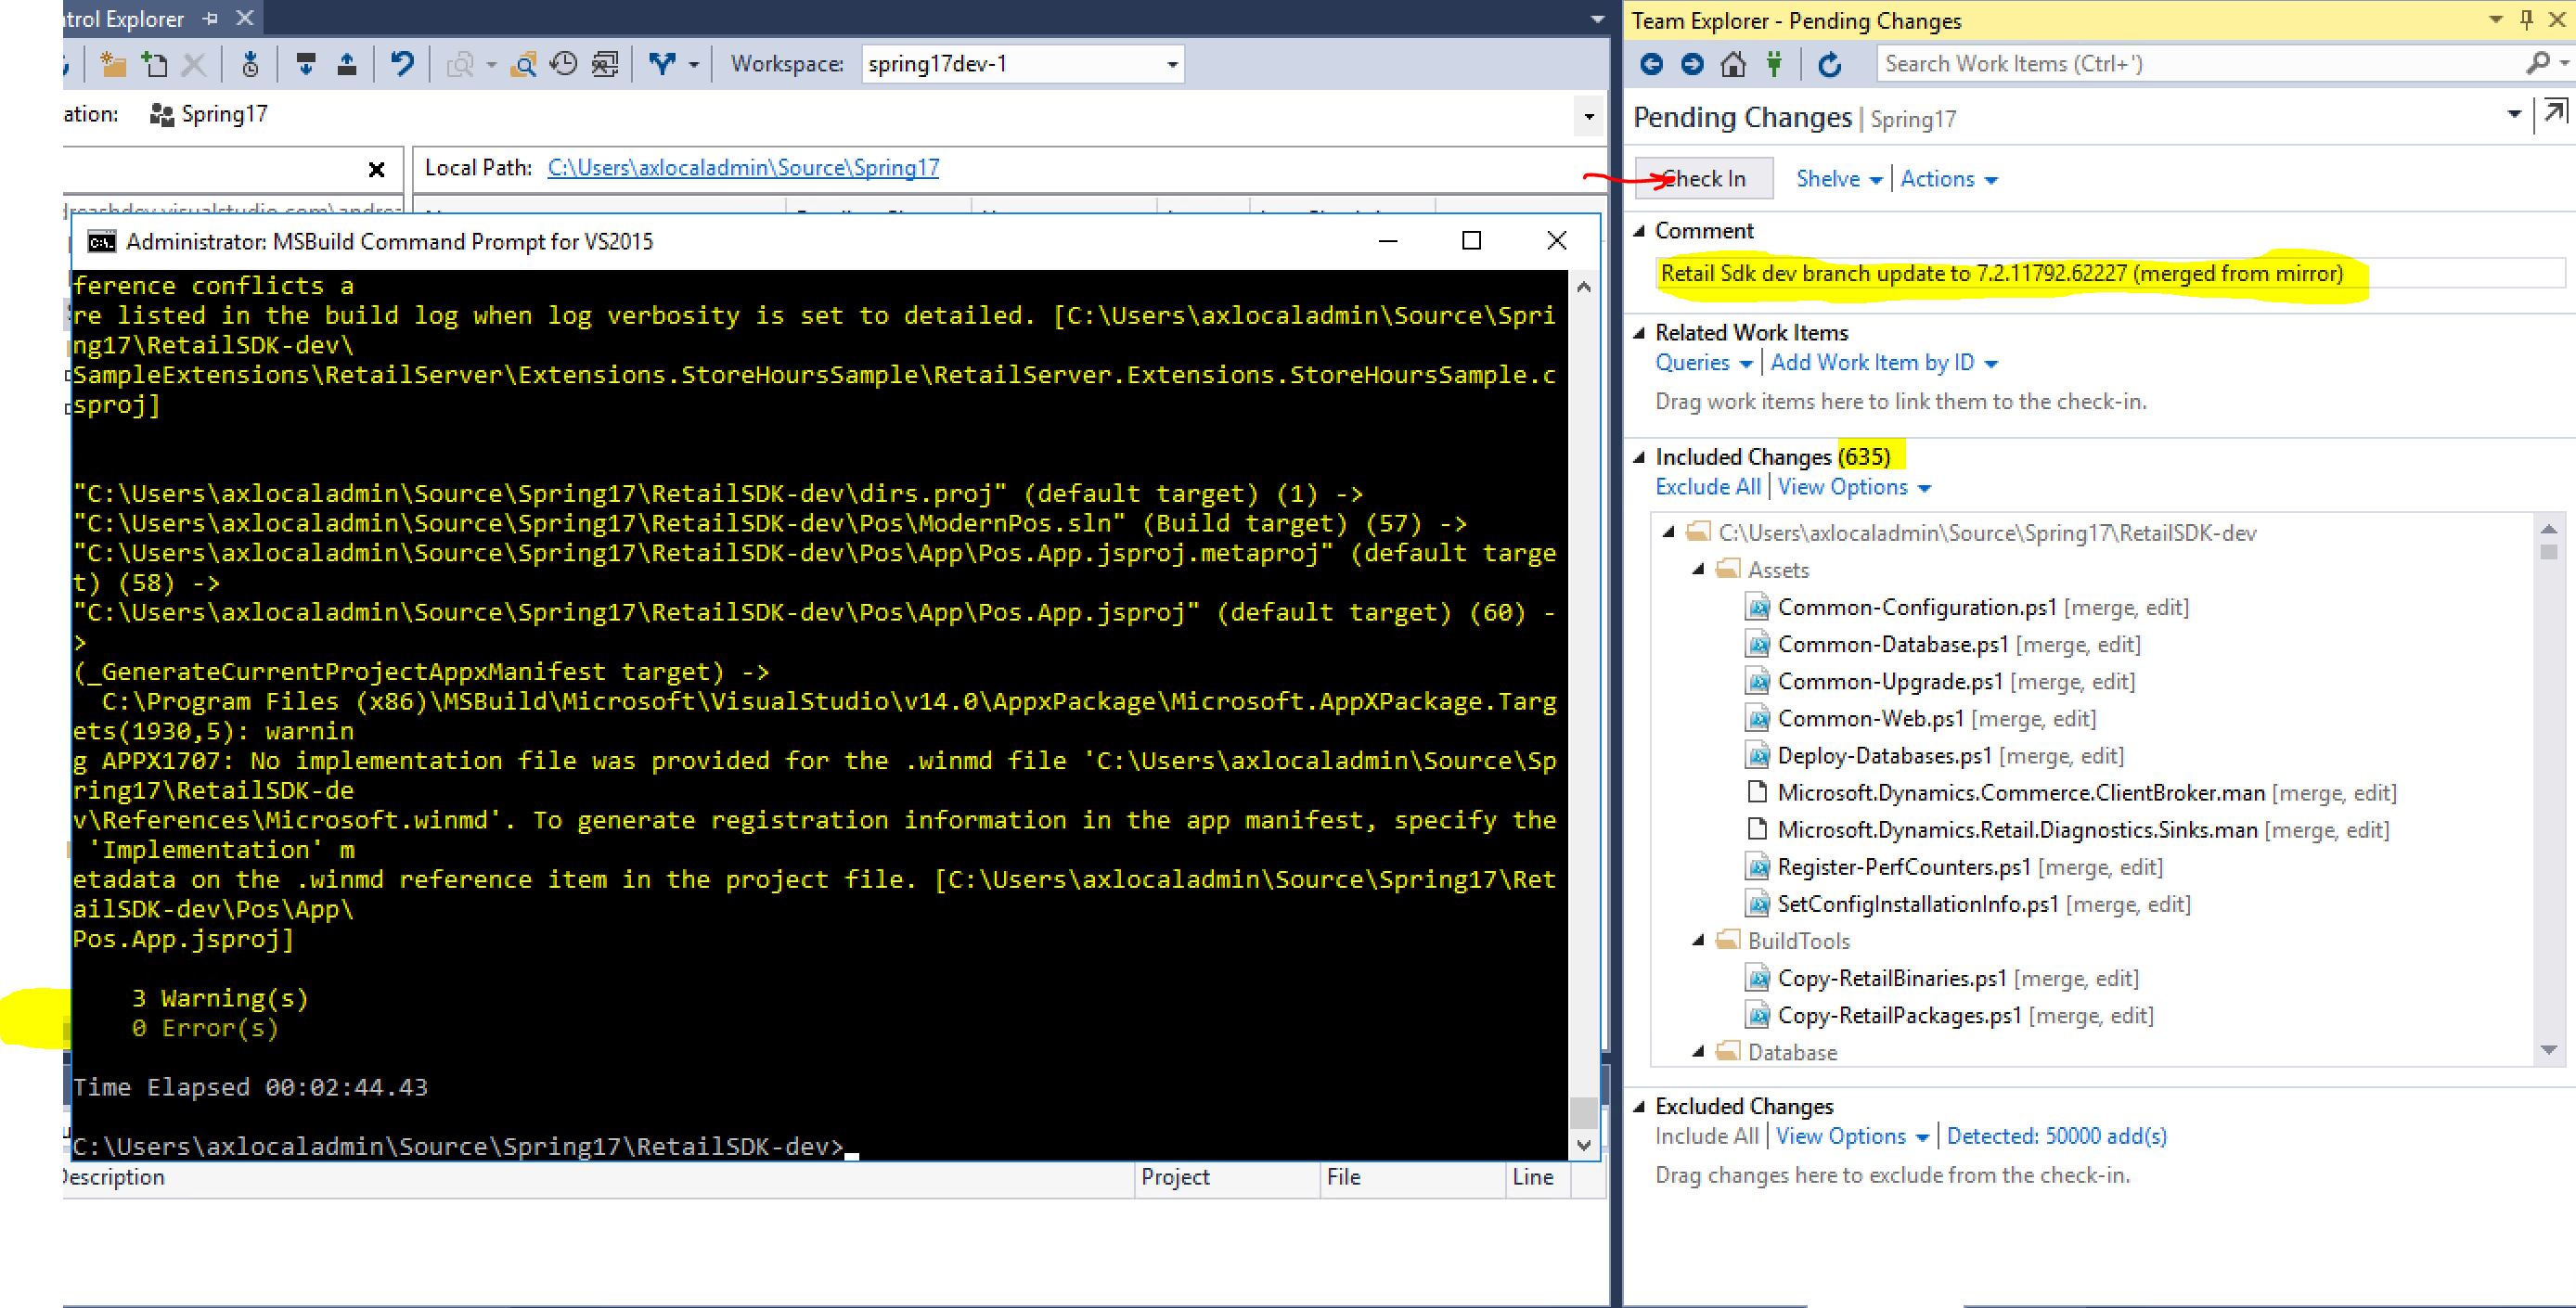
      • Check In the changes.

      Only in case of Retail channel customizations: Code merge the Retail Sdk customization branch

      • Make sure you do not have any changed files in the customization branch before you start. If this is difficult to accomplish create a new client mapping, get the customization branch into a different folder or machine and do the merge there. Do not start merging if you have opened files.
      • In Source Control Explorer, right click the mirror branch and select “Branching and Merge…”, Merge
      • Make sure that the source is the mirror branch and destination is your customization branch
      • Hit Next and Finish
      • Resolve any possible merge conflicts
      • Watch closely that all “Included files” are the correct files. These should only be the merged files, or updated files in the mirror
        Watch closely that all “Excluded files” only include generated files. Do not promote them

      Only in case of Retail channel customizations: Test local Retail Sdk customization build and submit to VSTS

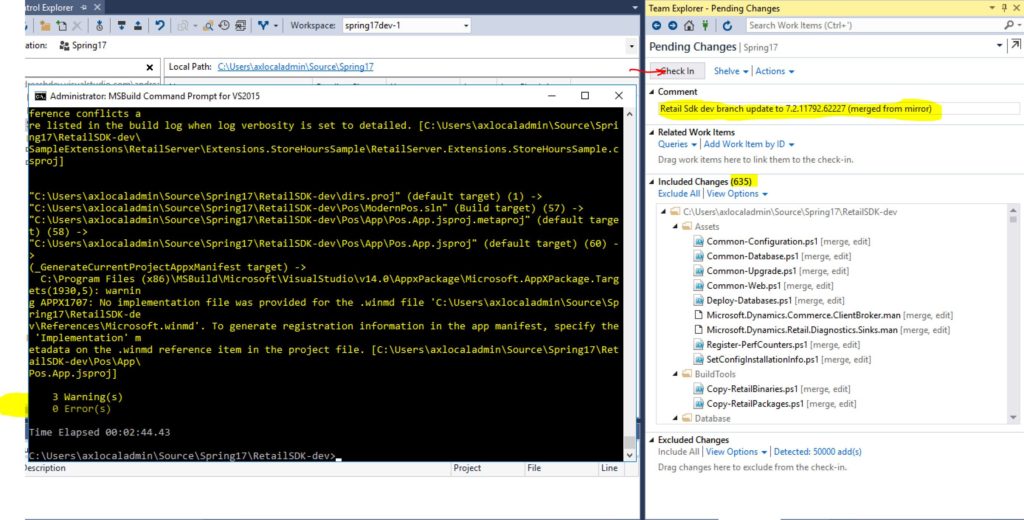
      Before checking in these changes, lets make sure that all builds fine. Open a Visual Studio MSBuild developer command window, and type “msbuild” at the root of the Retail Sdk customization branch. Once all builds fine, submit the changes with a meaningful changeset name.

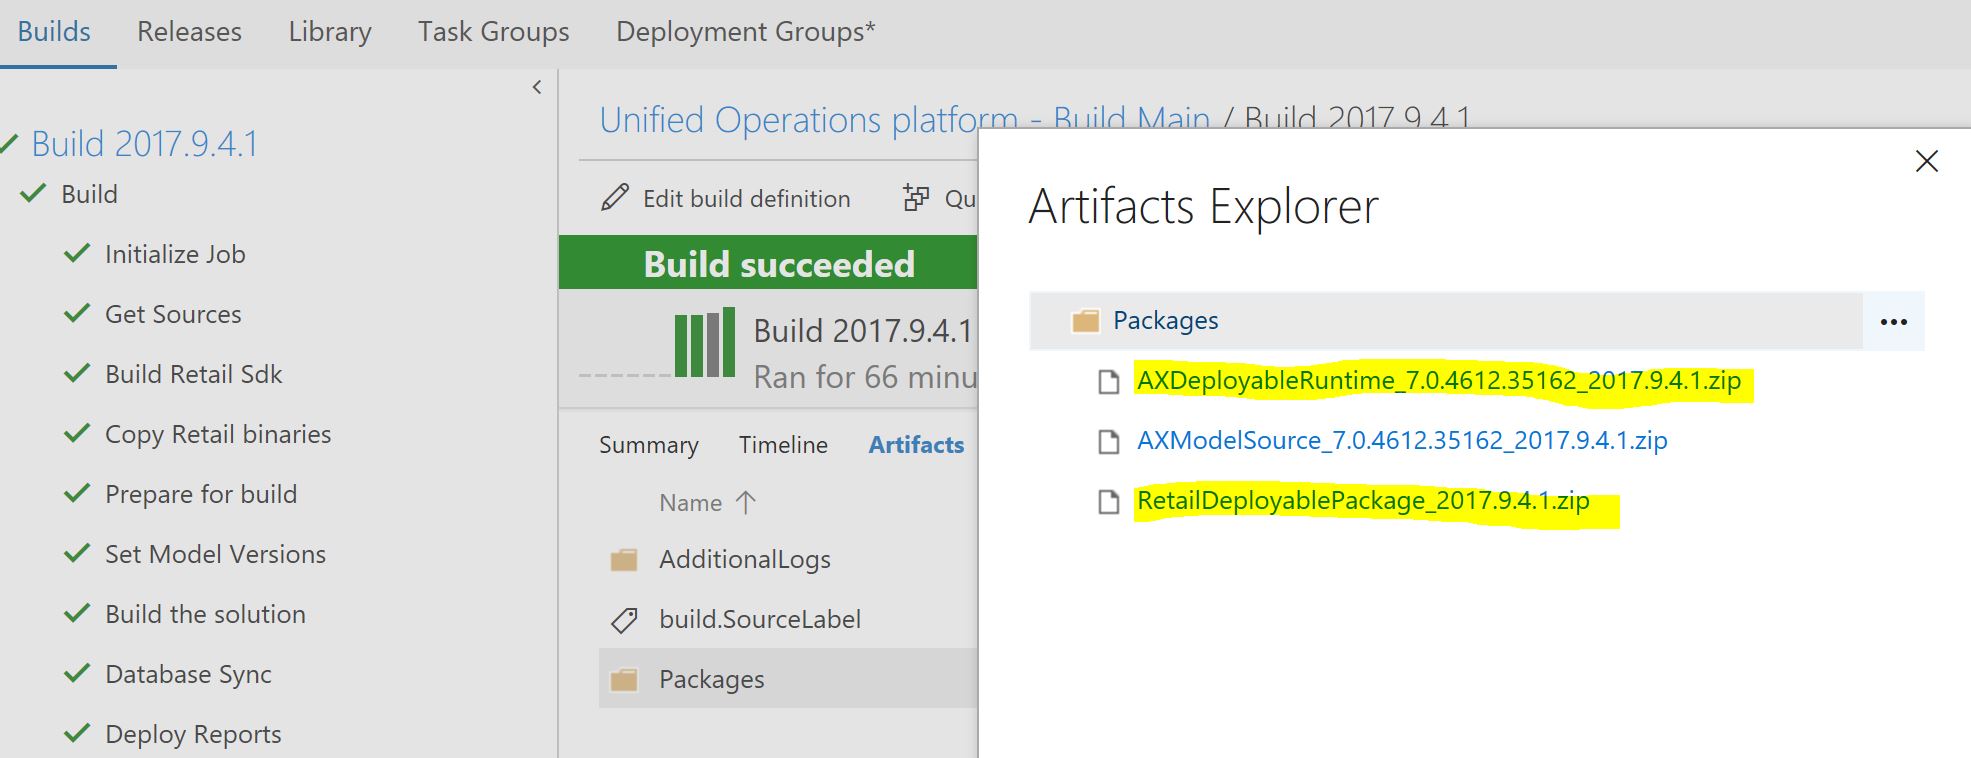
    Run build on build machine

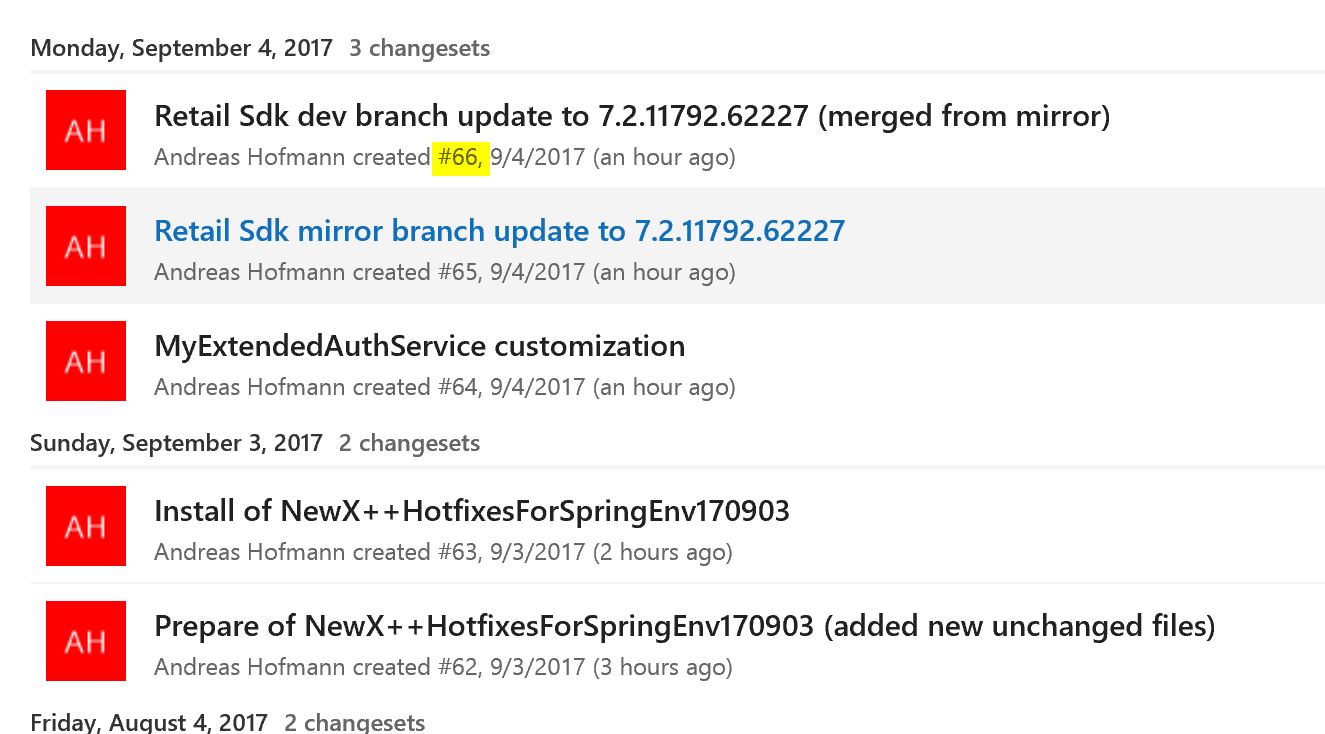
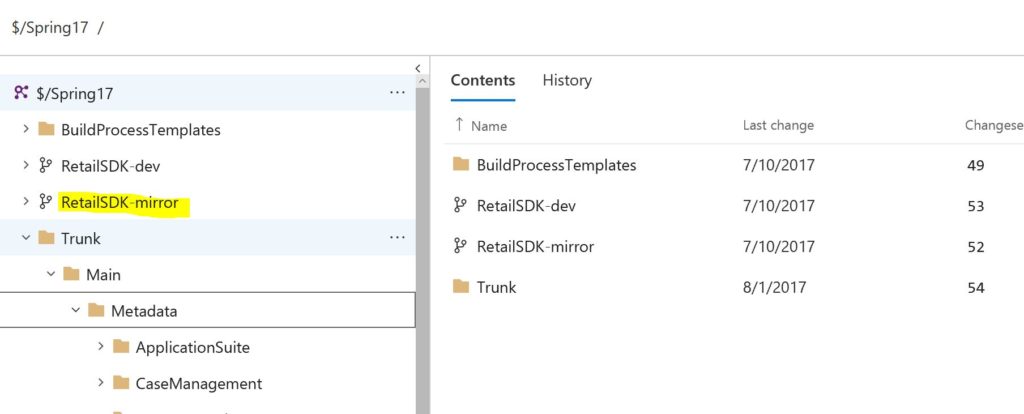
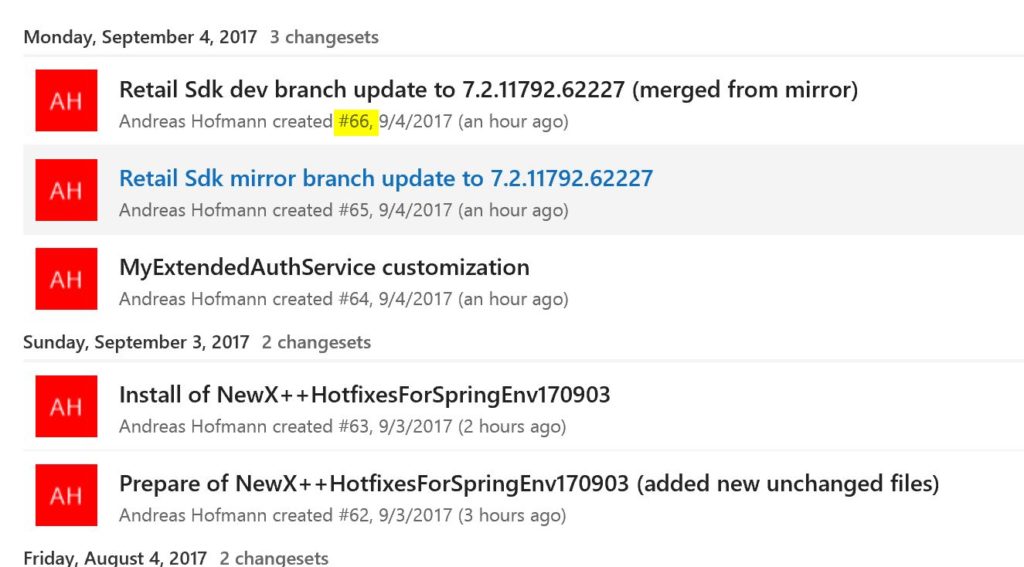
    Inspect the submitted changes in the VSTS code branch. In the example below, I see 2 checkins for the X++ hotfixes, one other code change, one to update the Retail Sdk mirror branch and one to code merge the Retail Sdk customization branch.

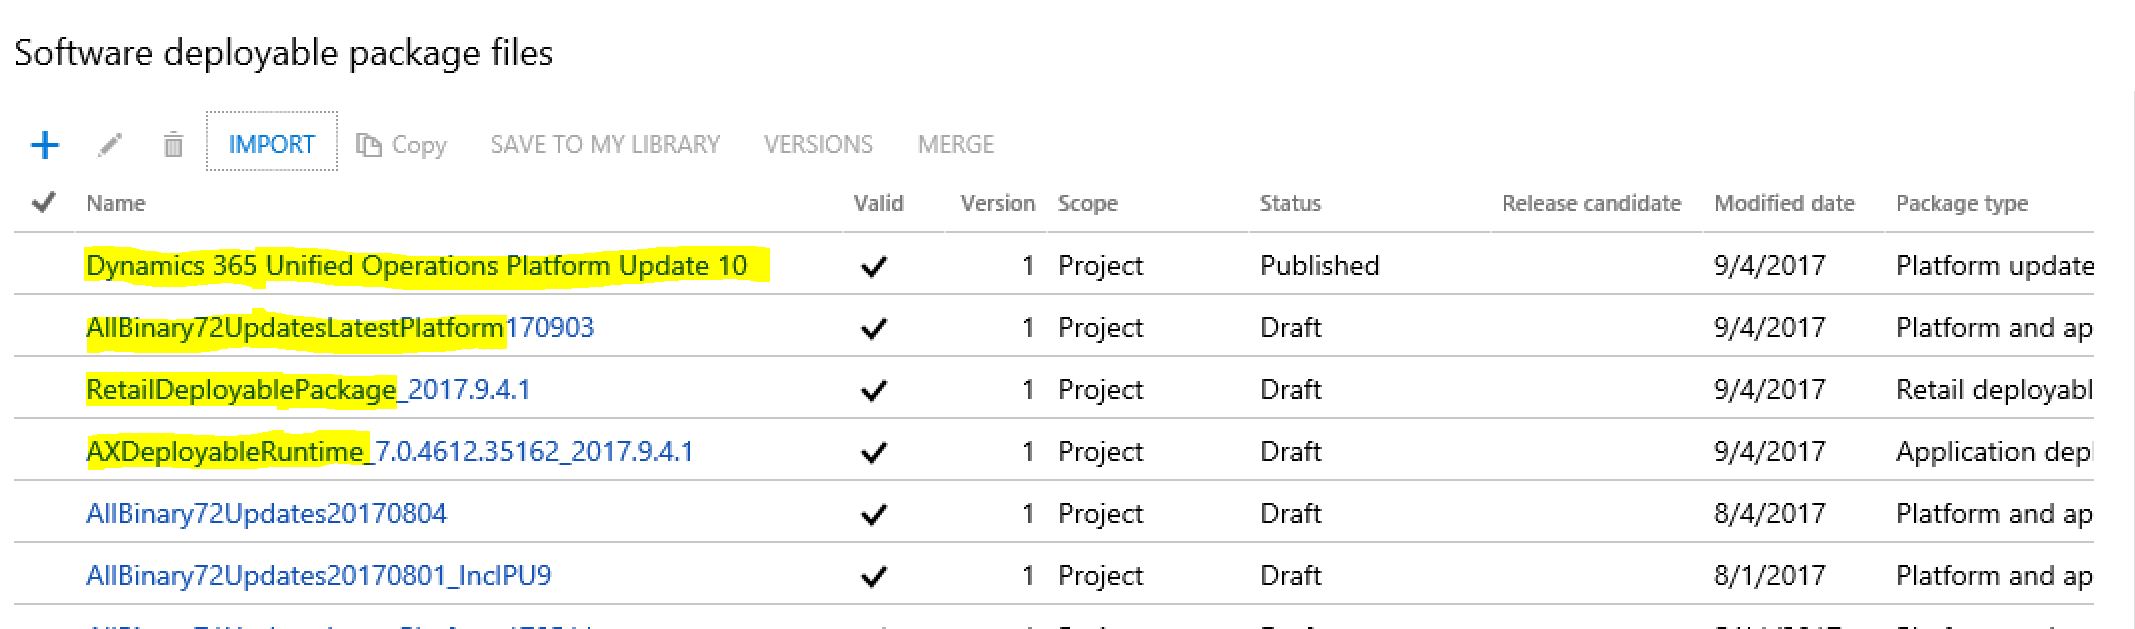
    Upload the AX and Retail deployable packages to LCS

    Find the packages in VSTS and upload them to LCS.

    Deploy AX and Retail deployable packages

    Deploy the packages from the LCS asset library (in the image below the 3rd and 4th).  The RetailDeployablePackage is only needed in case of Retail channel customizations.

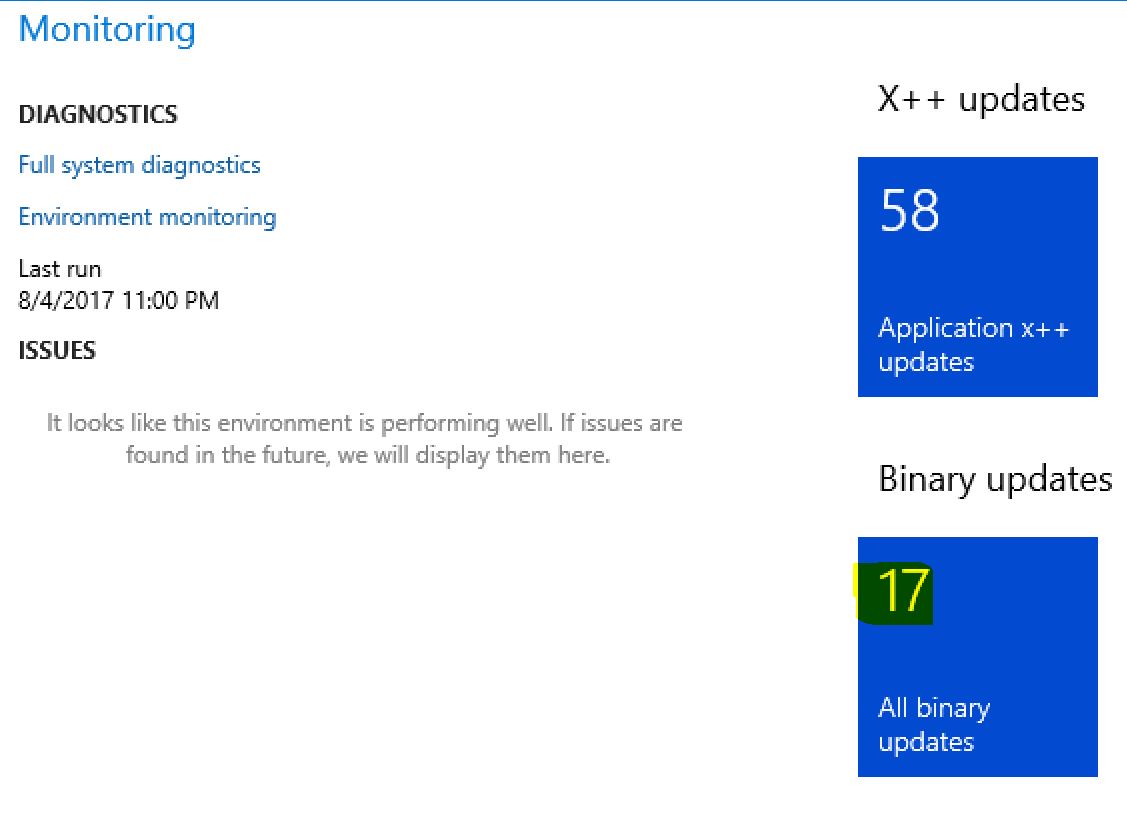
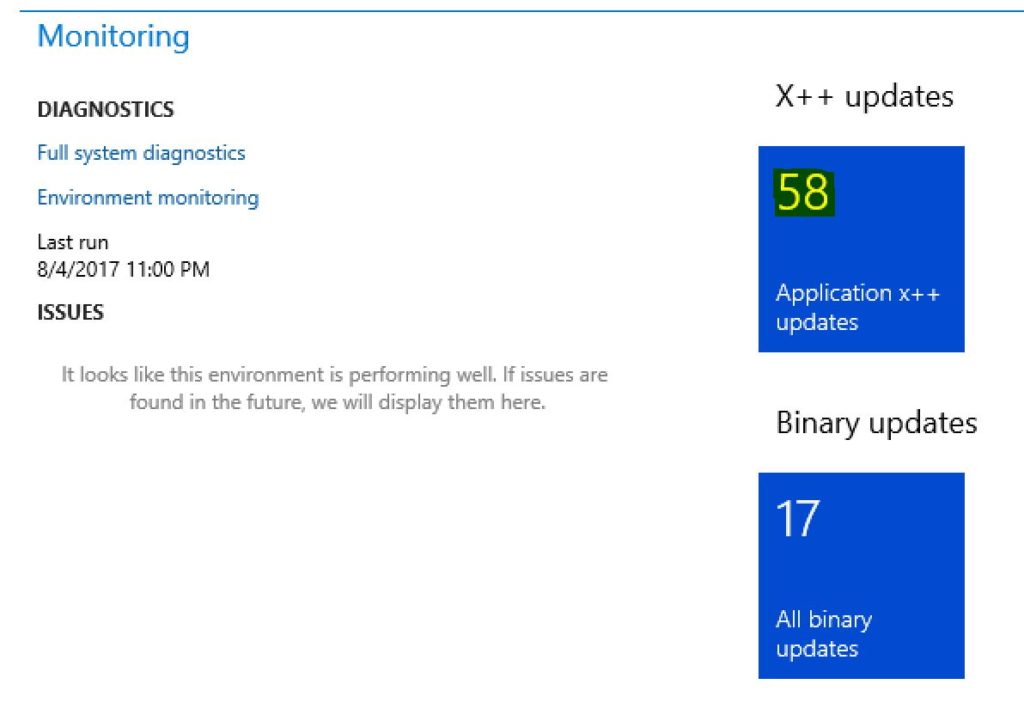
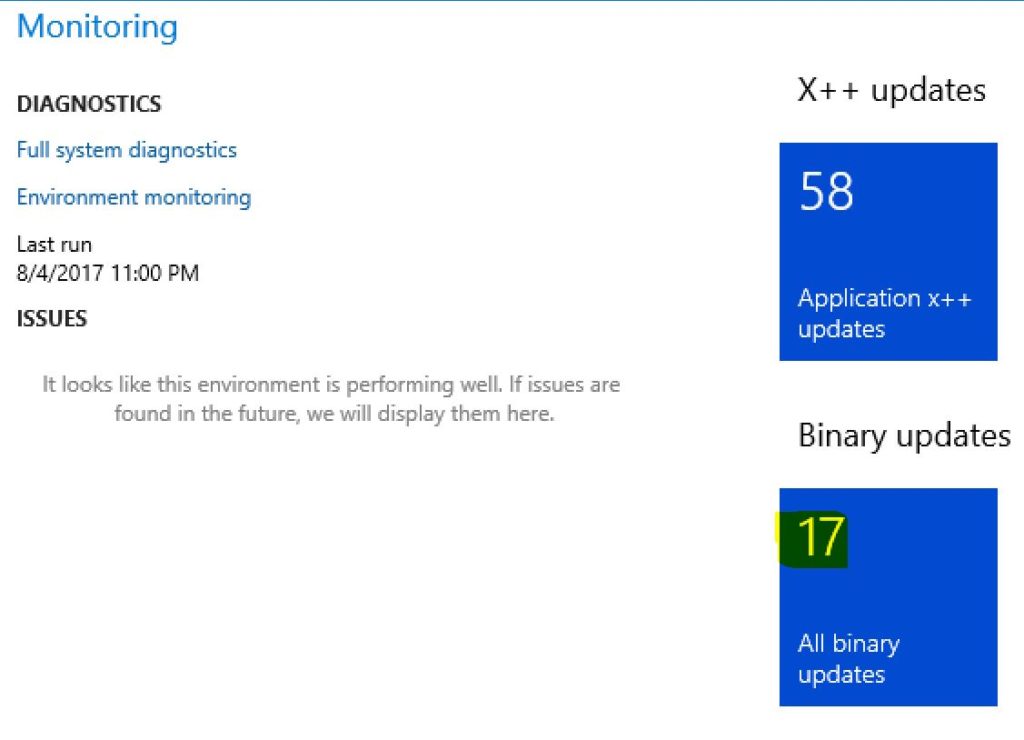
    Once the deployment succeeded, you should see the tile count go down.

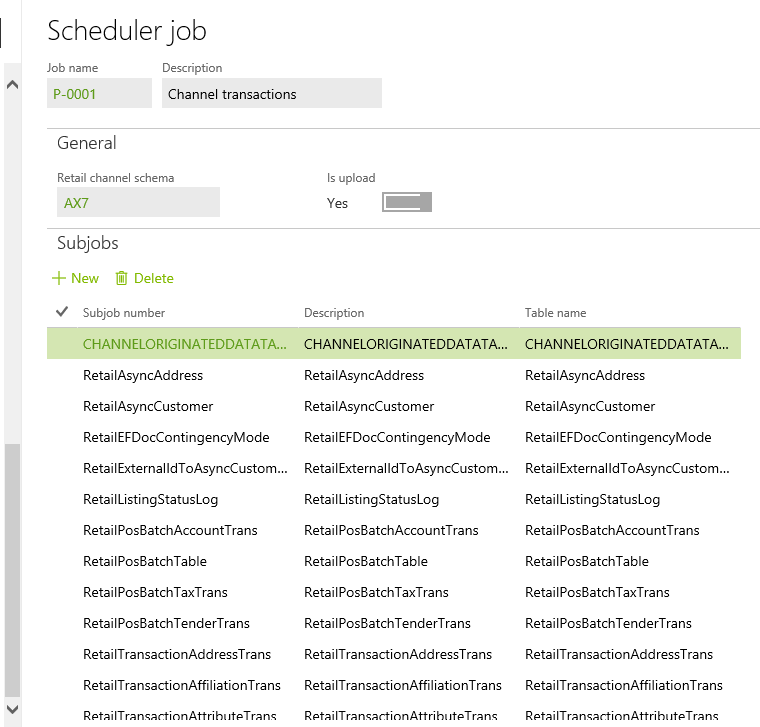
    Retail only: Update channel components

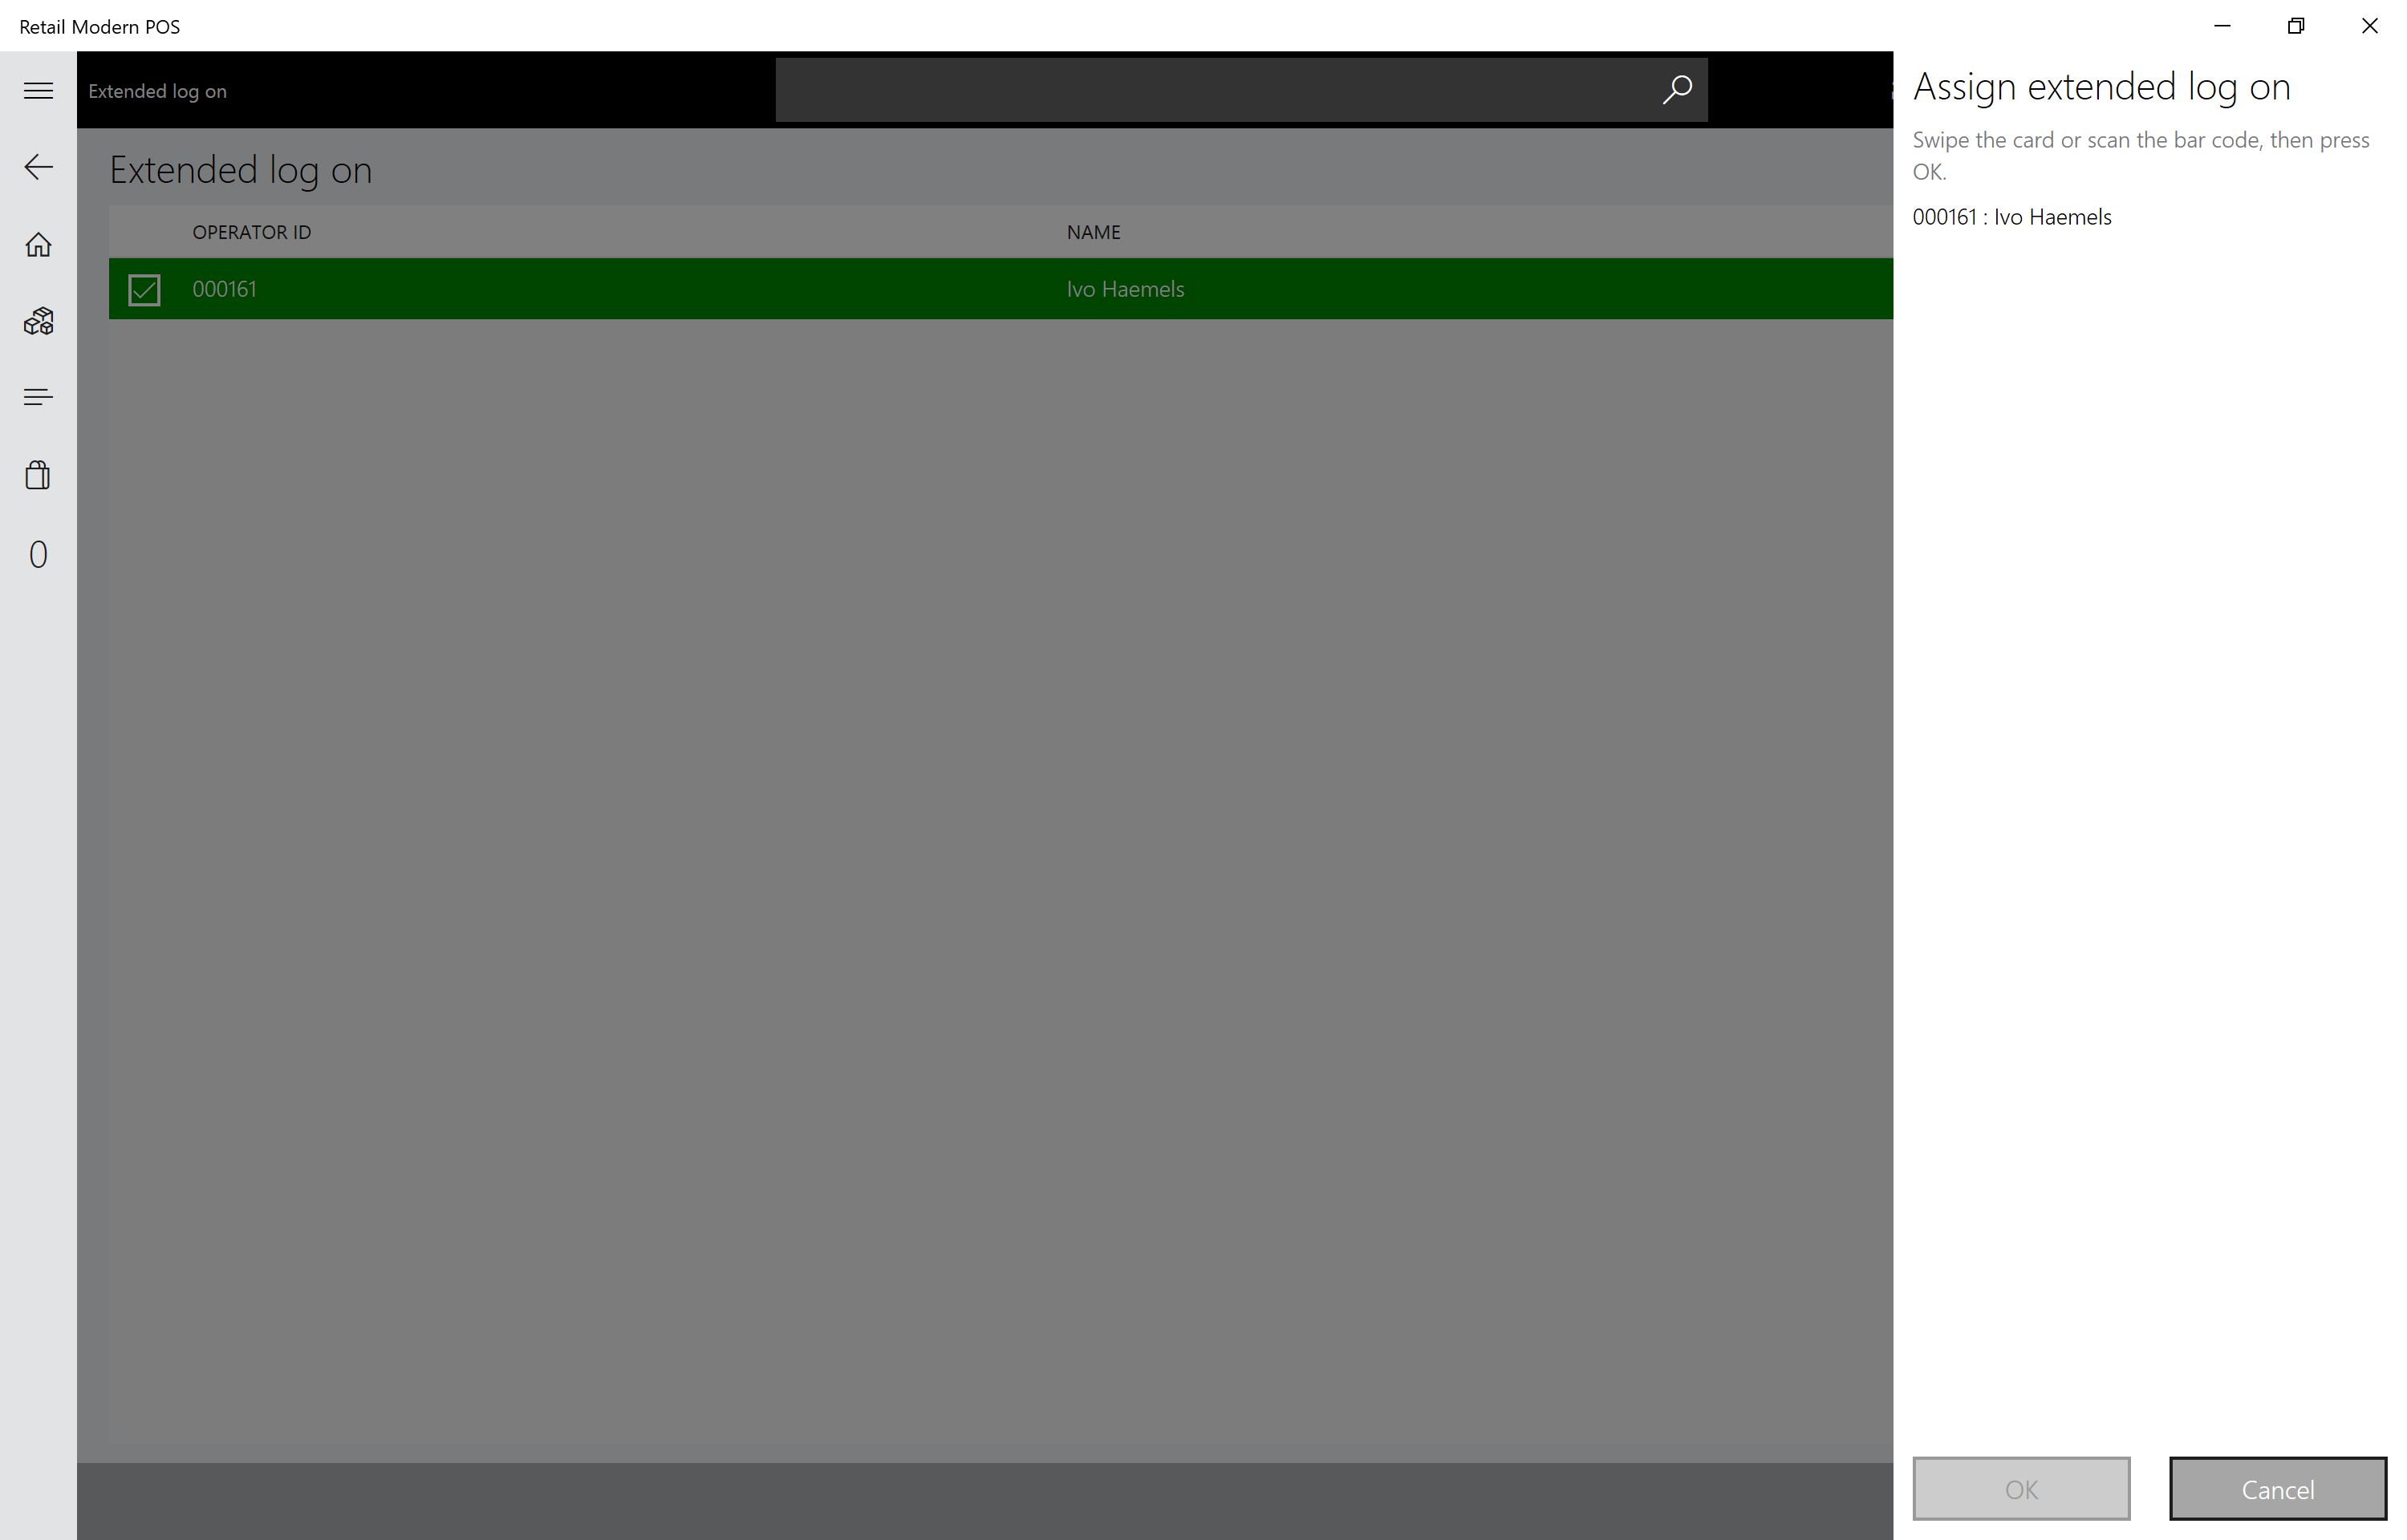
    Follow the wiki about how to deploy the store components (Modern POS, Modern POS Offline, Hardware station, Retail Store Scale Unit)

Using a Magnetic strip reader (MSR) to login to Dynamics 365 Retail POS


Note: Implemented with Dynamics 365 version 7.2.* (but likely working fine with lower or higher versions). Sample code can be downloaded at the end of this blog.

A little-known feature is the ability to log into POS with a barcode scanner or MSR. All the low-level plumbing is already implemented in POS to accept the data and to call the right RetailServer activity. Also, CRT handlers exist that carry out the mapping from the scanned/swiped data to the credential Id, which is then ultimately used to look up a user. This handler is being called as part of the authentication pipeline of the CRT.

Functional walkthrough

A manager must first assign a worker’s credential. For that add the operation called “Extended log on” an appropriate button layout and sync the download job that pushes the data for the registers (by default 1090). When that button is clicked, the following screen can be used to assign credential ids (insert/update):


Use the scanner or MSR when the application indicates it. Once saved, you are all set to try the login. For that, just scan/swipe on the logon dialog and the credential id is being looked up (read):

If the credential was found, the correct user will be logged in without any further prompt.

Technical details

If you want to use this functionality, you will very likely want to adjust the code that maps the scanned/swiped data to a credential id. The default implementation takes the first 5 characters and throws the rest away. What if the information in the scanned/swiped data is the same for the first 5 characters and only differs further down the string? We will need to implement our own CRT handler(s) so we can replace the mapping functions. The following example uses MSR data simulated by the Peripheral Simulator for Retail.
Note: The crt.STAFFCREDENTIALSVIEW view shows what information is stored for any staff member. The good thing is we do not need to touch any of that code, we just need to adjust the 3 CRT request handlers that need the mapping from scanned/swiped data to the credential id.

  1. Create a new CRT service with 3 new handlers for GetUserEnrollmentDetailsServiceRequest, ConfirmUserAuthenticationServiceRequest, and GetUserAuthenticationCredentialIdServiceRequest
    namespace MyCompany.Commerce.Runtime.MyExtendedAuthService
    {
        using Microsoft.Dynamics.Commerce.Runtime;
        using Microsoft.Dynamics.Commerce.Runtime.Handlers;
        using Microsoft.Dynamics.Commerce.Runtime.Messages;
        using Microsoft.Dynamics.Commerce.Runtime.Services.Messages;
        using System;
        using System.Collections.Generic;
        using System.Globalization;
    
        public class UniqueSecretExtendedAuthenticationService : INamedRequestHandler
        {
            public IEnumerable SupportedRequestTypes
            {
                get
                {
                    return new[]
                    {
                            typeof(GetUserEnrollmentDetailsServiceRequest),
                            typeof(GetUserAuthenticationCredentialIdServiceRequest),
                            typeof(ConfirmUserAuthenticationServiceRequest)
                    };
                }
            }
    
            public string HandlerName
            {
                get
                {
                    return "auth://example.auth.contoso.com/msr";
                }
            }
    
            public Response Execute(Request request)
            {
                if (request == null)
                {
                    throw new ArgumentNullException("request");
                }
    
                Response response;
                Type requestType = request.GetType();
    
                if (requestType == typeof(GetUserEnrollmentDetailsServiceRequest))
                {
                    response = this.GetUserEnrollmentDetails((GetUserEnrollmentDetailsServiceRequest)request);
                }
                else if (requestType == typeof(GetUserAuthenticationCredentialIdServiceRequest))
                {
                    response = this.GetUserAuthenticationCredentialId((GetUserAuthenticationCredentialIdServiceRequest)request);
                }
                else if (requestType == typeof(ConfirmUserAuthenticationServiceRequest))
                {
                    response = this.ConfirmUserAuthentication((ConfirmUserAuthenticationServiceRequest)request);
                }
                else
                {
                    throw new NotSupportedException(string.Format(CultureInfo.InvariantCulture, "Request '{0}' is not supported.", request));
                }
    
                return response;
            }
    
            private GetUserAuthenticationCredentialIdServiceResponse GetUserAuthenticationCredentialId(GetUserAuthenticationCredentialIdServiceRequest request)
            {
                return this.GetUserAuthenticationCredentialId(request.Credential, request.RequestContext);
            }
    
            private GetUserAuthenticationCredentialIdServiceResponse GetUserAuthenticationCredentialId(string credential, RequestContext requestContext)
            {
                // TODO: this is the place where you can customize the mapping between what was scanned/swiped and what the credential id is in the StaffCredentialsview
                string credentialId = credential;
    
                return new GetUserAuthenticationCredentialIdServiceResponse(credentialId);
            }
    
            private GetUserEnrollmentDetailsServiceResponse GetUserEnrollmentDetails(GetUserEnrollmentDetailsServiceRequest request)
            {
                string credentialId = this.GetUserAuthenticationCredentialId(request.Credential, request.RequestContext).CredentialId;
                return new GetUserEnrollmentDetailsServiceResponse(credentialId, string.Empty);
            }
    
            private Response ConfirmUserAuthentication(ConfirmUserAuthenticationServiceRequest request)
            {
                return new NullResponse();
            }
        }
    }
    
  2. Put the class into a project and update the C# project file so it can be built by the Retail sdk (imports at top and bottom)
  3. drop the dll into your RetailServer bin\ext folder (for testing only)
  4. update your RetailServer bin\ext\commerceruntime.ext.config file to include the new assembly
  5. Update your Customizations.settings file to include this file as part of your customizations

Note: The changes in Customization.settings and commerceruntime.exe.config need to be made in the RetailSdk under VSTS, so these changes will be used by the build and package generation.
A fully working zipped up project can be found below. Just add the project to the SampleExtensions\CommerceRuntime folder and compile.
Extensions.MyExtendedAuthService

CDX extensibility – Synchronizing data from channel to HQ via P-job


By default, there are very few tables that get synchronized from the store to the HQ. These are mostly tables related to the transactions being generated. However, there are scenarios where customers may want to create other data in their own tables in the channel and bring it back to HQ. In many cases, that may not need to happen in real-time and this task can be accomplished by using the pull job architecture. Below are the steps how to set this up.

Dynamics 365 for Operations table creation

Since the records will trickle in from multiple channels, stores, terminals, the table’s index must include the data that differentiate the records. A good example is the RetailTransactionTable to look at how it’s done.
Create the table with the AOT and follow these guidelines:

  • A column called “REPLICATIONCOUNTERFROMORIGIN” of type RetailReplicationCounter needs to be added.
  • Add the other data columns that you would like to synchronize (in this example, FieldStr1 and FieldInt1)
  • Set “Created Date Time” and “Modfied Date Time” to Yes.
  • Create an index that includes the fields that are needed to differentiate the records well. For retail stores, that could be Channel, Store, Staff, Terminal and the id of the record as called ChannelOriginatedDataId in this example.


Note: How to put this file into VSTS so the change is reproducible and deployable into other environments is omitted here.

Create the table schema for the Channel database

Create a table with the same name but schema [ax] in SSMS. Here are some specific requirements to follow:

  • Include columns called [REPLICATIONCOUNTERFROMORIGIN], [ROWVERSION], [CREATEDDATETIME] and [MODIFIEDDATETIME] (details below)
  • If the table in HQ is per company (SaveDataPerCompany = yes), include a column [DataAreaId]
  • Create a clustered unique index for column [REPLICATIONCOUNTERFROMORIGIN]
  • Create a nonclustered primary key index for columns that uniquely differenciate the records, including [DATAAREAID] if data is saved per company
IF (SELECT OBJECT_ID('ax.CHANNELORIGINATEDDATATABLE')) IS NULL 
BEGIN
	CREATE TABLE [ax].[CHANNELORIGINATEDDATATABLE](
		[CHANNELORIGINATEDDATAID] [nvarchar](44) NOT NULL,
		[FIELDSTR1] [nvarchar](200) NOT NULL DEFAULT (''),
		[FIELDINT1] [int] NOT NULL DEFAULT (0),
		[CHANNEL] [bigint] NOT NULL,
		[STORE] [nvarchar](10) NOT NULL,
		[TERMINAL] [nvarchar](10) NOT NULL,
		[STAFF] [nvarchar](25) NOT NULL,
		[CREATEDDATETIME] [datetime] NOT NULL,
		[MODIFIEDDATETIME] [datetime] NOT NULL,
		[REPLICATIONCOUNTERFROMORIGIN] [int] IDENTITY(1,1) NOT NULL,
		[DATAAREAID] [nvarchar](4) NOT NULL,
		[ROWVERSION] [timestamp] NOT NULL,
	 CONSTRAINT [I_AX_CHANNELORIGINATEDDATATABLE_PK] PRIMARY KEY NONCLUSTERED 
	(
		[CHANNEL] ASC,
		[STORE] ASC,
		[TERMINAL] ASC,
		[CHANNELORIGINATEDDATAID] ASC,
		[DATAAREAID] ASC
	)WITH (PAD_INDEX = OFF, STATISTICS_NORECOMPUTE = OFF, IGNORE_DUP_KEY = OFF, ALLOW_ROW_LOCKS = ON, ALLOW_PAGE_LOCKS = ON) ON [PRIMARY],
	 CONSTRAINT [I_AX_CHANNELORIGINATEDDATATABLE_REPLICATIONCOUNTERFROMORIGIN] UNIQUE CLUSTERED 
	(
		[REPLICATIONCOUNTERFROMORIGIN] ASC
	)WITH (PAD_INDEX = OFF, STATISTICS_NORECOMPUTE = OFF, IGNORE_DUP_KEY = OFF, ALLOW_ROW_LOCKS = ON, ALLOW_PAGE_LOCKS = ON) ON [PRIMARY]
	) ON [PRIMARY]
END
GO

GRANT SELECT,INSERT,UPDATE,DELETE ON [ax].CHANNELORIGINATEDDATATABLE TO [DataSyncUsersRole]
GRANT INSERT ON [ax].[CHANNELORIGINATEDDATATABLE] TO [UsersRole]

Note: How to put this file into VSTS and registered in the Retail Sdk’s Customization.settings file so the change is reproducible and deployable into other environments is omitted here.

Add the new table to the list of Channel tables

CDX needs to be aware of the schema of the channel table in order to map and sync it with the HQ table. In Retail and commerce > Headquarters setup > Retail Scheduler > Retail channel schema, click Channel tables and add a new table with the new fields:

Add a new scheduler subjob

In Retail and commerce > Headquarters setup > Retail Scheduler > Scheduler subjobs create a new subjob that maps both HQ and channel table. Make sure that:

  • the special column [REPLICATIONCOUNTERFROMORIGIN] is both mapped in the field mapping and used in the replication counter field, and
  • the slider for “Pull Data” is set to Yes.

Add the subjob to the job

In Retail and commerce > Headquarters setup > Retail Scheduler > Scheduler jobs add the subjob to a job. You could reuse the existing P-0001 job as in this example:

Finally, in Retail and commerce > Headquarters setup > Retail Scheduler you must regenerate the sync helper classes with “Generate queries”.
Note: The previous steps in the Dynamics 365 for Operations user interface to configure CDX are shown here for better illustration. Ideally, these should be coded in X++ to get reliable and automatic deployments into other environments.

Verification

Add some data into the table in the channel side ([ax] schema) and run the pull job. Then inspect the data in the HQ side:

Data access in the CommerceRuntime


Below are some code samples for reading and writing data in Channel database. This is just for Channel database. This does not necessary mean that the data needs to go to D365 HQ. It may, either via CDX pull job or via Real-time service call. This information is only for simple reads and writes in Channel db.

Prerequisites:
Dynamics 365 for Operations (1611)
KB3214687
KB3214679

First, create the SQL table in ax schema and a view in crt schema:

    CREATE TABLE [ax].[MY_EXTENSION](
		[DATAAREAID] [nvarchar](4) NOT NULL,
		[RECID] [bigint] NOT NULL,
		[COL1] [int] NOT NULL,
		[COL2] [nvarchar](100) NOT NULL,
		[COL3] [bit] NOT NULL,
		[ACCOUNTNUM] [nvarchar](20) NOT NULL)
    . . .
    END
    GO

    CREATE VIEW [crt].[MY_EXTENSIONVIEW] AS
    (
        SELECT ACCOUNTNUM, DATAAREAID, COL1, COL2, COL3 FROM [ax].[MY_EXTENSION]
    )
    GO

    GRANT SELECT ON [crt].[MY_EXTENSIONVIEW] TO [UsersRole];
    GO

The shown sample adds 3 columns to be stored from 3 extension properties.

Grant the right permissions to table and view. This is the list of supported SQL roles:

DataSyncUsersRole Used by CDX process account
PublishersRole Used by publishing process account (eCommerce)
ReportUsersRole Used by reporting user account
UsersRole Used by runtime user (RetailServer)

Next, create a sproc for updating:

CREATE PROCEDURE [crt].[MY_UPDATEEXTENSIONPROPERTIES]
    @TVP_EXTENSIONPROPERTIESTABLETYPE         [crt].EXTENSIONPROPERTIESTABLETYPE READONLY
AS
BEGIN
	DECLARE @nvc_DataAreaId NVARCHAR(4);
	DECLARE @recId bigint;
	DECLARE @accountNum [nvarchar](20);

	DECLARE @Col1Value int = 0;
	DECLARE @Col2Value nvarchar(100) = '';
	DECLARE @Col3Value bit = 0;
	
       SELECT DISTINCT TOP 1 @recId = tp.PARENTRECID, @nvc_DataAreaId = ct.DATAAREAID, @accountNum = ct.ACCOUNTNUM
       FROM @TVP_EXTENSIONPROPERTIESTABLETYPE tp
       JOIN [ax].CUSTTABLE ct on ct.RECID = tp.PARENTRECID
       WHERE tp.PARENTRECID <> 0
			
	SELECT @Col1Value = COALESCE(tp.PROPERTYVALUE, 0)
	FROM @TVP_EXTENSIONPROPERTIESTABLETYPE tp 
	where tp.PARENTRECID <> 0 and tp.PROPERTYNAME = 'COL1'
	
	SELECT @Col2Value = COALESCE(tp.PROPERTYVALUE, '')
	FROM @TVP_EXTENSIONPROPERTIESTABLETYPE tp 
	where tp.PARENTRECID <> 0 and tp.PROPERTYNAME = 'COL2'
	
	SELECT @Col3Value = CAST(CASE WHEN tp.PROPERTYVALUE = 'True' THEN 1 ELSE 0 END AS BIT)
	FROM @TVP_EXTENSIONPROPERTIESTABLETYPE tp 
	where tp.PARENTRECID <> 0 and tp.PROPERTYNAME = 'COL3'

	MERGE INTO [ax].[MY_CUSTOMEREXTENSION] dest
	USING (SELECT @accountNum as ACCOUNTNUM) as source on  dest.ACCOUNTNUM = source.ACCOUNTNUM
	WHEN matched then
		update set dest.COL1 = @Col1Value, dest.COL2 = @Col2Value, dest.COL3 = @Col3Value
	when not matched then
		INSERT (RECID, ACCOUNTNUM, DATAAREAID, COL1, COL2, COL3)
		VALUES (@recId, @accountNum, @nvc_DataAreaId, @Col1Value, @Col2Value, @Col3Value);
END
GO

GRANT EXECUTE ON [crt].[MY_UPDATECUSTOMEREXTENSIONPROPERTIES] TO [UsersRole];
GO

Note the MERGE INTO statement. This allows to either create or update a record.

For reading in the CRT, here especially for extension properties, use SQLPagedQuery, SQLServerDatabaseContext and ExtensionsEntity:

var query = new SqlPagedQuery(QueryResultSettings.SingleRecord)
{
    Select = new ColumnSet(new string[] { "COL1", "COL2", "COL3" }),
    From = "MY_EXTENSIONVIEW",
    Where = "ACCOUNTNUM = @accountNum AND DATAAREAID = @dataAreaId",
};

query.Parameters["@accountNum"] = customer.AccountNumber;
query.Parameters["@dataAreaId"] = request.RequestContext.GetChannelConfiguration().InventLocationDataAreaId;
using (var databaseContext = new SqlServerDatabaseContext(request))
{
    ExtensionsEntity extensions = databaseContext.ReadEntity(query).FirstOrDefault();
    if (extensions != null)
    {
        var col1 = extensions.GetProperty("COL1");
        if (col1 != null)
        {
            customer.SetProperty("COL1", col1);
        }
        else
        {
            customer.SetProperty("COL1", 0);
        }
 	 
        . . .
    }
    else
    {
        customer.SetProperty("COL1", 0);
    }
}

In order to write the data to the db, use this code to call the sproc shown above:

using (var databaseContext = new SqlServerDatabaseContext(r))
using (var transactionScope = new TransactionScope())
{
    if (!r.Customer.ExtensionProperties.IsNullOrEmpty())
    {
        ParameterSet parameters = new ParameterSet();
        parameters["@TVP_EXTENSIONPROPERTIESTABLETYPE"] = new ExtensionPropertiesTableType(r.Customer.RecordId, r.Customer.ExtensionProperties).DataTable;
        databaseContext.ExecuteStoredProcedureNonQuery("MY_UPDATEEXTENSIONPROPERTIES", parameters);
    }

    transactionScope.Complete();
}

In the case of you want to write other data to the database (no extension properties to entities), build the SqlParameters one by one and match in your sproc. For reading, it may be easier to just treat it as extension properties, then convert to whatever you want. Or you could create your own entity and query for that.

Hosting a downloaded dev VHD of Dynamics 365 for Operations

In order to save cost or time, it may be practical for partners/customers to host their own version of the VHD that is based on the official downloadable VHD by Microsoft. One scenario could be that the Contoso demo data is good enough for development, but some additional data setup, hotfix application or code customizations may be needed. These steps could be carried out once by one person, and then that VHD could be re-used. Some partners may be on a monthly cadence to “rev” their dev environments. There are two options to do this:

  1. Reuse the VHD and host it locally in HyperV or similar virtualization technologies
  2. Reuse the VHD and host it in Azure

The option 1) is straightforward and many will opt for this. There are some cases where it is useful to host in Azure though, mostly for simpler sharing of a VM or because an appropriate host for the VM is not available (i.e. laptop not powerful enough). Here is a step-by-step guide that worked for me to bring up the VHD to Azure so I can simply spin up a new instance in relatively short time:

  1. Download the VHD from https://connect.microsoft.com/ and unpack it
  2. (optional) prepare the VHD with data, binary fixes or customizations
  3. Upload the VHD to your Azure subscription. If you have not done already, you need to install the Windows Azure Sdk. If you have not done already, you need to create a management certificate for Azure on the local machine and upload it to Azure (basically this grants access to the Azure subscription). Then follow this: https://docs.microsoft.com/en-us/azure/virtual-machines/virtual-machines-windows-classic-createupload-vhd. I did not have to run sysprep on the downloaded VHD from Microsoft. I think this step is needed if you carry out step 2).
    When the steps are done, you should see the new VHD ready to be used as a template for creating new VMs.
  4. Create a new VM based on that VHD: https://docs.microsoft.com/en-us/azure/virtual-machines/virtual-machines-windows-classic-createportal?toc=%2fazure%2fvirtual-machines%2fwindows%2fclassic%2ftoc.json(optional but suggested) Update the administrator password to something else, so nobody else can hijack your VM (if they somehow had the RDP connection)

Update 3/30/2017:
I have added a PowerShell script that is ready do be executed after changing some of the variables:
UploadD365VHDUpdate5.ps1

RetailTransactionService (Real-time service) customization sample – Secure app settings

This video demonstrates how to store application settings securely and manage them in AX. These settings are needed for AX business logic and CommerceRuntime business logic. The data is fetched via a RetailTransactionServiceEx call. The CommerceRuntime service takes care of calling the RTS and caching for a configurable period.  Video also shows how to test this by exposing it via RetailServer and using the RetailServer TestClient.

Retail Sdk customization branch update

This video shows the steps involved to code merge a new Retail Sdk into your current customization branch. In this case, I am updating my AX 7 RTW Retail Sdk (with customizations) to the AX 7 Update 1 Sdk. Same steps apply if you snap to a hotfix or to another update. It is a good practice to use a mirror branch as it makes code merges much easier. The update of the mirror branch is a prerequisite for this step, and was shown in a separate video.

Retail Sdk mirror branch update

This video shows the steps involved to update your VSTS-based Retail Sdk mirror branch with a newer build. In this case, I am updating my AX 7 RTW Retail Sdk to the AX 7 Update 1 Sdk. Same steps apply if you snap to a hotfix or to another update. It is a good practice to use a mirror branch as it makes code merges much easier. The code merge (as the next step) will be shown in a separate video.

Final note: If you take the Sdk from a new development VM, it may be installed at the C:\ or J:\ drive as shown in the video. If you however take a hotfix, the Retail Sdk can be found in the ‘Code’ subfolder:

RetailSdk location in hotfix package

Update your Retail Sdk to add payment packaging and deployment support (AX 7 RTW and Update 1)

Update 8/8/2016: Hotfix to Update 1 is now available: “KB 3183058: Retail Sdk update for packaging and deployment of payment files.”. If you can update, that is recommended, if you cannot, this article still applies.

The steps below allow you to update some files in your Retail Sdk so that payment packages can be built as well.  The same code changes as in this zip package will be released as part of Update 2 and possibly even as a hotfix to Update 1.

Benefits

The update allows you to generate all packages with all payment files (payment device assemblies, payment connector assemblies, and payment web files) embedded. All you would need to do is to get the payment files from the 3rd party, place them into the 3 locations dedicated for them and build. Whether built manually on command line or via VSTS automated build, the packages would include the files correctly.
Furthermore, the deployment of these packages will place the file in the correct locations. The packages that include these files are RetailServer, ModermPOS, ModernPOSOffline, CloudPOS, HardwareStation and AOS. The developer is not needed to know where the files need to be deployed too.

One-time setup steps

  1. Make sure you do not have any open files in your current VSTS client. If you do, look at RetailSdk-PaymentIncremental.zip and make sure at least these files are not in edit mode.
  2. Take the RetailSdk-PaymentIncremental.zip (link is below) and unpack it into the Retail Sdk customization branch (Note: At a future date, these changes will come through an update, at that point a simple code merge will have to be done). Make sure that the top folders of the zip file are being copied into the root of the Retail Sdk ($RetailSdk).
    SdkPaymentPackagingZipContents
  3. In Visual Studio, look at the changes and make sure no customizations (to the same files) were overwritten. If they were, merge the files rather than just copy them in. However, the chances are high none of these files were customized.
  4. Add the payment files from the 3rd party vendor to the Sdk, under the PaymentExternals folder. You should have gotten 3 different folders, and these should be matching the new Sdk folders.
  5. Do a local verification build. Open a Visual Studio 2015 Developer command window and issue a “msbuild /v:Rebuild” from the top of the Retail Sdk.
  6. If it built successfully, this part is done.

Verification

  1. After doing the build, verify that $RetailSdk\Packages\AosPaymentsPackage\content.folder\AOSService\Code\WebArtifacts has the files from the $RetailSdk\PaymentExternals\PaymentWebFiles folder.
  2. Verify, that $RetailSdk\Packages\AosPaymentsPackage\content.folder\AOSService\Code\Assemblies has the files from $RetailSdk\PaymentExternals\IPaymentProcessorAssemblies
  3. Verify that $RetailSdk\Packages\ModernPOS\bin\Debug\content.folder\CustomizedFiles\ClientBroker has the files from $RetailSdk\PaymentExternals\IPaymentDeviceAssemblies.
  4. Deploy the packages via runbook and verify functionality (on development or sandbox environment).
  5. If there are any issues with the payment assemblies themselves (not with packaging or deployment), contact the party that released the files
  6. Once everything worked (one-time steps and verification with payment files and deployment), submit the changes from the zip file plus the payment files to your VSTS.

Deployment

There is no difference for deployment of the existing packages. One thing to note is that the new package AOSPaymentPackage must be installed by itself and last.  The deployment for production environments is exactly the same (via DSE if Microsoft-hosted). The AosPaymentPackage must be installed last.


RetailSdk-PaymentIncremental-RTWandUpdate1